I love to use Pinterest as my virtual bulletin board. As you might guess many of my pins are sewing related. Click here to see what fun stuff I've found and pinned to different sewing boards.
Showing posts with label fit. Show all posts

Friday, November 25, 2016

Pattern Work: Disneyland with Princess Periwinkle de Nîmes (M6076)


Another M6076, Palmer and Pletsch princess-seamed shirt. I've been altering the pattern (off and on) for a year now, working to get the perfect fit for me.
I think the original sleeve-into-torso seam was somewhat more dropped than what I've ended up with. I'm quite happy with the fit of this shirt - it really conforms to me, and the long curved princess-seams are flattering. Below is a photo of me wearing the Princess, recently,  at Disneyland.

Note that this denim is the very, very light weight variety, it looks more like chambray. Princess Periwinkle comes, of course, from Nîmes, the origin of our modern denim fabric.

A trip to see the holiday decorations at Disneyland with Cousin Martha, motivated me to get the Princess finished!
https://en.wikipedia.org/wiki/Denim Discusses source of denim in Nîmes 

https://en.wikipedia.org/wiki/Periwinkle_(color) - Periwinkles seem to be related to vinca - a rather invasive European flower a lot of people plant around here, and are then often sorry to have done so! I love the blue color though, much like the one in this shirt. It's also referred to as 'lavender blue' - I wonder if that's where the Burl Ives  song (it's really an old folk song but he popularized it in the 1960's) comes from? I always wondered about that, because all the lavender I know is purple 

Thursday, February 25, 2016

Ench By Sew-41: Fit for a Princess – Fitting Princess-Seams


Click on this link in iTunes  to download the 41'st episode of the Enchanted by Sewing Audio Podcast,  recorded in February of 2016. Or listen directly on the web by clicking on this link.


What is a princess-seam? A princess-seam is intended to mirror the shape of a woman’s torso. It’s a long, lengthwise curved seam midway between the side seams and the center of the garment. You might see a princess-seam in a women's nightgown, camisole, swim suit, blouse, shirt, dress, or coat. The lines you’ll typically see in a bustier, or merry widow garment, are a good example of princess-seams.

Princess-seams are sewn into the front and/or back of a shirt. They may start at the low or high hip,  the waist , or wherever the bottom of the garment is. In a fitted cropped top they’ll start at that bottom crop point, in a dress or coat, without separate skirt pieces, they are probably at the hemline. A princess-seam usually moves up to the armscye (armhole) or to the shoulder seam.

Often a princess-seamed dress does not have a separate waistline at all, since it does its shaping without darts. A -Line dresses often have princess-seams.

Well executed princess-seams can add a long sliming look. 

In this episode 

Primero /First  -  Royal Reflection – My own ideas about sewing history and choices I made for my recent princess-seam sewing.

Entonces/Then – Technicos for Princess-Seam fitting – What techniques I’ve been using to fit my princess-seamed shirt pattern

Resources:
* For my princess seam pattern,  I used M6076 0 a Palmer and Pletsch pattern
http://mccallpattern.mccall.com/m6076-products-10887.php?page_id=482


* Coco  Chanel's Sleeves https://cloningcouture.com/2014/08/04/chanel-and-the-sleeve/


Sunday, November 29, 2015

Pattern Work - Working For My Plaid - M6076 Princess Seamed - With Sleeves

Can't you just envision these pattern pieces and muslins as a red-plaid princess-seamed shirt?
In the November episode of the Enchanted by Sewing audio/pocast, I talked about sewing tartans and plaids. I also mentioned I have plans for a new red plaid, princess-seamed shirt, using M6076. As you may have noticed in my recent postings, Jasper-the-new-pooch has been sewing my slow sewing down even more. Still, I have gotten in some pattern work!


All four pattern pieces have a muslin attached. My next step is to transfer the seam lines onto the muslin, before I begin basting.

 I drew those seam lines  onto the pattern, based on the measurements I took from the sleeveless Western Winds shirt, which I created from this same pattern (altering to create a sleeved version as well as getting a good fit for me). I've really enjoyed wearing Western Winds and got quite a lot of late summer/early fall use out of that shirt - of course here in California it stays warm longer than much of the U.S.

For Western Winds, I cut back the top of the shoulder towards the neck, but I've dropped that back in place for this sleeved version. My new pattern includes lines for both sleeved and sleeveless versions. I  cut with room for either version, then use my clover wheel to lay down the armscye lines, then cut away what I don't need for the particular version I'm making. 

For more description, see my previous post- Sleeved to Sleeveless.

There's a good chance I'll be making a few more changes to the muslin, and therefore pattern, before I snip into that red plaid. I also plan to re-test the new pattern on another sleeveless version, sometime over the next few months. Tried and true patterns take a while to get just so, but they sure are worth their weight in gold.
I store in-progress muslins and pattern pieces clipped onto binder clips  hanging off cup hooks. That way they don't get wrinkles in between sewing sessions, and they all stay together.


Wednesday, September 16, 2015

Fitting Western Winds - Princess-Seamed Shirt M6076 (Journal/Sloper/Pattern Work)

Journaling - Learning to fit and work with my sloper.

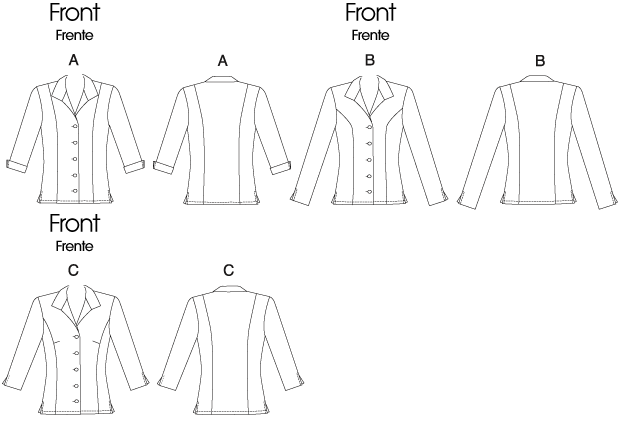
M6076 - Three princess-seamed shirts
I'm also learning to question, my sloper.

I'm starting with a basic princess-seamed shirt pattern - McCalls 6076.

Initially I'm working with the princess-seam in shoulder seam option (view A). (others in line drawing below)

Noted so far
- Learning to compare front or back pattern pieces to my sloper, I have to learn where to place them. Do I line up the base of underarm seam/armscye? If I start comparing at shoulder seam I can get thrown off because I often need to alter this area - except on some commercial patterns, when it's fine!

First time through with a test-garment (that's the one I'll actually wear, one step beyond my muslin) I'm making a sleeveless version. I'm taking careful note of where I
-a- I alter  the underarm seam (armscye) to create a tighter fitting armhole
-b- Take  the top of the armhole back somewhat, for this no-sleeve version.

Later I'll test the muslin with a muslin sleeve, where I'll test the pattern without both of these (a and b) alterations.

Another benefit to a sleeveless test garment is,  I'm getting it out of a piece that is somewhat less than 2 yards. I will be piecing the under collar, and also the front facing. But I don't expect those piecing line to show.

Waistline and Princess Seam Alterations
Working on a very fitted look without overfitting
 Would be better to add an extra seam allowance - 1 inch instead of 5/8-  for all this playing around
Lots of trying on here! Did same front and back on all 4 princess seams

I made sure to safety pin the front closed matching up the button hole marks, so that I don't overfit. I want the shirt to button and need a certain amount of overlap for that.

- First I basted a 1/4 inch seam along the princess stitching line
- Then increased (still with a basting stitch) the princess line seam allowance to 7/8"
- Then I unabasted the second line of basting below the bust and graded back to the 7/8"

- Finally I took in/graded the waist with a kind of elongated half oval, about 3 and 1/2 inch above and below the waist. Challenging figuring out when to alter waist and when to alter princess seams - lots of safety pin basting helped with that

Altering Armscye/Armhole for Sleeveless Version

 I took the shoulder seam back towards the neck for an improved sleeveless style

* Compared to my sloper, and graded in 1/2 inch at bottom of armhole/armscye on side seam for sleeveless. Then I graded back out  to original side seam after, hummm.... about one to two inches? A french curve is handy for doing that. I admit, I eyeballed it. I kept the original full seam on the pattern, because I'll probably want it for the sleeved version. I also kept it on the muslin  so I can reuse the muslin when testing a sleeved version.

* I also tested  raising the side seam up for the sleeveless version (based on what I learned in French Pattern Drafting class going from moulage to sloper) , but it was too tight.


* For sleeveless, I'm  raising outside shoulder (taking it back towards the neck line) for sleeveless style - 1 3/8" (11/8") without S.A. - so probably either 9/8 (1 and18) or 6/8 (3/4) " cut back/off - the first for 1/4" and second 5/8" S.A. I'll mark on the pattern what works for sleeveless - but keep the full original armscye on pattern for sleeved version test.

In addition to desirability of a sleeveless shirt for our late-running summer-in-fall weather, this helps me to focus on fitting aspects of the torso. The sleeve adds in a whole 'nother fit challenge, even though it means I have to make alterations when I go between sleeveless and sleeved. A good reason to journal!

M6076 - Test Garment Fit In Progress


Shoulder Seams
 * I ended up adding 1/2" (better would have been more - because I only took a 1/4 "seam allowance (S.A.)  - so next time add in 7/8") to the back
* I therefore took back 1/2" from the front  because of alteration to back. Again because I only sewed the 1/4" S.A., next time through I will add back another 3/8 inch and sew  a full 5/8" S.A.

* I've made this shoulder line adjustment many times, the reason I didn't catch it when comping my Master Pattern Trace (M.P.T.) to the sloper? For the back - I forgot that the S.A. is not included in the sloper pattern, as it is in the commercial pattern. (Often forget this). For the front, I don't know. The front of my sloper just looks too high. The No S.A. sloper comes out at the same time as the M.P.T.. So it seems like maybe I should make a tentative adjustment to my sloper front - dropping it by perhaps.... 3/8 or 1/2 inch. It's challenging thinking between with and without S.A. But this is something to think about math 'wise as I continue to work comparing my sloper to patterns I trace.

- I pin basted the muslin to make sure I had a basic fit, but I really didn't see the shoulder issues until I cut out and stitch -basted the test garment. In the future, maybe encourage myself to stitch-baste that muslin. I have a way of not seeing the pattern as real until I move past the muslin. It seems good enough, and I really want to see it as an actual garment. And with the pins in, I'm always in a hurry to get out of it!

I basted with a stitch  length of 6 and starting out with 1/4" seams. Then I keep trying it on and increasing the S.A. up to 5/8" . Alternatively, I could have added a full 1" S. A. on the first pass,  but I figured since the muslin was OK, I didn't need to.

Right now I'm happy with accurately placed shoulder seams - which gives a shirt a custom fitted look. I took in the 2 side seams more, but they are still a little loose. However, I haven't yet basted a deeper princess seam (4 actual seams). Once I check those, I'll know if I want to grade in - all or some of - the side seams to increase the fitted look.

~ ~ ~ Web Resources ~~~
An interesting related fitting post, that journals some of the challenges of fitting a basic princess-seamed pattern http://artisanssquare.com/sg/index.php?topic=16322.0

Friday, March 13, 2015

Fitting in the Sleeve Sloper (Pattern Work)


First I made my moulage.

Then I made my sloper.

They looked a lot alike, so I only blogged about my moulage. Here are the most recent details I wrote about that Lynda Maynard class in this posting.

We've been working on getting a sleeve to fit into our slopers for two classes now. And I'm continuing to work at that fit and pattern drafting task at home. 

This is not the most attractive garment I've ever sewn!
It's a sloper, which is the equivalent of my moulage plus wearing ease.
Yes, I know I've got too much ease in my sleeve at this point
After I made more change at home, and before I went back to creating
a new version of the pattern, I did the math -
The total distance around the sleeve stitching line for the
armscye/sleeve cap, should be 3/4 of an inch
larger than the distance for the front and back arm holes.

Can you see the work that went into my first shot at drafting a sleeve pattern?
I also write small to do lists on the pattern piece and use a lot of color coding and
 dating to remind myself of what I did in class versus at home, etc.
This is the follow on to the drafting block by the way.
I re-scooped the front, flattening it and giving it less curve, added to the height at
the top center to get the bicep balance line to come out parallel to the floor,
and also added 3/8 of an inch to both the long underarm seam lines.

After making all those changes, I definitely needed a new version of my pattern!
After I made this, I traced out a new sleeve to cut out and sew to try on the other side
of my muslin sloper.

Still To Do 

before class
Next - I'll be stay stitching my second muslin sleeve, cutting it out, basting the balance lines, completing the underarm seam line, and basting in the ease lines.

Then I need to go back to my sloper and alter my side seams to be 5/8 of an inch farther into the seam allowance. I have 1 plus inch seam allowances.

Must remember to note that change on my sloper pattern! Good thing I haven't cut out my most recent version of that pattern, so I can draw that in and use my eraser and still have a clean final working copy.

Entonces I 'll attach the sleeve to the other side of my sloper, making sure my front is attached to the front part of my sloper fit garment, of course!

At that point I'll check all the balance lines in the mirror and see if I need to alter any thing else obvious before I return to class next week. I included a slightly over 1" seam allowance when I drew the pattern markings on, so I can make some alterations.

I create a new version of all my patterns every week after class. That way I have a record of where I've been and what I've done. I can go back to a previous version too. Also it's just less confusing and it motivates me to write more notes on my patterns.

I also include my name, date, phone number and email (I've smudged those out in these photo)
on every single pattern piece and muslin garment. 
In sewing lab, everybody's stuff looks the same and it's a lot of work down the drain 
if I misplace anything.
~ ~ ~
It's not exciting or glamorous working on creating a perfect-fit-me garment, but it sure leads to a lot of daydreaming about what I'll work on once I have the patterns that result from this process.

And that's the kind of thing that keeps me ....
Enchanted by Sewing!

   ]

Sunday, February 8, 2015

Drafting my Back Block - Learning Pattern Work with Moulage/French Pattern Drafting

Version 1 of my Back Pattern Block Draft

I'm taking Lynda Maynard's Moulage class at Cañada College. Moulage is the traditional style of pattern drafting used in France. Lynda studied pattern drafting, among other things, with Kenneth King. We're using a printed version of Kenneth King's Moulage book. 

On the web I can only find Kenneth King's Moulage Book on CD http://www.kennethdking.com/book/#moulage


We'll be creating a skin-tight, fitted moulage and then a sloper - a moulage that includes minimal wearing ease. We'll also be drafting sleeve patterns/slopers to work with these. My sewing buddy Susan and I, are very excited about those sleeves! Susan was featured in last month's Enchanted By Sewing Audio/Podcast - A Very Fitting Sewing Day With Susan

We've begun by drafting our back pattern blocks.

To get to this point, we followed Kenneth King's/Lynda's directions. Those included:

1) Taking careful measurements of, and recording, many dimensions of our bodies - front and back. I think there are about 20 measurements between our neck to the floor, with most of them centering around the torso. This is not something you can do for yourself. You need at least one buddy. It reminded me of the measurements we took when we made our dress form kits. (I produced a podcast about creating Dress Forms)

2) Using these measurements in a number of formulas, to create a sheet of calculations. Again we made a careful record. It was definitely worth my time to triple-check that I had
a) transferred the right measurement into the formula
b) done the math correctly
We rounded up all of our math to the nearest 1/8'th of an inch. 1/8'th of an inch is the smallest measurement on most rulers.
The book includes metric directions as well.
3) Next we followed  Kenneth King's/Lynda's directions to draft the back block you see here, using the calculations. Once more I'm went back and triple-checked, to be sure I was using the correct calculations in my draft.

Lynda reviewed our work not only for correctness, but also to make adjustments for various figure types. She adjusted the line in many of our shoulder drafts down at an angle. I'd guess that you might see the need for this later on in the process, if you're doing this work on your own.

Next we'll be drafting our front block.

After that, we'll work up a version in muslin.

This is one of those processes that takes a lot more time than I'd expect, but it's going to be well worth it for me.

My goals for the class are:

A) To make a new fit garment for my dress form, Conchita. I'll also be removing some of Conchita's padding and batting, to fill out that fit garment correctly. Gosh, wouldn't it be great if it were that straightforward for people to lose weight?

B) To create clear plastic transparencies I can use when altering commercial patterns. Lynda says the material she uses for this is from Tap PlasticsTap  Plastics:
24 1/2"  by  45"  by  .020  smooth/matte  polypropylene  sheet  SKU#20346)

C) Down the road... I might use these block in some way, in conjunction with draping my own patterns


Learning more about what makes patterns come together is the kind of thing that keeps me . . .
Enchanted by Sewing!
~ ~ ~
My Buddy Susan and I share what we've each learned about getting a good fit with our sewing patterns. In Last month's Enchanted By Sewing Audio/Podcast  Susan described key things she learned from sewing fit classes (Also we had a lot of fun chatting) A Very Fitting Sewing Day With Susan (Download or just listen on Line) http://enchantedbysewing.blogspot.com/2015/01/ench-by-sew-028-very-fitting-sewing-day.html

Enchanted By Sewing Audio/Podcast - Dress Forms (Download or just listen on Line) 
http://enchantedbysewing.blogspot.com/2013/09/ench-by-sew-12-dress-forms.html

Friday, January 30, 2015

Ench By Sew-028: A Very Fitting Sewing Day With Susan

This show is created, produced and brought to you by Laurel Shimer.

A Tule Fog in California's Sacramento/San Joquin Delta
Susan's Living in the Historic Land of Tules These Days!
Hey! 
The latest Enchanted by Sewing Podcast has been published!

Socializing over sewing never gets old. It's that’s the kind of thing that keeps me . . .  enchanted by sewing.

Listening Option I) You can listen to the show right on the web (while sewing perhaps?:-) by clicking on this link 

*****
~ OR ~
Listening Option II)  Click on this link to iTunes  to download this and other Enchanted by Sewing shows to your mobile device (iPhone, Android, etc.) free from iTunes

The Enchanted by Sewing Podcast is, an extension of my regular sewing blog - Me Encanta Coser,  (http://www.meencantacoser.blogspot.com) which,  roughly translated means, Enchanted By Sewing

My blog is written in English. The name celebrates the historical and modern use of the beautiful Spanish Language in the San Francisco Bay Area of California, where I live.

Bruce - "Scored Mom's Boho Bed!"
This month’s show  is  *A Very Fitting Sewing Day with Susan*
Recently I went to visit with my buddy, Susan, and her household’s two dogs, Bruce and Bain. You’ll hear Bain’s comments at various times during the show, just the way you occasionally hear some of the audio from things in my house like the train that runs just behind our yard. I’m partial to including a little locally occurring audio ,because it adds another sense to the personal journal style of the show.

Don’t you feel like you know Susan by now?  I’m always mentioning her and the time we’ve spent together in this show. This month I got a chance to share a sewing day at Susan’s house with you. It started out as an interview, but it became a duologue – even when I cut out several of the places where I interrupted!


Bain - "Aren't I a Good Dog?"
Pensamientos Primeros/First Thoughts . . . we talked  about our sewing relationship and some of the non-sewing things that give you a sense of who Susan is and what drew us together.


Entonces/Then . . . we talked about some of the things that she learned about fitting patterns, that I’ve benefitted from over the past couple years.


This month's Pensamientos Finales/Final Thoughts . . .  are scattered throughout the show as we each share with you a little something about where Susan is living. The area she’s recently moved to has a very long-term historic role in agriculture and pre-agriculture, within California, that has provided people with both food, fabric,  and more, for over 4,000 years. 


I wrote a posting showing some of the gorgeous tapestry purses Susan made for holiday presents. As you can tell, not all the bags were completed when I took the photo. back in early December. http://meencantacoser.blogspot.com/2015/01/tapestry-pursestotesbags-sewing-day.html

Susan designed and sewed these San Francisco Giants take-it-to-the-game cold drinks bags for a number of lucky relatives for Christmas presents.

Blue Ice fits inside

After the interview Susan and I talked more about our sewing plans
We both liked Vogue V1412 for her
Recently she texted me to say that she has started working on it
~ ~ ~
Web Resources


Remember when Susan Sang Backup for Neil Young?
Neil Young Interactive Greendale http://www.nygreendale.com

Neil Young - Greendale Album http://en.wikipedia.org/wiki/Greendale_(album)

Tutorial - Full Bust Adjustment and Small Bust Adjustment http://www.craftsy.com/blog/2014/07/how-to-make-a-full-bust-adjustment/

A Threads Article about the book Susan talked about in this interview, Fitting and Pattern Alteration by Elizabeth Leichty, Judith Rasband and Della Pottberg-Steineckert

Discovery Bay: Geography and Agriculture Interest


Tule Fog

Invasive water hyacinth threatens the Delta http://www.mercurynews.com/my-town/ci_27358407/delta-water-weed-problems-called-worst-years 
I was reading up on Discovery Bay, which is in the Sacramento/San Joquin delta, cause my buddy  lives there. You read a lot of CA history about the San Francisco Bay and Golden Gate in relation to first nations people, European explorers and Gold Rush, but less about the agricultural and natural harvesting food value of the Delta region to people over the last 4,000 plus years - which continues today. Looks like these creepy little weeds have a big impact on the value of this region. Unclear how they arrived, but invasive plants have a way of doing that and the drought has made the situation worse...

Thursday, October 30, 2014

Ench By Sew-025: Restyling


Hey! 
The latest Enchanted by Sewing Podcast has been published!
Listening Option I) You can listen to the show right on the web by clicking on this link
~ OR ~
Listening Option II)  Click on this link to iTunes  to download this and other Enchanted by Sewing shows to your mobile device (iPhone, Android, etc.) free from iTunes 
https://itunes.apple.com/us/podcast/enchanted-by-sewing/id566370325)

This month’s show  is  Restylin’.
It all came about when I started shaking the dreams from my hair. Restylin' is about my transition in sewing and wardrobe style . It involves looking at patterns in a new-to-me way, and working my brain around ways I want clothes to fit me.

The Enchanted by Sewing Podcast is, an extension of my regular sewing blog - Me Encanta Coser, which,  roughly translated means, Enchanted By Sewing 

My blog is written in English. The name celebrates the historical and modern use of the beautiful Spanish Language in the San Francisco Bay Area of California, where I live. 

This month I’m working on creating two tee shirts M6078 and V8323. The details are in these blog postings from MeEncantaCoser.blogspot.com
V8323 - Princess Seamed - Katherine Tilton Tee http://meencantacoser.blogspot.com/2014/10/princess-seamed-tee-shirt-pattern-work.html

M6078 - Retro Style Polka Dot Cowl Neck Knit top - Reminiscent of I Love Lucy http://meencantacoser.blogspot.com/2014/10/reworking-retro-style-polka-dot-tee.html

1) Pensamientos Primeros
– (Sewing) For my wardrobe’s sake (How about those red accents!)
2) Technicos  
Reworking my sewing style/methods. Pattern alteration experiences.
3) Pensamientos Finales
Transitions - Restyling  

David Crosby sang, 
“I almost cut my hair
It happened just the other day . . .”

4) Epiologue 
Redefining what I want to create

* * *
Restyling has me  shaking the dreams from my hair.   That’s just one more thing that keeps me . . . 
Enchanted by Sewing.


Saturday, September 27, 2014

Terminado - Completing Peaches and Rosalinda


Check out the Enchanted by Sewing Podcast for September
to hear all about my shirt dressing sewing experiences
That's my daughter in Rosalinda (NL6223) on the Left, and me in Peaches and Cream (M3623) on the Right.

I altered the patterns, sewed and finished both dresses in time for the significant family event I mentioned in my last posting ("Can't Say it Sew It"). Auntie Seamh Rippah was a regular, though uninvited, visitor in my sewing zone.

Part of me just knew it was incredibly important to, rather quickly, create these two dresses. Another part of me questioned what on earth I was doing creating not one but two projects when life was throwing a lot of emotional hoo-hah my way. 


Payback
Was I happy with the results? Yes
Did having a new dress, as well as quickly creating a new dress for my daughter, help me during a challenging event? Yes
Did spending time during other sewing projects altering the M3623 shirtdress pattern and focusing on fit pay off? Yes


Being able to create something tangible when life was full of emotional hoo-hah is another thing that keeps me . . .
Enchanted by Sewing
~ ~ ~
Web Resources
My Enchanted by Sewing Audio Podcast for September - all about working with this pattern http://www.enchantedbysewing.blogspot.com/2014/09/ench-by-sew-024-shirtdressing-and-fall.html

Can't Say it Sew It - Creating something tangible helps me deal with life challenges http://meencantacoser.blogspot.com/2014/09/cant-say-it-sew-it.html

Pattern Work - Progress Peaches and Cream Shirt Dress http://meencantacoser.blogspot.com/2014/09/shirt-dressing-peaches-and-cream.html

Avoiding Auntie Seama Rippah http://meencantacoser.blogspot.com/2012/11/avoiding-auntie-seama-rippah-for.html

Saturday, April 12, 2014

Seams to Fit Part 4: Neat as a Pin (Technicos)

Using pin techniques to join sections of my bustier precisely.


The outer shell of my Bustier is coming along
Too bad I can't just pin it to myself and head out the door


Seams To Fit Part 1: A Little Less Laxity 
Seams To Fit Part 2: Making My Mark 
Seams To Fit Part 3: More Power to Interlining!

Pinning seams becomes extra important when working on sewing narrow, curved, very fitted pieces together. I wanted a stitching line that runs precisely along the stitching line I created when fitting the test garment and creating the pattern. It went a bit against my casual, arty bent to be concerned with being as neat as a pin. It just wasn't a natural skill for me, and I had to think carefully about the process.

In my last "Seams To Fit" posting, I described how I used stitching marks on my interlining pieces to define the stitching lines on the fashion fabric it's backing. In both part 2 and part 3, I described how I made sure the fashion fabric was matched up properly.

Now that I was getting ready to sew each bodice piece together, I began to think of each piece as more of a section. That section is composed of one appropriately shaped piece of fashion fabric (the denim that shows on the outside of the bustier in my case) backed by an equivalently shaped interlining (a blue plaid cotton flannel). When it's prepped, one section is like one pattern piece.

At this point in the process, I needed a way to join the stitching lines of each section precisely to it's neighboring section. When working on doing the same operation on the inner fitting shell of the bustier (then I was joining the cutil/lining pieces together) I'd found this to be rather challenging. I was constantly turning the sections over and finding that the pins weren't going through into the stitching lines.


I marked the stitching lines all the way around each section
with pins, using the stitching lines marked on the interlining
I figured out the best way for me to get the sections joined together precisely, the second time around. In part 3, I describe how I'd marked each section (equivalent of one pattern piece) marked all the way around with pins. The pin heads show on the interlining side. Now, I could line up each section (one fashion fabric/interlining section for each pattern piece) with it's corresponding section. 
Working pins through from the stitching lines on one section
to find the stitching lines on the other side.
Here you can see a couple of pins I've already pinned through from the other side.
These are ever so slightly off!
When I laid, for example, piece 1a next to 1b, putting the fashion fabric (right sides) together, I now had pins on either seam line. I moved down the marked/pinned stitching lines pinning in the direction of the seam. As I moved, I worked another pin from one side of the stitching lines into the set on the other section. My fingers could feel that the pins were marrying up. I could, and did, still flip the sections back and forth, but it went a lot more easily than it had in the inner shell.


The only Photoshopping I did was to
change the fabric of my dress form, and
swap the real background for my little
gingham and scissors creation:-)
When I went to do the actual sewing, things just sewed up better. I only had to stop and unstitch a very short distance once. 

The proof is in the denim pudding. My bustier's outer shell is coming along and fitting snug and right.

The fitting shell that goes below will provide the support the garment needs to allow the garment to leave my dress form and head out into the world.

Figuring out techniques for sewing seams precisely is one of those thing that keeps me...
Enchanted by Sewing! 
~ ~ ~
Web Resources

Boning Up On Bustiers: http://meencantacoser.blogspot.com/2014/03/ench-by-sew-018-boning-up-on-bustiers.html

My Pinterest  Bustiers Board 


Wednesday, April 9, 2014

Seams to Fit Part 3: More Power to Interlining! (Technicos)

Using  stitching marks on my interlining pieces to define the stitching lines on the fashion fabric it's backing.              

Previously
Seams To Fit Part 1: A Little Less Laxity 

Seams To Fit Part 2: Making My Mark 

I figured out how to take advantage of my interlining, to help match the seams on my bustier project.

What is interlining?
Interlining is like a piece of backing for a garment's fashion fabric. In this bustier project, my fashion fabric is denim. My interlining is a piece of plaid 100% cotton flannel. You will never see the interlining once the garment is done, even on the inside. That's because this garment will have a second shell that includes lining. The interlining will be sandwiched in between the lining and the garment fabric.

I cut the interlining just like I cut the fashion fabric.

The interlining is just sewn on underneath the piece it backs.  I treat the two pieces of material as though they are just one piece of fabric. The back/wrong side of the interlining is sewn to the back of the fashion fabric.

Why did I used interlining in this garment?
Typically interlining is used to make a fashion fabric more stable and give a little less. For example you might use interlining with linen to make it crisper. (In which case you might cut the interlining just a little more narrow - a good trick, eh?)

In this case, I used interlining as a layer of extra protection because of the bones/stays that are in the next layer below it. It helps avoid the chance that these bones will slip out and poke into the outer/fashion fabric layer.


How I took advantage of my interlining, to help match the seams on my bustier project.

Because this bustier has really small pieces, and is really fitted, I marked, then sewed through, the stitching lines all the way around on my interlining pieces. I just sewed through that one layer, to make the seam/stitching lines really clear. 

I also marked all the stitching lines on the inside of my fashion fabric. I could have basted those lines, then matched up the stitched lines to ensure that my seams are precise.

But I really don't like having to take all those basting threads out of the fashion fabric. Also, sometimes they're hard to remove, especially if I sew over them.

Since I have the stitched lines on the interlining and the marked lines on the fashion fabric, I was able to slip pins through from the interlining into the marked line and pin the interlining layer to the fashion fabric layer all the way around the piece. I could easily check on the fashion fabric layer to see that the stitched line above was marrying up right with the marks all the way around.

I repeated this process with the adjoining piece - both on the fashion fabric and the interlining fabric - then joined the seams of the two pieces together, slipping the pins from one seam line marking into the one below. I was able to constantly check my pinned stitching lines, to make sure that the seam line below was matching up properly with the seam line on the top.


Figuring out how to sew narrow garment pieces together precisely, and save time removing basting stitches later on, is the kind of technique that keeps me....
Enchanted by Sewing.


~ ~ ~
Web Resources

Boning Up On Bustiers: http://meencantacoser.blogspot.com/2014/03/ench-by-sew-018-boning-up-on-bustiers.html

My Pinterest  Bustiers Board 


Wednesday, April 2, 2014

Seams To Fit Part 1: A Little Less Laxity - Learning Precision

I'm improving a lot of sewing skills while working on my bustier project. For one thing I'm doing more pattern work, which is not only helping me to practice creating a physical pattern (I began with a commercial pattern and altered it - a lot). Also I'm learning to use the actual resulting pattern in new ways. 

I've changed my concept of when to create a seam allowances, at least for this very fitted garment
Creating a pattern with no seam allowance, is starting to be useful
Typically, when working with a woven fabric, I've used the standard 5/8" seam allowance that comes on a commercial pattern, or else added that same measurement to my own pattern. I knew that traditional patterns are often created with no seam allowances (Burda Magazine patterns are an example), but I didn't understand why that was done. Now I have a reason to leave that allowance off the pattern.

It has to do with fit.

I don't usually make fitted garments. If the seams I sew in, say, a loose shirt project aren't absolutely, precisely the same as the original pattern it's probably not a big deal. I sew the back to the front at more or less 5/8" away from the cut edge. A little extra or less between a couple of friends, and you're not going to notice the lack of precision in the finished project. 

 A bustier, however, is an ultra-fitted garment. In addition it covers much less body area than that loose shirt. Oh, and by the way, instead of that loose shirt's one back and one front piece - the back of my bustier is three pieces. The front is five pieces - several of which are extremly narrow. And those eight pattern pieces cover less surface area than the loose shirt's two.

If I'm at all casual about the seams whose positions I've carefully detailed while fitting this pattern, the garment is in danger of being too tight to fit. Or it may simply fall off!

I need to know, when I sew, that the seams I planned to sew during the fitting stage, are the ones I actually do sew. The first important thing I do to achieve that goal, is by marking my seams accurately. My goal is to get the seams within 1/8" of what I've decided is correct. I may still loose a little one way or another. My final back and front seams will make up any final corrections, but if it's very much off it will be noticeable. I want to avoid that.

Next Posting - Seams To Fit: Making My Mark