I love to use Pinterest as my virtual bulletin board. As you might guess many of my pins are sewing related. Click here to see what fun stuff I've found and pinned to different sewing boards.
Showing posts with label princess seam. Show all posts

Friday, November 25, 2016

Pattern Work: Disneyland with Princess Periwinkle de Nîmes (M6076)


Another M6076, Palmer and Pletsch princess-seamed shirt. I've been altering the pattern (off and on) for a year now, working to get the perfect fit for me.
I think the original sleeve-into-torso seam was somewhat more dropped than what I've ended up with. I'm quite happy with the fit of this shirt - it really conforms to me, and the long curved princess-seams are flattering. Below is a photo of me wearing the Princess, recently,  at Disneyland.

Note that this denim is the very, very light weight variety, it looks more like chambray. Princess Periwinkle comes, of course, from Nîmes, the origin of our modern denim fabric.

A trip to see the holiday decorations at Disneyland with Cousin Martha, motivated me to get the Princess finished!
https://en.wikipedia.org/wiki/Denim Discusses source of denim in Nîmes 

https://en.wikipedia.org/wiki/Periwinkle_(color) - Periwinkles seem to be related to vinca - a rather invasive European flower a lot of people plant around here, and are then often sorry to have done so! I love the blue color though, much like the one in this shirt. It's also referred to as 'lavender blue' - I wonder if that's where the Burl Ives  song (it's really an old folk song but he popularized it in the 1960's) comes from? I always wondered about that, because all the lavender I know is purple 

Tuesday, November 22, 2016

EnchBySew-49: Fall Color Sewing


~ ~ ~

Click on this link in iTunes   to download the 49'th episode of the Enchanted by Sewing Audio Podcast,  produced in November of 2016. Or listen directly on the web by clicking on this link.


~ ~ ~ This Month’s Show ~ ~ ~


Pensamientos Primeros/First Thoughts: Impact of Color on My Sewing Choices

Technicos/Techniques: Patterning and Sewing Color

Pensamientos Finales/Final Thoughts:Searching for Color in San Diego County 

~ ~ ~ Web Resources ~ ~ ~
Recently I've created several postings related to the fall colors mentioned in this months 'cast,  in my Postcard from California blog http://postcardfromcalifornia.blogspot.com

My regular sewing blog  - includes postings about the princess-seamed shirt Marigold are in the Me Encanta Coser/Enchanted by Sewing blog http://meencantacoser.blogspot.com

Saturday, August 20, 2016

Ench By Sew-46: Ready Set Sew! - Sewing Style

Click on this link in iTunes  to download the 46'th episode of the Enchanted by Sewing Audio Podcast,  recorded in August of 2016. Or listen directly on the web by clicking on this link.

Ready Set Sew! Sewing my own garments, allows me to define and create my own style.


This Month’s Show 

1) Primeros Pensamientos/First Thoughts
* Defining this sewist’s current style 

* Elements of Style- According to Laurel
-Color
-Design Lines and Fit, 
-Fabric and Drape
-Lifestyle

In reference to wearing fur -We go with what the always charming Felix Bassenak (S.Z. Sakall) said to Elizabeth Lane (aka Barbara Stanwick) in Christmas in Conneticut…

"You need it? Nobody needs a mink coat but a mink!"
http://www.imdb.com/title/tt0037595/quotes

2) Entonces/Then
Technicos: Techniques I used for altering M6403, the pattern I used for my black linen summer pants


In Pensamientos Finales, I recall
the importance of
sewing this maxi jumpsuit
3)) Pensamientos Finales/Final Thoughts
Looking back- Sewing myself as a grownup


….

M6403 pants pattern - out of print but many copies available on the web
M6076 Palmer and Pletsch princess-seamed shirt


Monday, August 15, 2016

Floribunda Bouquet - Terminado! Finished! (M6076)

Summer clothes work around here well into the fall months. So it what well worth my time creating a third version of this summery princess-seamed shirt M6076 (altered -no sleeveless version on pattern). I'm so happy to have  another crispy version of this shirt. Floribunda has already gone out with me on a bike rides, a couple of dog walks, and even slightly dressed up- over my black denim skirt accompanied by a long doubled string of pearls and flat red sandals-  to visit my buddy Marilyn
Friend Susan recommended the large black buttons versus a couple of different patterned buttons I'd laid out - they were cute but didn't pop like this big black buttons.


I'm now working on a pair of black linen pants to flesh out my essential summer wardrobe. 


Sunday, July 31, 2016

Sewing Pinto's Purse (Buttercup Purse, Green Sewing)


Web Resources: "A Purse for Pinto" - Download or Listen on-line  (free) http://enchantedbysewing.blogspot.com/2016/07/ench-by-sew-45-purse-for-pinto-green.html

How about that fabric combination?
Felt great to use up new scraps
and an older remnant 
 In my July Enchanted by Sewing Audio- Podcast, I talked about my motivation for sewing Pinto's Buttercup purse, as well as describing some of the techniques involved in this use-up-the-scraps green sewing project. Here's how Pinto and her purse came together.
Not enough shirt scraps for the bag's outside, but piecing together the remaining bits, made a pretty lining to use inside this buttercup purse. The rosebud fabric was another remnant that had been hanging out in my fabric inventory for a goodly while!


Saturday, July 9, 2016

Summer Essentials: Pinto the Picnic Shirt Terminado! (M6076)Sleeveless Princess-Seamed Shirt

Nothing like the neighborhood Fourth of July to inspire me to finish sewing Pinto the Picnic shirt. (I've blogged about my work fitting M6076 - both for Pinto and Western Winds numerous times  ) Pinto is such a cool, comfortable - not to mention cute (!) summer essential. I'm  looking forward to wearing her when I bike to summer chorus and also when buddy Marilyn and I next meet for a cup of tea. I know I'll also reach for her just any old time I reach into the armoire, looking for something to pickup my spirits. I sure hope to create a few more of these sleeveless wonders before fall.


Saturday, June 18, 2016

Fitting Pinto: (M6076)Sleeveless Princess-Seamed Shirt - Perfect for Summer Temperatures

The word "pinto" in Spanish does indeed refer to a specific kind of bean
It also means "spotted" or "speckled" !

Last fall I first fitted a sleeveless version of M6076. I called my first version of this shirt Western Winds. I've been reaching for my Western Winds shirt repeatedly in these warmer days. It's on the wash line every time I hang up clothes. To prevent fading I machine wash my own-sewn garments but I hang them to dry on plastic hangers on our clothes line . There is really no more time involved, as the hangers can go straight into the closet once dry.

There is no sleeveless version in the pattern, so I worked out where I wanted the armscye to be cut. A french curve ruler really helps with that. I did create a muslin for that original version.

I'm finding that, despite marking up my first-version master pattern tracing and markup of the master pattern, as well as that muslin, I'm still needing to do a lot of basting on Pinto, both with a basting stitch and safety pins. I'm hoping the altered cutting and stitching lines I just made to the last version of the pattern will help me make the next version of this shirt more quickly! I marked all alteration cut and stitch lines in a specific marker color and dated them too. One thing I've learned about altering patterns is to do that. I've also learned that different fabric, in a fitted garment, need slight differences in the amount of seam allowance.

My side and shoulder seams are still basted. Next step is to sew over them with a regular stitch length.

As you can see I also haven't yet added the facing or collar. To make sure the various seams in this fitted shirt hung right I safety pin basted the two front pieces up the center front line for the time being. I can still pull the shirt over my head for fitting.

~ ~ ~

Completed Western Winds - Last Version of this shirt http://meencantacoser.blogspot.com/2015/10/western-winds-terminadofinished.html

Thursday, February 25, 2016

Ench By Sew-41: Fit for a Princess – Fitting Princess-Seams


Click on this link in iTunes  to download the 41'st episode of the Enchanted by Sewing Audio Podcast,  recorded in February of 2016. Or listen directly on the web by clicking on this link.


What is a princess-seam? A princess-seam is intended to mirror the shape of a woman’s torso. It’s a long, lengthwise curved seam midway between the side seams and the center of the garment. You might see a princess-seam in a women's nightgown, camisole, swim suit, blouse, shirt, dress, or coat. The lines you’ll typically see in a bustier, or merry widow garment, are a good example of princess-seams.

Princess-seams are sewn into the front and/or back of a shirt. They may start at the low or high hip,  the waist , or wherever the bottom of the garment is. In a fitted cropped top they’ll start at that bottom crop point, in a dress or coat, without separate skirt pieces, they are probably at the hemline. A princess-seam usually moves up to the armscye (armhole) or to the shoulder seam.

Often a princess-seamed dress does not have a separate waistline at all, since it does its shaping without darts. A -Line dresses often have princess-seams.

Well executed princess-seams can add a long sliming look. 

In this episode 

Primero /First  -  Royal Reflection – My own ideas about sewing history and choices I made for my recent princess-seam sewing.

Entonces/Then – Technicos for Princess-Seam fitting – What techniques I’ve been using to fit my princess-seamed shirt pattern

Resources:
* For my princess seam pattern,  I used M6076 0 a Palmer and Pletsch pattern
http://mccallpattern.mccall.com/m6076-products-10887.php?page_id=482


* Coco  Chanel's Sleeves https://cloningcouture.com/2014/08/04/chanel-and-the-sleeve/


Monday, February 22, 2016

Princess-Seamed Aurora - On her Way (M6076)

Slowly but steadily M6076 Princess-Seamed Aurora shirt comes to life. Still primarily basted. Her sleeves feel comfortable, and boy has it been comfortable getting a sleeve pattern to fit!

Onward to real seams.

Monday, February 8, 2016

Sleeves are Troublesome: Discussion with Susan

Dear Susan,

Here's that princess-seamed shirt muslin (M6076) we talked about. I'm noticing....

* Two sets of diagonal wrinkles across bodice

* Bicep stretches across tight -  but I know for sure sleeve cap should be 3/4 inch longer than curve of armscye. It's not now.

*  I cut back the armhole on this side , so I lost the extra in the sleeve cap 
*  I think the  front pull up means I dropped under arm too much?
* Is the tight bicep maybe because I'm missing 3/4" ease, or because armscye is too low ?
* Hmmm why does back stretch across now? Torso fit fine in the sleeveless version and in this muslin before I added sleeve

Sunday, November 29, 2015

Pattern Work - Working For My Plaid - M6076 Princess Seamed - With Sleeves

Can't you just envision these pattern pieces and muslins as a red-plaid princess-seamed shirt?
In the November episode of the Enchanted by Sewing audio/pocast, I talked about sewing tartans and plaids. I also mentioned I have plans for a new red plaid, princess-seamed shirt, using M6076. As you may have noticed in my recent postings, Jasper-the-new-pooch has been sewing my slow sewing down even more. Still, I have gotten in some pattern work!


All four pattern pieces have a muslin attached. My next step is to transfer the seam lines onto the muslin, before I begin basting.

 I drew those seam lines  onto the pattern, based on the measurements I took from the sleeveless Western Winds shirt, which I created from this same pattern (altering to create a sleeved version as well as getting a good fit for me). I've really enjoyed wearing Western Winds and got quite a lot of late summer/early fall use out of that shirt - of course here in California it stays warm longer than much of the U.S.

For Western Winds, I cut back the top of the shoulder towards the neck, but I've dropped that back in place for this sleeved version. My new pattern includes lines for both sleeved and sleeveless versions. I  cut with room for either version, then use my clover wheel to lay down the armscye lines, then cut away what I don't need for the particular version I'm making. 

For more description, see my previous post- Sleeved to Sleeveless.

There's a good chance I'll be making a few more changes to the muslin, and therefore pattern, before I snip into that red plaid. I also plan to re-test the new pattern on another sleeveless version, sometime over the next few months. Tried and true patterns take a while to get just so, but they sure are worth their weight in gold.
I store in-progress muslins and pattern pieces clipped onto binder clips  hanging off cup hooks. That way they don't get wrinkles in between sewing sessions, and they all stay together.


Sunday, November 15, 2015

Sleeveless to Sleeved - Pattern Work - M6076

The purple line shows the cutting lines I used for altering the original pattern to be  sleeveless
The red lines are my new adjustment lines
Earlier this fall, I first began working with the princess-seamed pattern M6076. The first result was my sleeveless Western Winds Shirt. I really liked the fit, fabric and buttons on this shirt and I wore it quite a lot.  The pattern doesn't actually come in a sleeveless version - I raised the underarm point and then graded the top of the underarm seam to create a well fitting sleeveless version.

My next goal is to create a sleeved version. So far (Jasper is encouraging slow sewing!)  To date, I've just worked on one of the four pattern pieces - the Side Front. 

Once I get all four pattern pieces reworked, and since I made alterations right on Western Winds, I'll probably make another sleeveless version just to test this version of the pattern. Also I have enough clover green linen left from my Irish Laurel dress to make it!

Then I'll be testing the sleeved version in muslin. The main changes I'm making are
1) Taking the end-of-shoulder point back out about 1"
2) Taking the underarm point out 1"
3) Dropping the underarm seam point 1.5"

I went back to Western Winds and noted where I actually sewed my princess-seams
Then I added a new seam allowance, using a Clover tracing wheel
, 1" out from those seams. 


Monday, October 12, 2015

Western Winds Princess-Seamed Sleeveless Shirt- Terminado/Finished!

I talked about the process of altering the princess-seamed shirt, commercial pattern M6076, back in Fitting Western Winds . I used my sloper to work in conjunction with the pattern.

Fitting + sewing made it such that I put off finishing the project. It means the project took a little longer. And yah know how 'tis.... when I don't sew every single day a project looses it's oomph. I wanted to get going with something else new when I had time to sew.


Good thing I had a trip to visit with my dear cousin in San Diego  motivating me to finish my Western Winds shirt. I loved wearing it on the trip, and have worn it several times since. It's still summer-warm in my part of California. Aren't I glad this good warm weather basic didn't become a UFO, because it's been adding a lot to my just-doesn't-feel-like-fall-yet wardrobe.

BTW I simply used bias tape to finish off the inside of the armscyePor que no? It works great and I had it already.

Fabric was from the "Japanese Cottons" section at Stone Mountain and Daughters in Berkley (in my materials inventory for about a year and a half) 


Horsey buttons were in my buttons inventory - scored them free somewhere. They give it that true western feel, don't you think?


Wednesday, September 16, 2015

Fitting Western Winds - Princess-Seamed Shirt M6076 (Journal/Sloper/Pattern Work)

Journaling - Learning to fit and work with my sloper.

M6076 - Three princess-seamed shirts
I'm also learning to question, my sloper.

I'm starting with a basic princess-seamed shirt pattern - McCalls 6076.

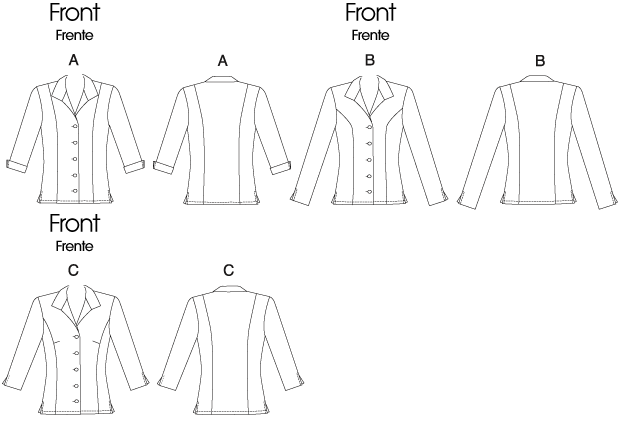
Initially I'm working with the princess-seam in shoulder seam option (view A). (others in line drawing below)

Noted so far
- Learning to compare front or back pattern pieces to my sloper, I have to learn where to place them. Do I line up the base of underarm seam/armscye? If I start comparing at shoulder seam I can get thrown off because I often need to alter this area - except on some commercial patterns, when it's fine!

First time through with a test-garment (that's the one I'll actually wear, one step beyond my muslin) I'm making a sleeveless version. I'm taking careful note of where I
-a- I alter  the underarm seam (armscye) to create a tighter fitting armhole
-b- Take  the top of the armhole back somewhat, for this no-sleeve version.

Later I'll test the muslin with a muslin sleeve, where I'll test the pattern without both of these (a and b) alterations.

Another benefit to a sleeveless test garment is,  I'm getting it out of a piece that is somewhat less than 2 yards. I will be piecing the under collar, and also the front facing. But I don't expect those piecing line to show.

Waistline and Princess Seam Alterations
Working on a very fitted look without overfitting
 Would be better to add an extra seam allowance - 1 inch instead of 5/8-  for all this playing around
Lots of trying on here! Did same front and back on all 4 princess seams

I made sure to safety pin the front closed matching up the button hole marks, so that I don't overfit. I want the shirt to button and need a certain amount of overlap for that.

- First I basted a 1/4 inch seam along the princess stitching line
- Then increased (still with a basting stitch) the princess line seam allowance to 7/8"
- Then I unabasted the second line of basting below the bust and graded back to the 7/8"

- Finally I took in/graded the waist with a kind of elongated half oval, about 3 and 1/2 inch above and below the waist. Challenging figuring out when to alter waist and when to alter princess seams - lots of safety pin basting helped with that

Altering Armscye/Armhole for Sleeveless Version

 I took the shoulder seam back towards the neck for an improved sleeveless style

* Compared to my sloper, and graded in 1/2 inch at bottom of armhole/armscye on side seam for sleeveless. Then I graded back out  to original side seam after, hummm.... about one to two inches? A french curve is handy for doing that. I admit, I eyeballed it. I kept the original full seam on the pattern, because I'll probably want it for the sleeved version. I also kept it on the muslin  so I can reuse the muslin when testing a sleeved version.

* I also tested  raising the side seam up for the sleeveless version (based on what I learned in French Pattern Drafting class going from moulage to sloper) , but it was too tight.


* For sleeveless, I'm  raising outside shoulder (taking it back towards the neck line) for sleeveless style - 1 3/8" (11/8") without S.A. - so probably either 9/8 (1 and18) or 6/8 (3/4) " cut back/off - the first for 1/4" and second 5/8" S.A. I'll mark on the pattern what works for sleeveless - but keep the full original armscye on pattern for sleeved version test.

In addition to desirability of a sleeveless shirt for our late-running summer-in-fall weather, this helps me to focus on fitting aspects of the torso. The sleeve adds in a whole 'nother fit challenge, even though it means I have to make alterations when I go between sleeveless and sleeved. A good reason to journal!

M6076 - Test Garment Fit In Progress


Shoulder Seams
 * I ended up adding 1/2" (better would have been more - because I only took a 1/4 "seam allowance (S.A.)  - so next time add in 7/8") to the back
* I therefore took back 1/2" from the front  because of alteration to back. Again because I only sewed the 1/4" S.A., next time through I will add back another 3/8 inch and sew  a full 5/8" S.A.

* I've made this shoulder line adjustment many times, the reason I didn't catch it when comping my Master Pattern Trace (M.P.T.) to the sloper? For the back - I forgot that the S.A. is not included in the sloper pattern, as it is in the commercial pattern. (Often forget this). For the front, I don't know. The front of my sloper just looks too high. The No S.A. sloper comes out at the same time as the M.P.T.. So it seems like maybe I should make a tentative adjustment to my sloper front - dropping it by perhaps.... 3/8 or 1/2 inch. It's challenging thinking between with and without S.A. But this is something to think about math 'wise as I continue to work comparing my sloper to patterns I trace.

- I pin basted the muslin to make sure I had a basic fit, but I really didn't see the shoulder issues until I cut out and stitch -basted the test garment. In the future, maybe encourage myself to stitch-baste that muslin. I have a way of not seeing the pattern as real until I move past the muslin. It seems good enough, and I really want to see it as an actual garment. And with the pins in, I'm always in a hurry to get out of it!

I basted with a stitch  length of 6 and starting out with 1/4" seams. Then I keep trying it on and increasing the S.A. up to 5/8" . Alternatively, I could have added a full 1" S. A. on the first pass,  but I figured since the muslin was OK, I didn't need to.

Right now I'm happy with accurately placed shoulder seams - which gives a shirt a custom fitted look. I took in the 2 side seams more, but they are still a little loose. However, I haven't yet basted a deeper princess seam (4 actual seams). Once I check those, I'll know if I want to grade in - all or some of - the side seams to increase the fitted look.

~ ~ ~ Web Resources ~~~
An interesting related fitting post, that journals some of the challenges of fitting a basic princess-seamed pattern http://artisanssquare.com/sg/index.php?topic=16322.0

Sunday, January 4, 2015

Panne Velour Princess Tee - Bit of a Pain (V8323)

Do you spell that Panne or Pain?
Working with Panne Velour Knit is a slippery business!
I was sure I'd have no problem zip-stitching up this crushed panne velour knit tee in time for having our neighbors over for New Years Eve supper. Har de har har! 

Do you like snakes because of the way they slither? Well if so, I recommend you run right out and buy a couple yards of crushed panne velour. Actually, I still recommend it. It's a beautiful fabric and it feels fantastic. I just encourage you to take a little extra time - OK a lot of extra time- when you plan your sewing schedule around this material. I also recommend choosing a pattern that requires minimal stitching.

This is my third experience with Katherine Tilton's form-fitting princess-seamed tee shirt, V8323. I've been quite happy with the red and floral velour versions I created recently. I've already worn both a number of times. Working with slippery panne velour is a bit of a surprise though. My Princess Laurel,  floral version of this tee was also a velour type fabric, but it didn't have the same moving-down-the-road, slithery characteristics as this crushed panne. The neck didn't cut right (because of the way the material moves), so I've cut a piece of thin tissue paper I plan to baste down -by hand - so that the neck will actually be round. The fabric just slipped and slid around and under my scissors and shaped things in unexpected ways, so getting a round neckline didn't happen. Once I baste down the round shape on the tissue, and eyeball it to make sure it is round and symmetrical on both sides, I'll cut right along the stitching line. Or else I'll leave that stitching line in place and sew the self-fabric bias strip right up against that basting line.

When I started out sewing the princess and side seams, I immediately found that funny things were happening. The back raw edge started disappearing beneath the front one. So I had to get busy with Auntie Seama Rippah. And you know how Auntie feels about knits, right? To date, I've got the princess seams and side seams hand-basted. And what did I learn then? I'm also going to need to sew it up tighter. Yup, it's the fluid nature of that panne velour.  I'm sure I'll be hand-basting the sleeves on as well.

It looks like it will be a pretty shirt that feels great on my skin. Perhaps you'll see me in it by next New Years Eve!

~ ~ ~ 
Web Resources

I wore the Red Interlock Knit Version of this tee for Christmas and plan to wear it for Valentine's Day. I've certainly been wearing it since the holiday, because I love it's fit, color and feel http://meencantacoser.blogspot.com/2014/12/fitted-red-tee-in-time-for-christmas.html

My Princess Laurel Tee - I used Floral Velour the first time I made a tee with this pattern. I've worn this shirt quite a lot as well. http://meencantacoser.blogspot.com/2014/12/terminado-my-princess-laurel-tee.html

Auntie Seama Rippah and I aren't really the best of friends http://meencantacoser.blogspot.com/2012/11/avoiding-auntie-seama-rippah-for.html

Tuesday, December 23, 2014

Fitted Red Tee in Time for Christmas, Valentines, and Any Day I want to feel cheerful (Vogue 8323)


I'm loving my "Princess Laurel" tee from Katherine Tilton's, Vogue 8323 so much that right after I made it up in floral velour, I repeated the deal in this Christmas'y/Valentine'ish light weight, red, interlock knit. This Katherine Tilton pattern, Vogue 8323, is a princess-seamed, very fitted, tee shirt.

There's more about my experiences sewing this tee in this month's December audio/podcast, Enchanted by Sewing - Festive Holiday Tees and Tea (#27)

Saturday, December 20, 2014

Terminado! My Princess Laurel Tee

There's more about my experiences sewing this tee in this month's December audio/podcast, Enchanted by Sewing - Festive Holiday Tees and Tea (#27)
Hoping to get another photo where the center of the shirt 
doesn't pull up on me! It isn't really THAT fitted.
I've been wearing this princess seam tee 
quite a lot for a week (layered)
I call this my "Princess Laurel" tee because

1) It's named after myself
2) It has princess seams
3) When I was little, my older sister Trisha kept me entertained with stories about her flights to Treasure Land. Apparently she went there every night after I went to sleep. She had a magic plastic comb with genuine diamels that she used to transport herself! One day she brought me a pair of shoes decorated with sequins, that looked, oddly enough, like my old slippers that had gone missing! In Treasure Land, amazingly, there were two princess that looked exactly like us - Princess Laurel and Princess Trisha!

I was a true believer in Treasure Land, and begged her to take me along one night. She promised she would when I was a little older, but I think the comb was lost when we moved and I never got to go.

This floral velour tee shirt is named in honor of the royal garments that Princess Laurel once wore, 

I really like wearing this Katherine Tilton  Vogue 8323, princess-seamed, very fitted, tee shirt. I made this first version in a floral velour (I think that's what it is - the fabric was a freebie from donations made at school), that I think is probably mostly polyester with some spandex. I've been wearing the shirt over a pale pink turtleneck or a black turtleneck, as it's not very warm. It looks pretty without them though, and I look forward to getting a photo of those.

I embellished the shoulder seams with
pale rose glass beads and twists of fabric

I added some pink glass buttons and twists of fabric on the shoulder seams, for fun embellishments. Isn't it great sewing your own clothes and doing stuff like that? Impromptu embellishments like that are just one of many things that keeps me, enchanted by sewing!

The pattern work was harder than I thought - getting the fit lines to mirror my body. I've found that my dress form Conchita is pretty good for getting basic fit areas, but when it comes to absolutely fitted, nothing beats putting the garment on my own body and checking it out in the bathroom mirror (or with a buddy like the day Susan H came and she marked all over the inside for me). One thing I learned was, not to make the adjustments to the princess seams permanent before I added the sleeves! The sleeves pull the fabric back, over and all which ways. Baste, Baste, Baste!  Oh, I had some fun with Auntie Seamah Rippah and all the seams I thought were ready for regular stitching but really weren't!

I employing my lesson about basting while making another plain red version of this tee, which I look forward to blogging about. It's almost done. Of course being a different piece of knit - a kind of fluid interlock, the red knit had to be taken in a little more. And of course the self-fabric neckband had/has to be fit differently.

Getting the neckband on this floral version in right such that it didn't gap and wasn't too tight was a real challenge. I basted a lot with pins and by hand. I also laid it over my duct tape dummy (remember Helen?) to get a sense of how the neckline would fall on my actual body. Boy, no neckband is the same.

Also I think since this neckline mostly curves at the center, then shoots up almost straight, I think the trick is a slight stretch on the curvy center part, then less stretch as it goes up. 
Great tee. I have fabric for a few others that I hope to make soon, while the alterations and fit challenges are fresh in mind. Also I just love the way it looks on, so I want more!


~ ~ ~
Web Resources
My Early Pattern Work on V8323 http://meencantacoser.blogspot.com/2014/10/princess-seamed-tee-shirt-pattern-work.html

http://www.katherinetilton.com

Sunday, October 12, 2014

Princess Seamed Tee Shirt (Pattern Work)

V8323
Last week I wrote about the pattern work I'm doing with the cowl neck knit/tee shirt pattern for the remainder of my black and white polka dot knit. At the same time, I'm working on altering this pattern for a princess-seamed tee shirt. I have two pieces of fabric I'll be using for this tee. One is a heathery gray, somewhat heavy cotton knit. The other is a print of roses in a kind of heavy velourish sort of fabric. The rose print was a freebie, so I'm less clear on it's history.

I'm hoping both tees will work well in our temperate fall and winter climate, in the San Francisco Bay Area - if we ever get any cooler weather that is! Right now the weather gods seem to think it's still summer - actually a warmer summer than we usually get. 

So far I've traced and dated the master pattern (view C) on drafting paper, leaving in more than enough seam allowances for altering. I'll probably use some commercial tee shirts for muslin/patter testing. I hope that, even though this is a knit, I can still get some idea with the help of my dress form Conchita, as to where shoulder and side seams need to go.

I believe that Marcy Tilton Thomas' sister Katherine Tilton, designed this pattern. Here's a newsletter where Marcy talks a little about the pattern http://www.marcytilton.com/index.php?cid=1050

Friday, April 19, 2013

Shirt or Blouse? Pattern Plays a Big Role

I used Butterick 5226 for my No 1. Ladies Detective Agency Shirt I guess it's the more fitted character of the princess seams views that cry blouse! to me. The others strike me as shirts.  


Vogue 8747 is still in print
Vogue 8747 - much like the front-of-the-bust gathered shirts that Lexie in BBC's Monarch of the Glen wore, strike me as shirts. So I guess being more fitted doesn't always say blouse....


Simplicity 9857 is Out of Print
But several used pattern sellers on the web have it


*Simplicity 9857 (out of print). These garments, with their more romantic flowing lines, look blouse-like, don't they? Those front tucks are not at all crisp, so that must be it.


Vogue 2105 80's Blouse (out of print) Seems more blouse-like than shirt like. Why? Is it simply the way the pattern front styles the garment? Is it the deep open neckline? Perhaps it's the nearly hidden buttons and the somewhat formal, dressy look of these pieces.


Vogue 2105 is Out of Print
But several used pattern sellers on the web have it


McCalls 7360 is Out of Print
But several used pattern sellers on the web have it


I'd definitely call this a blouse....McCalls 7360 (out of print), says soft, both in it's romantic flowing lines, and it's traditionally feminine, historically inspired collar details.


Thursday, October 18, 2012

Alteraciones: Changing UP those Patterns

I've been working with
the alterations I've made over several years
On this tried-and-true pattern
To be sure the alterations are good ones
This pattern is out of print, but various
vendors have it for sale on the web
Progreso para octubre/October Progress

I'm  looking back at my plans for this month's sewing, to see how the actuals are coming along. Isn't that what we do when we want to see whether or not we're channeling our resources in the right direction and how our business is coming along? Sewing is not my business, it's my enchanting past time, but I like to feel that I step back and think sometimes, about whether or not my recreation energy is being well spent. The proof is in the pudding. Eventually I want to get some pretty, comfortable and useful clothes out of the time I invest with needles, pins and patterns. And I want to find that those are clothes that I spend a lot of time wearing, not attractive garments that just hang in my closet waiting for a special day to be worn.

Let's See How My October Sewing Basket  is Progressing .......


- 1.  Finish the basic much needed camisole I worked so hard on in September. Hooray it's done! I wore it under that new sheer yellow tee shirt I made a couple of months back, and immediately figured out that I need to stabilize the lovely broad braided shoulder straps (that idea came from the Jan Bones Lingerie book, which my library has), made out of spaghetti strap type tubes. So cute, and SO stretchy. I think I'm going to hand sew a piece of satin'y ribbon along the back of the straps and then try wearing it again.


- 2.  A new pair of pants, either light weight denim or beige twill - I've got 3 yards of each. I'll be using the same patterns I used for The Lady Wears Shorts, which I've got fitting pretty well. I'm taking a "Pants Construction" class at Cañada this month. 

ON HOLD Turns out this project is not due by the end of the month as I'd expected. I've put both the cutting out and sewing of these pants on hold until the end of this month because ...
Taking advantage of what Susan is learning
in the Fit Class
to get a really well-fitting blouse pattern,
That's something I don't currently
have in my pattern stash.
Vogue V8747

a) I'm learning a lot of techniques in my 4 week Pants Construction Class (it ends October 23) which will affect not only how I sew them but how I cut them out. The pockets for example will be cut with a leash that fastens into the waistband. We're starting in on waistbands this coming weekend and I have some questions about how to make my pants more stable in that zone, and how to better work with Petersham ribbon.  Better to wait on everything.
b) Sewing samples for my main sewing class, lingerie class and pants construction class seems to take an inordinate amount of time. I'm learning to enjoy cutting out and thinking hard about sample pattern shapes and techniques, but I'm surprised to find that I can spend 2-4 hours on just one sample, and we make several each week. Then sometimes I find I need to re do them. Now I know one reason why I never put the time in, to learn techniques before. The other reason is that it's just fun to sit down and sew up a favorite, tried and true pattern. That's something I probably won't do in October, but I am going to put on my list to do at least once in November.

- 3.  Trace, tissue fit and toile a very fitted princess-seamed Vogue blouse pattern. I'd like to say get it sewn too, but given time.... I'll be happy to just get going on this project.

IN PROGRESS I'm pleased to say that I've gotten going on this project. I've been working in sewing lab with my new buddy Susan. She's taking the fitting class I plan to take next fall, and we're putting her new knowledge to work.  It's taking a lot of energy just working out the fit, but it's going to be worth it to have a really well-fitting fitted princess-seamed blouse pattern. You can bet I've already got plans to sew that up in three different fabrics from my sta- errrr fabric inventory (!) once I get that pattern working. Here's what I've done with it.

a) Identified that I shouldn't try to fit the sleeve until I get the bodice, and it's resident armscye working with my body. I learned this by chatting to Kelly, an experienced Cañada Fashion Department class taker, who's often working in the sewing lab. Kelly told me to come and see her about my sleeve pattern once I've got the bodice in good shape. She's going to help me learn what to slash and where once the armhole area is working well for me. She also hinted at the possibility of a "cut-on gusset" once we do that. Lots of new things to learn

b) I traced, and cut out, the main princess-seamed bodice pattern pieces onto the tissue I use (medical supply paper, like the kind you sit on when you visit the doctor, only it's new and un-sat-on).I doubled all the pieces, as though I were cutting it out of actual fabric,  so that I could put it on like a full bodice for fitting. This included four pieces: bodice front, bodice side front, bodice back and bodice side back.

It was a little challenging figuring out where to leave, and how to cut, extra tissue paper versus just moving the tissue around with gaps and inserting gap-filling tissue paper as Susan fits the pattern to me. This is something I will learn over time.

c) Susan fitted the tissue to my body. We used colored marking pens to note where tissue seams had been joined, wide posit tape (great for removing without tearing) and many pins. 

One thing I learned was that no matter how obvious the results of fitting seemed at the end, I could have marked the results more clearly. Next time I will know more.

d) I cut out 3 of the 4 pieces in crummy fabric to test the bodice. I'm already concerned that I missed a place where I'm supposed to add a seam allowance, but I'll find out once I sew it up and put it on. Sometimes you just have to forge ahead. And the material is so yucky, I won't care if I have to chuck it and start over.

e) I need to review how to join princess seams. There's a funny, but familiar, big notichy shape on the side front  I just don't get. So I'll need to break down and go back to the pattern instruction sheet.

f) On Monday I plan to have that bodice toile/muslin basted up and ready to review with Susan in Sewing Lab.

- 4. IN PROGRESS- Start in on the next project for my main sewing class at Cañada - elastic waist linen pants

Whew! These have really been a lot of work. I decided to be very scientific about a capri elastic-waist pants pattern I've been using for maybe seven years. I think I've actually sewn this  pattern at least 20 times, altering both the fit and the shape of the leg. I've sewn them as capris, long straight leggers, a divided skirt and palazzo pants. 

I retraced the original pattern, which I'd damaged and shrunk with regular scotch-type tape and the iron (I figured out to use iron-able posit tape after I first began working with this pattern). Pattern weights from an obliging drawer in the Sewing Lab at school helped me to get the damaged spot straightened out enough to trace the whole piece. Then I retraced that original tracing and filed away my first careful, reconstructed pattern pieces, so I can always go back to the original without the pain and agony. On the second tracing I drew in the alteration lines I've made over the years, making notes in different colors so I could see which were the original pattern lines, and which were mine. I had a kind of shlocky heavy-paper version of the pattern I had been using, that I took these lines from.

Next I've begun working to determine if the alterations I made over time, using the scotche here and the schotche there method, to determine if these are the best alterations for the garment. This may sound tedious, but I think it will prove to be worth it. I took a pair of dark linen capris I found I'd cut out of the pattern and forgotten about (I also drew there lines in on my pattern in another maker color to ensure they matched my schlocky pattern lines), taped them to a window with light coming behind and used narrow posit tape and pins to find the actual grain line of the fabric. Then I used more of the same to create perpendicular lines at hip and around the widest part of my hips. After which I basted in white thread, which stands out against the dark fabric, along all 3 lines on the one pants  front where I had done this. I did the same with one back leg. 

Entonces - I then basted up the pants (without the in seam pockets) - just the leg and crotch seams. I plan to try these on in Sewing Lab, tie a piece of elastic around my waist, mirror check, and ask a buddy to see if they think the basting lines of white grain-check thread are hanging straight. Also the widest-point of hip line may tell me something. 

Amazing how long this all takes! The payback comes as I continue to use this pattern, which I also intend to use in combination with a pattern from the lingerie class to make tap pants.

- 5. IN PROGRESS I'd love to get at least one tee done, either one of my new Hot Patterns or another of the Stretch and Sew 333 tees I sewed for class in September, but that is a bit too much blue skying.

a) I cut out one of the Strech and Sew tees, though trying a different neckline version for it may keep me from getting it done as quickly as I might otherwise do.

b) I tissue traced my new Hot Patterns Weekender Sunshine top. 

Though I'm spending a lot of time in the sewing lab at school, I'm doing more sewing science than sewing construction. They don't call it a "lab" for nothing. It's great to be able to take advantage of the facilities and the people around me. If I'm going to take sewing classes, I want to learn as much as I possibly can. The techniques and knowledge of how to fit, plus improving the way favorite patterns fit my body, are going to stand me in good stead when I want to just sit down and zip on my machine.