I love to use Pinterest as my virtual bulletin board. As you might guess many of my pins are sewing related. Click here to see what fun stuff I've found and pinned to different sewing boards.
Showing posts with label bias. Show all posts

Saturday, June 14, 2014

Technicos: Sewing and Showing My Bias (Cutting and Sewing Bias Strips) (Seam Finish and More)

How I make bias strips

1) After straightening the fabric. I fold it (so I get more strips). Then I lay it square along my cutting grid and draw a straight line that runs carefully through the 45 degree angle line. 


2) Then I lay a gridded ruler carefully and precisely along that line. I move the ruler up however many inches I want the width of my bias strip to be.


3) The farthest edges come out with a little triangular bulge. If it's important to have the print in the same direction, then I'll snip the two ends off after I seam these two together.

4) But if I don't care how the print comes out. I can match up the two ends, by flipping one strip the other way. After I sew that seam, I'll snip the ends off to the right of the seam line.

Saturday, March 8, 2014

Lilacs and Liberty: An Insiders View

I've had an awful lot of fun wearing this shirt I finished at the beginning of the year. Yup, it's another of my favorite Butterick 5526 - the pattern my buddy Susan altered for me. You may recall the other two versions I made. The first was my No.1 Lady's Detective Agency shirt, and later came the Mille Fleur shirt I took to London (I also finished the red plaid Pearly-Wannabe jacket for that trip. with some strips of bias trim I eked out of the scraps from the shirt).

The main fabric is Robert Kaufaman Lilac Gingham and the trim is Liberty of London Tana Lawn "Mauverina". I've had a lot to say about Liberty and this wonderful quality cotton, both in my podcast and this blog.

I ams really happy with my threesome button groupings (Click
on the illustration to see an up-close view of those)
I also liked the pocket, a variation on the pattern pocket
but I took tucks instead of the folds in the sporty-style shirt.
I also added these long tucks in front and back that weren't in the
other two versions of this shirt. The fluid nature of the
gingham seemed to call for them. They're figure-flattering too.
In my February podcast, "Getting Shirty",  I described some of the seam finishing techniques for shirts I've been working on incorporating more often in my sewing projects. I'm really happy that I did a good job on the inside as well as the outside of this garment. I wear it often and so there's quite a lot of pleasure putting on this well-fitting (thanks Susan!) shirt.


Remember when I described slicing double packaged bias tape lengthwise and wrapping the one remaining fold over the raw edge of the hem, and facing edges in the podcast? Doesn't that make a nice crisp edge? You bet! And it really defines that shirt tail hem too. I sewed three rows of topstitching too, which also helps with the stable, crisp feeling.

Notice that French Seam. Isn't that a nice clean look? It really looks finished and helps with the hang of the garment.


Not being a dab hand at seam finishes, I wasn't sure if using a french seam at the shoulder seam would be challenging. But it worked out just fine. I did baste the set-in-sleeve first, but I would have done that even in a traditional rights-sides-together seam.

We spent a lot of time learning about seam finishes in my Intermediate Construction Class at Cañada. I'm only just starting to get in more practice with them - just as soon as I'm done with this bustier project I'm chugging away on. (Woof! It's turning into a multi-month project. But what a feeling of accomplishment it will be when I'm done:-) 

Once that challenging project is complete (Oh and did I mention I'm planning to squeeze out a simple straight denim skirt to wear with it before I move on? Hey it's got to have a real spot in my wardrobe....), I'm going to get some more recreational sewing time in with shirt sewing. You bet I've got one more cut out and in the hopper, and several more for which I have fabric (two of them are my favorite lengths of Liberty Tana Lawn I got on my trip to London last year). I'm really looking forward to polishing my seam finishing skills on those new garments. 

I'm looking forward even more, to putting them on and wearing them!


Practicing new skills and getting to enjoy the results. That's the kind of projects that keep me...

   Audio/Podcast Getting Shirty: http://www.enchantedbysewing.blogspot.com/2014/02/ench-by-sew-017-gettin-shirty.html Includes seam finishing techniques and pattern discussion


This book has really helped me to learn how to sew different seam finishes. The illustrations and descriptions are spot on!
The New Complete Guide to Sewing: Step-by-Step Techniques for Making Clothes and Home Accessories Updated Edition with All-New Projects and Simplicity Patterns (Reader's Digest)


Thursday, October 3, 2013

To Drape or Not to Drape - No Question About It - Ericson Is Inspired by Vionnet: (historical and modern draping)

Vionnet made these gowns 
for the 
Duchess of Windsor
For Madame Vionnet, 
It was all about fabric and cut.

This past weekend I attended Artistry in Fashion (AIF)* at Cañada College in Redwood City CA (San Francisco Bay Area). This is the school with the excellent fashion department , where I have often mentioned I take sewing and fashion design classes.

I was really looking forward to hearing the keynote speaker, Sandra Ericson **, as my draping class teacher, Judith Jackson, has studied with Ms. Ericson  and dropped a lot of little hints about this designer's experiences studying the work and designs of Madeline Vionnet. Madame Vionnet, as you probably already know, was a famed french designer and queen of the bias cut. I knew I'd enjoy the talk, but had no idea that I'd walk away absolutely inspired to learn to cut and drape some bias of my own. 
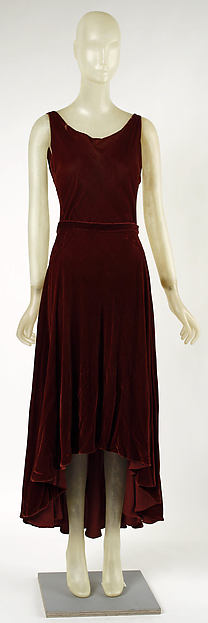
This Vionnet evening dress
makes me yearn
for a piece of silk velvet!

Having only just recently begun to learn about draping, I'm starting to get a sense of the fun involved in smoothing fabric over a dress form, capturing excess, and letting the material speak to me about where it wants to go and what it wants to do. So far in our first four working classes, we're still working with traditional straight of grain and cross grain goods. We haven't moved into bias land yet.

I can hardly wait.


Learning more about designing and sewing garments cut on the bias, is going to be another pathway that keeps this sewist, 
Enchanted by Sewing!
~ ~ ~
Talk and Draping Demo Notes 
* Very few pattern pieces used, often only one or two
* Bias expands and contracts to fit the body
* Though sewing is limited, these styles are not for beginners. Garment constructors should be "champion edge-finishers"!
*For Vionnet, it was all about fabric and cut.

Madame Vionnet was not so much a sewist as she was a "technician". She focused on cut and cloth, analyzing the construction of the cloth and ways that the fibers restricted movement  (Laurel reflects - it's about drape and sway. This reminds me of the Enchanted by Sewing podcast where I interviewed Susan S. and she described herself as a "Fashion Engineer"). 
* Sandra Ericson sometimes drapes wet. I wonder what kind of dress form she uses when she does this? I sure wouldn't drape wet on my foam core "Uniquely You" dress form! Might be OK on my duct tape dummy though...
* Ms. Ericson several times pointed out gussets she used in garments made from the patterns she designs. A couple of women behind me kept whispering, that they didn't know what a gusset is. I tore up a little piece of notebook paper and wordlessly clued them in. 

I think at one time, many home sewers knew about adding gussets for a little extra ease at key points, but in this age of commercial patterns people tend to be leery, or just unaware, of altering garments in this way.

* When you're draping, cut away what you're not going to wear
* Finished some edges with a serger and invisible thread (hem perhaps?)
* Noting S. Ericson's bolero jacket, reminiscent of Balenciaga, we learn he studied with Vionnet, tending to create garments in stiffer fabrics. Laurel thinks this pattern would make a very nice travel jacket.
* Vionnet's principle was to use nothing fake to support the shape of the garment. For example - no shoulder pads. If a sleeve needed more height, she might dart it, to make it stand up
~ ~ ~
Fabrics Used ....
on some of the sample garments displayed in Sandra Ericson's talk 
 Hold the fabric up, let it drop, and see how it hangs

*Rayon - Note rayon has a "high specific gravity" that drags a garment down (Laurel asks, Is that sometimes a good thing?)
* Rayon Twill (donut skirt)
* Silk Velvet (skirt, Komono Cool Top)
* Silk Noil - Laurel says Thai Silks (longtime business with a good reputation, in nearby Los Altos, has very nice silk noil and they sell on the web.
* Wool Crepe (the V- dress, the Midterm dress)
* Heavy Wool Coating (we noted how differently garments made with this fabric, hung versus more drapey materials)
* Light Weight Wool Cashmere
* Upholstery Fabric (the Measure Coast - no pattern - set of instructions purchased and you make it to measure. Includes those now, very familiar, gussets!
* S. Ericson likes hand woven fabrics. She encourages us to see how they hang down.
* Ms. Ericson often uses Nature's Way Muslin (Rocklin?) for making toiles/muslin's when draping, but uses others as well and is checking out a new one she's found.
~ ~ ~
Resources

Fashion Engineer for Work and Play - Snakes Alive Environmental Consultant by Day, Sewist by Night 
Learning about Vionnet's focus on the technical side of working with fabrics, reminded me of this interview with Susan S.

Dress Forms? What are those? How do I get one? Can I make it myself? How much does it cost and how much time does it take?
When you drape - unless you have the luxury of a live model - you generally use a dress form. In this episode of the Enchanted by Sewing Podcast, I describe my experiences creating two different kinds of dress forms. I also provide links to another show, where Lori,  of the Sew Forth Now Podcast, talks about the history of dress forms, as well as her  pre-made, adjustable dress form.
http://www.enchantedbysewing.blogspot.com/2013/09/ench-by-sew-12-dress-forms.html

Center for Pattern Design - Ms. Ericson's Digital Studio 
 Lots of Resources plus her own Patterns for Sale http://www.centerforpatterndesign.com

Of the models I saw in the the talk - I was most partial to the four-square dress, pyramid dress, and cocoon coat. These are not Big-4, slam-bang, mass-market, discount patterns. Inspired sewists are paying for the work of a pattern-design artist. Most patterns seem to range between $20 and $35, at this time.

One place you can see examples of  Vionnet's work, is by searching  the collection of the Met Museum
http://www.metmuseum.org/toah/works-of-art/C.I.46.4.24ab,25ab

Madeleine Vionnet book by Betty Kirke - Classic study on famed draper and technical artist. Includes 30 patterns. Warning, this book is not cheap, but would you get a ton of patterns in addition to the text, so why would it be? Sandra Ericskson mentioned it many times in her talk


Drape Drape by Hisako Soto
This affordable book looks like it might be a good approach to start playing around with draping
http://www.amazon.com/Drape-Hisako-Sato/dp/1856698416/ref=pd_sim_b_4

~ ~ ~
P.S. Next Years Keynote Speaker at Artistry in Fashion is Patti Palmer. You better believe I'll be attending again!

** Yes, Sandra is Lois Ericson's sister

Tuesday, March 26, 2013

It's Done! No. 1 Lady's Detective Agency Shirt (B5526)

Butterick 5526
With Alterations
Click on the Illustration above for more detail
Are you a fan of the No. 1 Lady's Detective Agency books? Heroine M'ma Ramotswe often reflects on fine animals, like the ones on this lovely print, that we over on the other side of the world, associate with Africa. I've had this animal material in my fabric inventory for years, never feeling quite sure what to do with it. And I'm glad I saved it, because it's going to see a lot of use. Precious Ramotswe would like it too, I know.

I'm not sure I've ever spent so much time sewing one garment. But the time put in was worth it. Here's what makes me proud and happy, when it comes to this project.

1) Thank you Susan for all your work! The pattern fits really well. It's comfortable and flattering.  I'm looking forward to making many more shirts with it. And after all Susan's work, I still managed to finish off the sleeves on my own, using my favorite front-of-the-bathroom-mirror technique! You know that one right? Yep, I use lots of pins, and try not to spill too many all over the counter, or worse yet in the bathroom, the floor.

That mirror is where I got that final fitting on the sleeve to work, when it was time to get on with the project - my first of three for my intermediate sewing class. There's a time to be fitting and a time to just use the mirror, figure it out, and start sewing.

BTW I'm not the first person to need a lot of alterations when it comes to this pattern. Good thing my buddy Susan worked so hard creating that muslin before I sewed this garment, unlike Sarah Sew who loved  the results but can’t wear the shirt she labored over! Here's an excerpt from Sarah Sew’s review at Pattern Review "I would check your fit before finishing the shirt completely. Most patterns seem to run large, this one, however, seems to run small. Also the armhole is rather high. "

No kidding on the fit challenges, especially those armhole comments, Sara.

Cute buttons, huh?
You can see here, how the topstitching adds oomph!
2) I've also focused on learning to be a crisper sewer in the beginning and intermediate sewing construction classes at Cañada. I'm particularly proud of my crisp, neat hem and the sharp edged cuffs on my 3/4 length sleeves for this shirt. For the hem (as well a the inside edge of my front facing) I cut double wide packaged bias tape down the middle (lengthwise) then sewed one edge to my raw edge and the other edge behind/under/sandwiched between the bias fold and the back side of the garment - then hand (for the facing) or machine (for the hem) stitched down.  It looks neat if it's exposed when I'm wearing the shirt open over a tee and it gives the kind of definition I was looking for.

I've also learned that multiple rows of topstitching add crispness/definition/body. I just can't decide on the best word for this, so I guess I'll go with oomph!  My hem has two rows of stitching (stitch lengthof 3.0 or 3.5 is nice I think), and the front edge of the shirt has 3 rows.

See I told you I do a lot of checking
in the bathroom mirror!
There's my little red tray of pins,
 the ones that like to scatter.
Here you can just see I'm checking the
positioning of the buttonholes I'm
planning to sew. They're drawn straight on the
stabalizer, and on the hanger. But
will they be straight when I wear the shirt?
Yes!
3) My buttons march down in a nice straight line. I used a technique I've blogged about before, using stabalizer I normally use for machine embroidery to layout my buttonholes. When I have just a few buttons, I can use the scrap leftover from embroidery, but in this case, where I was sewing 8 buttonholes in a strip, I did use a brand new length.

4) I made some alterations I really like, both on the muslin and the actual shirt as I sewed it. Those include:
a) The cuff's were supposed to button in a traditional way - but I never really button longer sleeves shirts. First thing I do is to fold up my sleeves to just below the elbow. So why not start out that way, especially with such a casual style?  I permenently turned these cuffs back, and sewed them down with unbuttonable buttons. The little sleeve placket gap I like to wear in a regular sleeve, is a feature of the shirt now.
b) The front placket was just a turn-under-twice deal. Maybe that's OK for those who button their shirts high, but I won't be wearing this shirt like that. When I tried turning under the placket and put the shirt on, the back of the fabric (a vague shadow of the print) showed at the open neckline. Ugh! So I created my own facing pattern from the bodice front.
c) I fooled around with how far the buttoning part of the front should extend beyond the buttons. Because I used these large, printed-pattern buttons I left it kind of wide. Then I did three rows of topstitching to give it a nice heavy edge. Ancha in my intermediate construction class has suggested I add another three rows of stitching on the other side of the buttonholes, and I'm planning to take her advice.

Yep, it was indeed worth putting my energy into sewing a practical and versatile garment. However since I finished it I have been inspired to do some breakaway, rule-busting sewing! You'll hear more about that soon 
:-)

Friday, March 1, 2013

Technicos: Joining Bias Strips

I sewed a number of samples using bias strips I cut myself,  for my sewing class.

1. Here's one way to join the strips
2. Then the strips will be joined on the bias

3. In these narrow sewing tasks, sometimes
backstitching to  lock the stitches,
causes the fabric to get trapped in the throat plate
 under my needle.
So.....

4. So, instead of back stitching at the beginning and end
of this small joining seam,
I use a super small stitch length of 0.5 at the beginning and end of
the seam instead. In between I use a regular 2.5 or 3.0
stitch length.


Monday, February 25, 2013

Technicos: Cutting Bias Strips

I often buy packaged bias tape, but it's useful to be comfortable making our own. You never know when you're going to want a coordinated color on a sewing project, or maybe a really nifty contrasting color or pattern. When sewing samples for class we made our own bias strips. 

Here I folded a piece of fabric on the diagonal and then drew a set of nice straight lines. I was actually making bias strips of varying widths for different samples projects. If I were making strips for the same task, then I would cut them all the same width. For a garment I would want the strips as long as possible. So I'd take a pice of fabric as wide as it is long (such as a 44 by 44 piece of quilting cotton, since that fabric is typically 44 inches wide), then I would fold it into a big diamond and draw lines like those in this illustration.