I love to use Pinterest as my virtual bulletin board. As you might guess many of my pins are sewing related. Click here to see what fun stuff I've found and pinned to different sewing boards.

Monday, September 30, 2013

Thursday, September 26, 2013

Ench By Sew-12 Creating Dress Forms (Podcast Episode)

Co-Published with the Show Notes for Enchanted By Sewing


Hey! The latest Enchanted by Sewing Podcast has been published!
Two Ways to Listen
i)You can listen to the show right on the web by clicking on the this link
** * * 
~ OR ~
ii)  Click on this link to iTunes  to download this and other Enchanted by Sewing shows to your mobile device (iPhone, Android, etc.) free from iTunes 
Did I miss any links mentioned in the show? If so, please post here and let me know, or else email me ,  EnchantedBySewing AT gmail
~~~
This month show is about my experiences creating and using two different types of dress forms - 
a) A duct tape dress form
b) A Uniquely You dress form
~ ~ ~

Please send your thoughts about this month or next month's topic – Jeans Sewing -in the Post a Comment section,  below :-)
~ ~ ~

Please Note
My Uniquely You Dress Form Instructor was Judith Jackson. I referred to her as "our teacher" in the original recording, as I was waiting to ask her permission to include her name. She said 'yes' :-)

In this month's show

1) What is a dress form?
a. A mannequin who’se shaped like you. A fitting or body double, a way to fit patterns, garments, drape and design as though you’re the tailor and the dress form is you
b. Listen to Lori's Sew Forth Now Podcast for a history of dress forms
Lori not only talked about history, she also talked about the style of dress form and I’m not repeating any of that. Please listen to her wonderful show (she said it would remain there for the near future) esp interesting to me is lori’s archeologic work, uncovering the history of dress forms.
Lori uses an adjustable dress form, I worked with two different types – duct tape and a Uniquely You dress form
c.
2) Why I wanted a dress form
a. Fit
b. Trying out patterns and muslins in 3D
c.  Create and play around with my own designs, and minor commercial pattern alterations and design changes
d.  Because Lori made them sound so appealing!
e. Maybe for photographing in my blog….

3) Body Issues and your Team
a. Body issues are a part of our culture
b. Find helpers/team who help us feel good about ourselves
c. A dress form helps us distance ourselves from body issues – it’s just data
d. A dress form helps us notice our best features – what do I want to flatter more?
e. A dress form helps us make patterns or garments we design ourselves more flattering, so we learn to play up our best features
f. A dress form allows us to experiment with a muslin/toile – Can I make a shirtwaist that flatters my figure type?
g. Choosing our Team

4) Two types of dress forms I experienced. Basically what they are,  

5) Cost

6) Materials (tools)   and Resources (web stuff) - I list some Resources below

7) Safety- Working around kids,  young or older goofy, fun loving kids - Two good reasons not to !
8) Social Comfort/Body Issues – You need a work group, at least one other person. Find someone who supports your best interests and helps you feel good about yourself
9) How I’ve used my dress forms , what other things I or others might do w/ them
 - Fitting, altering, trying out new patterns, hand sewing/deconstructed neckbands - helps me conform neckline to lay well on me
- A Wedding in your future? Formal/Special Occasion Wear I would guess that if you’re doing a formal dress for someone with beading or close fitting - and maybe they aren't available at the drop of a hat, might be worth making a duct tape (or other type )  dress form for them


10) Technicos: In-depth details about how I made these two different styles of dress forms. What I actually did to create them

~ ~ ~
Resources

Listen to the Podcast on web - no need to download to a mobile device
http://traffic.libsyn.com/enchantedbysewing/draft5_dress_formENCHANTEDbySewingFINAL.mp3

There are so many fun things about dress forms - making them, draping on them,  displaying historic, artistic and other garments on them, and enjoying them as an art form - whether full sized, half size, miniature or doll size. There are even topiary forms inspired by dress forms. Whenever I see a good dress form that fits any of these categories, I pin it on one of my virtual bulletin boards http://www.pinterest.com/lrshimer/dress-forms/

Lori recorded a Sew Forth Now podcast episode on dress forms. I tried not to duplicate anything she already talked about in this great show

Dress forms are a popular theme with sewing bloggers 

"Threads" Magazine has many articles related to dress forms

Quick and Easy Duct-Tape Dress Form


Some people think Paper Tape works better than duct tape. Haven't tried it myself, but I'd be game!
      http://www.threadsmagazine.com/item/3633/paper-tape-dress-form Paper Tape Dress Form


Kenneth King make an extra body to use for two people  in Threads issue 161
 June/July 2012


I looked in the Threads Magazine Archive to find different articles. You can find that at...
http://www.tauntonstore.com/threads-magazine-issues.html  You can buy individual Threads back issues, if you or your public library doesn't have them on the shelf.


1) "Fit for Everyone" by Kenneth D. King in issue #161. This describes how to sew removable covers to make your dress form work for multiple figures.
A. "Tip: Meet Madeline" by Sandy Moeckel in issue #153. This tip describes how Sandy inexpensively made her dress form suitable for herself as well as her daughter.
1) "Tip: Identical Body Double" by Anne K. Brenz in issue #144. This tip describes the way Anne made her dress form fit her every curve.
"The Dress Form–A Sewer's Best Friend" by Carol Fresia in issue #123. Described below.
"Make An Arm for Your Dress Form" by Shirley Botsford in issue #90.
"Clone Yourself a Fitting Assistant" by David Page Coffin in issue #75. This article explains how to make a dress form from scratch.

~ ~ ~
Things I might try out for arty fun and practice with my dress form 


Making a newspaper dress on a dress form. Fun way to learn draping?


tutu might also be a fun way to experiment with draping on a dress form too "How to make a tutu out of paper" http://www.youtube.com/watch?v=qp6nKpzd0eI

Wednesday, September 25, 2013

Draping: Checking out my Dart Extensions (Fit)

In this illustration, I'm working with a tissue pattern I've
created from the muslin piece I draped on the dress form
I  tested the extended part of my dart, to make sure that there's
enough length. I did that by laying scrap tissue on top of my
freshly drawn pattern, adding the hemline on either side of the dart,
drawing in the dart, and pin-sewing it in place to make sure my
extension came out right. 
Some of the first things we are learning about in my draping class is adding darts. We start by drawing the straight of grain and the cross grains, and securing them to the dress form. Then we secure those grain lines to the dress form, and we're off.

We're learning not to think about making a dart, we capture a dart, as we smooth, and pin, the fabric into place.

I'm starting out using a class dress form, and looking excitedly forward to the day when I'll be draping on the Uniquely You Dress Form I made over the summer. The September Enchanted by Sewing Podcast will be all about my experiences to-date, creating and beginning to use two different types of dress forms. I wish I could publish the 'cast earlier, but I'm limited when it comes to disk space for new episodes (yes - I actually pay for podcast space!), so I can't publish before the end of the month.

Sunday, September 22, 2013

Jeans Sewing: Demystifying Jeans Drafting (Fit)

A classmate gave me permission to share
this photo of her first muslin being fitted
Notice that a piece of elastic has been pinned along
the waistline she stitched on her muslin. Part
of our fit job, was to make sure that line ended up
at her natural waistline. Do you see the pins at the
side seams? We added fabric beneath those zones.
We can tell the pants are fitting better in this zone now,
because the red lines of stitching that our classmate
basted at the high and low hip, are now
parallel to the floor.
In a recent posting I wrote about the class I'm taking in pants drafting. There, I'll be creating a pattern for jeans that will flatter my figure. (There are commercial jeans patterns that include extra instructions for fitting jeans patterns. )

The drafting process is pretty much new to me. I'd drafted two simple garments from books, but nothing anything along the lines of a pair of pants. Here's what I've learned so far.

First we created a pants block, taking personal measurements and making calculations as directed in the class textbook (*). Both the front and back block are contained within the same drawing, there are just different lines to follow. I found that somewhat heavy banner paper from an office supply store worked best for this. This block pattern does not include seam allowances.

Second I traced the pants block and created two tissue pattern pieces. Now I had separate front and back pieces. Before I cut out the pattern pieces I added 1 inch seam allowances. I measured out from my stitching/fit lines on the block with a clear ruler to add the straight seam allowances, and drew dotted lines where there were curves. I tried a Clover duel-wheel tool to do this - it looks like one of those carbon paper type wheels you might typically transfer pattern markings with - but I couldn't manage to get it to make two dark enough lines.

Third I pinned and cut out muslin pieces. I used a regular single tracing wheel and brightly colored tracing paper to mark every single measurement we'd used to create or draw on the block. These included: straight of grain, waist, high hip, low hip, crotch, thigh and calf. I also marked darts, the side seam, and bottom stitching lines. I used a 200 thread count muslin, which seems to be somewhat tighter than a typical muslin, it cost more too. I read somewhere that you cannot assume that higher thread count means it's better. You have to develop a feel for the good stuff.

I basted every single one of the stitching lines I'd marked with a stitch length of 5. I did use a locking stitch at the beginning and end of my stitching. I staystitched the waist line and bottom of the pants with a stitch length of 2.5. The staystitching keeps the muslin from stretching too much during fitting.

Fourth I sewed the muslin test garment, one leg at a time, then the crotch seam (putting one leg inside the other) for a smooth crotch seam. I left the center front seam open to the bottom of where the fly front zipper would be sewn - so I could put the test garment on !

Fifth I took my muslin test garment to class and worked with my fitting group to begin fitting the garment. This is the point where you look for all the things you often see in books about fit, things like folds in the wrong places, smiles and wrinkles. 

The most important thing I learned at this stage, was to keep the lines basted on the garment either parallel or perpendicular to the floor. Often the signal for a fit problem was that a fit line veered away from the straight.

• Where garments were too tight, we snipped along different basted lines and inserted pieces of fabric. You can see some of that in the illustration above.  
 Where garments were too loose we made tucks and folds.
• We adjusted the rise of some parts of our garment. Typical of this type of adjustment was snipping along the high hip mark, moving the waistline up, and pinning a piece of muslin underneath. Often these adjustments were curved.

Sixth Next, I'll be altering my tissue pieces to create a second pattern draft using the alterations on my muslin test garment, then it will be time to create a second muslin test garment.

Yes, it's a time consuming task. And it's exciting to learn more about how to create garments that truly fit.


Learning about pants drafting definitely helps keep me
Enchanted by Sewing!
~ ~ ~ 
We're using the book Building Patterns, The Architecture of Women's Clothing by Suzy Furrer.

Thursday, September 19, 2013

Jeans Sewing: Drafting my Jeans Block (Fit)


This is the pants block I drafted in class. The book mentioned below explains how to do this
Both the back and front of the pants are drawn on here
Next, I'll create the pattern tissues,
After which, I'll make a muslin fitting garment with all the fit lines
basted on in a bright color thread.
In next weeks class our teacher will help us to refine the fit.
Eventually this pattern will lead to my own jeans pattern!
Right now I'm working away on drafting a jeans muslin/toile . I'm very happy I chose to sew my jeans-style skirt first. It helped me to divide up the challenges of a new-to-me sewing project.

It definitely gave me a feel for the heavy denim I want to use, topstitching, and hardware. Plus.... A week after completing this poroject, I've worn the skirt five days, and gotten a kick out of it every time. I really feel ready to tackle those pants inspired by Mr. Levi. 

You can certainly fit a jeans pattern, by following instructions in a commercial jeans pattern. Several of the more popular patterns have special instructions just for doing this, and I made a collection of several of those patterns over the last year. However I'm lucky enough to be able to take Lynda Maynard's "Pants Drafting" class at Cañada College, so I'm taking advantage of that opportunity to get my jeans pattern created that way, and learn something about pattern drafting along the way.

We're using the book Building Patterns, The Architecture of Women's Clothing by Suzy Furrer. I'm kind of excited to look at the variety of garment blocks shown in the book! 

Tuesday, September 17, 2013

Dress Form Haiku

She's my fitting friend
My dress form - separate - but me 

:-)
Foam core, woman spirit
L.R. Shimer

Yes, I am working on the Enchanted by Sewing Podcast for the month of September tonight. 
How did you guess?

Monday, September 16, 2013

Jeans Sewing: Designing Pocket for Maximum Bling (Embellishment)

What makes the bling on this jeans pocket?
Some of it I can figure out, but other bits
I'm not so sure about.
Regular readers of this blog know that I've been working to build up my jeans-sewing skill set. I started out by sewing a jeans-style denim skirt (* ). I've been getting a kick out of wearing that skirt too. I wore it to classes three days in a row, and several other places since.

Now, I'm planning to move on to an actual pair of jeans. I'm taking a half-semester weekend class called "Pants Drafting" at Cañada, so I'm expecting to have a jeans pattern that fits me.

But what about the pockets? It's the pockets in the fancy-schmansy designer jeans that really appeal to me. I want cute ones. After making the skirt, I also decided that I should work on the pockets first, because by the time I got to the final stages of that garment, I just wanted to be finished and start  wearing it. If I have my pockets ready, you can bet I'd sew them on.

I'm starting to analyze the cute pockets I see. The one above certainly has me wondering.

I don't want to make an exact copy, I like creating my own designs for things. But I would like to know what kind of stitching and materials were used to create the pocket above.

1) What kind of white thread is that? Is it perl cotton? Is it regular topstitching thread? If I made my stitches that big, they'd get loose and fall out, so maybe I should hand sew something like this, and make some kind of locking stitches, despite the long size.

There seem to be at least two different types of stitching going on here, maybe three. 

2) Some of the bling is definitely small rivets, but others are little glass crystals with metal circles around them. I found some iron-on crystals  with no metal circles. I need to test them in the wash before I use them, by testing some on scrap denim - maybe in a little three sides-sewn bag I can turn inside out. On this youtube video, the creator told us, that you turn the garment with the bling on it inside out, and put it in a pillowcase before washing. I'd then probably hang it to dry. I already hang-to-dry most of the clothes I make.

3) I wonder if that big button really is just a regular button and not a jeans button at all However, it goes with the small crystals... I'll keep my eyes peeled for something along those lines.
~ ~ ~
* In "Jeans Sewing Skirting the Issue: Terminado! Done! I summarize my experiences sewing this skirt
http://meencantacoser.blogspot.com/2013/09/jeans-sewing-skirting-issue.html

DIY, Sparkle Your Old Jeans With Rhinestones - Youtube
http://www.youtube.com/watch?v=BJZELQ97fBg

This seems like the kind of place where you get sparkly bits. I'm still unclear if gluing sparkles on, works in the wash. Also this site refers to having sew-on rhinestones, but I'm not clear which products those are. But they have a phone number!
http://www.rhinestoneshop.com

This place has sew-on rhinestones, among other products
These two links are for their round shapes. You can go higher up in their product hierarchy and find other shapes, colors, and materials
http://www.dreamtimecreations.com/category/730/rhinestones-sew-on/sew-on-round-rhinestones/crystallized-swarovski-elements-3202-round-rhinestones/

http://www.dreamtimecreations.com/category/714/rhinestones-sew-on/sew-on-round-rhinestones/

How To Crystallize Your Seven Jeans & Other Denim
http://www.ebay.com/gds/How-To-Crystallize-Your-Seven-Jeans-amp-Other-Denim-/10000000006924991/g.html

Wash and Care for Embellished Clothing
http://www.ebay.com/gds/RHINESTONES-Wash-and-Care-for-embellished-clothing-/10000000001654801/g.html

Friday, September 13, 2013

Jeans Sewing:: Jeans'ing up for my own Blue Jeans Project

Now that I've completed my jeans-style heavy denim skirt I really feel ready to tackle a pair of traditional blue jean pants inspired by Mr. Levi and the California Gold Rush! 

What appears to be involved in creating my own jeans?

Getting the fit right 

The fit for my jeans'y-style skirt had it's challenges. For example the heavy denim hung from my body differently than the heavy twill I used to make a muslin.  But this and other issues, though time consuming, weren't overwhelming. They mostly involved getting the side seams and waistband curved right to support the weight of the fabric, a lot of trying on, pining, basting, repinning and rebasting.....


Getting the fit right on a pair of traditional jeans will be a bigger challenge. So I made the skirt, to get started with just a few jeans'y techniques before beginning jeans.

Learning or adapting sewing techniques that are different from those I use on other types of garments. 


The heavy-weight no-Lycra denim (11.5 oz.) I'm choosing for my first par of jeans, and jeans-style skirt, not only requires a jeans needle, it also feeds  through my machine differently. I've found I need to alter tension too, set the stitch length longer on both regular and topstitching, and consider my choice of thread carefully for each part of the garment. 

I'm also considering buying a walking or jeans foot.

Embellishment and Bling! 


I love the variety of stitching and hard embellishment I see on commercial jeans, particularly on the pockets. I'm on the hunt to try out different types of add-ons, and testing out both the application techniques and the washing process to keep my new jeans embellishment hanging in there. (I 'm working on a post that will be up in a few days, in regards to getting going with embellishment/bling).

Resources

Locating and making the best use of a variety of resources - classes, books, on and off-web articles. Frankly, it's easy to be distracted by too much information, and yet there's a lot of good stuff out there. I haven't found any books specifically on jeans sewing, and I'd like to have one I could just pick up for quick reference.


~ ~ ~
Jeans Sewing - Skirting the Issue - 
Jeans-Style Skirt Terminado! / Done!
http://meencantacoser.blogspot.com/2013/09/jeans-sewing-skirting-issue.html?showComment=1378743530744#c3428728796407559024

Pinterest is a great way to both search for and save off photos and resources for jeans sewing (as well as other sewing) topics

http://www.pinterest.com/lrshimer/0-sewing-jeans-inspiration/

http://www.pinterest.com/lrshimer/0sewing-jeans-techniques/

Illustration Credit for Free Download Image
© Missjelena | Dreamstime Stock Photos &Stock Free Images

Monday, September 9, 2013

Matters Millinery - Making My Own Hats

I created this fabric covered buckram hat
from black silk dupioni in Wayne Wichern's class.
The pink silk band and bow makes  a nice looking trim,
but so far I've only worn it plain.
Have you ever read the fascinating book The Mismeasure of Man by Stephen Jay Gould? The author presents stories about the historical study of phrenology (the Victorian idea of a noble brow is a typical example of phrenology). One aspect of phrenology was that researchers tried to prove that head size was linked to mental superiority.

It didn't pan out.

I'd love to think that my larger than normal head means I have an extra measure of brains. But according to Gould, that's not the case. About the only thing my 24.5 inch head size does for me is make it impossible to find a woman's hat that fits. Gals are supposed to have 22.5 inch head circumferences. Hence the Minnie Mouse look whenever I try on a cute hat. Over the counter hats perch up on top of my curls, making me a perfect cartoon model.

But of course, being a sewist, I can make my own hats and leave Minnie's at Disneyland.
~ ~ ~
You may have read a posting I wrote last fall called "Chewing a Bun with Tuppence" (http://meencantacoser.blogspot.com/2012/06/caps-off-chewing-bun-with-tuppence.html )  about the first fabric cap I made. I also wrote about another cap I made, using the same pattern a month or so later. I wear one or the other of these caps every single day. They protect my skin better than a regular baseball cap and are a lot cuter too! 

But I wanted to know how to make more than caps. I wanted to be able to make a structured hat.


I like my black silk duping hat plain
I took Wayne Wichern's Millinery class at Cañada College last spring. It was a lovely three-session, weekend class, perfect for full-time workers who want to squeeze in some creative time with recreational and artistic sewing. We had a lot of fun chatting while we stitched away - the majority of this kind of sewing is by hand. By the way, Wayne is not only a fun person, he's also a great teacher.


Most of our time in class was devoted to making fabric-covered buckram hats. I made a simple style in black silk dupioni. I played around with trims for this hat, but mostly I like it plain. It will be easy enough to add trims anytime in the future. I bought the fabric at Thai Silks in Los Altos. If you stop by their shop, ask about special discounts for fashion students and Cañada fashion students. It's a really nice store. They've been there a long time and have a good reputation in the area. They sell online too.

We also learned about the process of making straw hats. We didn't have the resources and room to block our own, but we gave Wayne our measurements, choose colors and styles and he blocked them for us.  We did the really hard part - we trimmed them with ribbons, lace and anything else we could come up with :-) So now I have a straw hat that fits, in addition to my black silk hat!

In addition we made fascinators or cocktail hats. I gave mine to Holly the Dolly to use as a regular doll's hat. I'll put up a picture of that in a future posting.
~ ~ ~
We loved showing off our creations at the reunion
in Wayne Wichern's Burlingame studio
In late summer Wayne invited us to his Burlingame studio for a follow-up party where we showed off our creations. Wayne teaches a variety of workshops in his studio. If you live in the area, or might come for a visit, I can promise you'll have a wonderful time in this sociable setting. Warning! These popular workshops fill quickly.
~ ~ ~

Whenever I see an appealing hat, cocktail hat or fascinator on the web, I pin it to http://www.pinterest.com/lrshimer/hats-and-other-millinary/

Wayne Wichern Millinery http://www.waynewichernmillinery.com

Wayne's Workshop Schedule - Burlingame CA (San Mateo County, San Francisco Bay Area) Follow the link to classes for the current year at http://www.waynewichernmillinery.com


Thai Silks
252 State Street, Lost Altos, CA
http://www.thaisilks.com


Friday, September 6, 2013

Draping With a New Retro Friend

Eventually I'll be draping on my own
Uniquely You dress form, but for the first few assignments
we use the school's forms.
I fee very lucky to be matched up with this lovely
lady, created in 1965.
This year I created and began to use both a duct tape, and Uniquely You dress form. These new fitting companions have helped me to fit patterns, muslins, and garments.

I learned so much getting started with these dress forms, that my September Enchanted by Sewing Podcast show, will be about what I've learned creating and using these dress forms. 

Still, there's more to come.

This fall I'm taking the Draping class at Cañada college. There I'll be learning the art of draping, and I can see that it truly is an art. I'm just beginning to develop my eye, use my fingers to smooth the fabric as I drape, and starting to learn where the material is telling those fingers it should go. It's pretty exciting to think that by the end of the semester, I should know enough to draft some of my own patterns - patterns that are made just for me, by me!

We're using the Connie Crawford Art of Draping book. I've listened several times to the Sew Forth Now podcast, where Lori interviewed Ms. Crawford (Sew Forth Now #35: The Industry) and enjoyed the story of how this very experienced woman came to create this book.

The dress form I'm currently using in class (I'll be using my own Uniquely You dress form later on in the semester) is a 1965 model. Just think how many students have learned to drape and sew with her! I compared her with some of the newer forms, and noticed that she is, as our teacher says "perkier". That is, her bust is more enhanced than other more modern dress forms. Yup, shapely chests were popular in the middle of that decade.


I'm so pleased I've been teamed with this retro 60's gal. 
It's sewing companions and classes like this that keep me....
Enchanted by Sewing
* * *
You can find Lori's interview with Connie Crawford on the Sew Forth Now Podcast  

Tuesday, September 3, 2013

Jeans Sewing: Skirting the Issue - Terminado!/Done!


¡Que Bueno!
Huzzah! 
Worth the Work
I created this jeans-style denim skirt
in order to work
on jeans sewing skills
I do feel more confident about approaching my
first jeans project.
I'm also really looking forward to wearing this
great new addition to my wardrobe!
On the final evening of Labor Day weekend,  I finished the jeans-style denim skirt (  Palmer and Pletsch M6361 )  I've been blogging about over the last month. (*) The task was acquiring the tenor of a forever-more sewing project. Those are deadly! Sometimes I get so tired of long-term sewing projects, that they get popped into an in-process bin and you know what happens next, right? Often, by the time I return to the bin it's even more intimidating. Or maybe it just looks silly or dated. I didn't want to have my skirt become a UFO (What Lori often referred to as UnFinished Objects in the Sew Forth Now Podcast). So I kept at it, even when other sewing projects sung out, and they definitely did! You can just bet I never let myself take that jeans needle out of my machine.


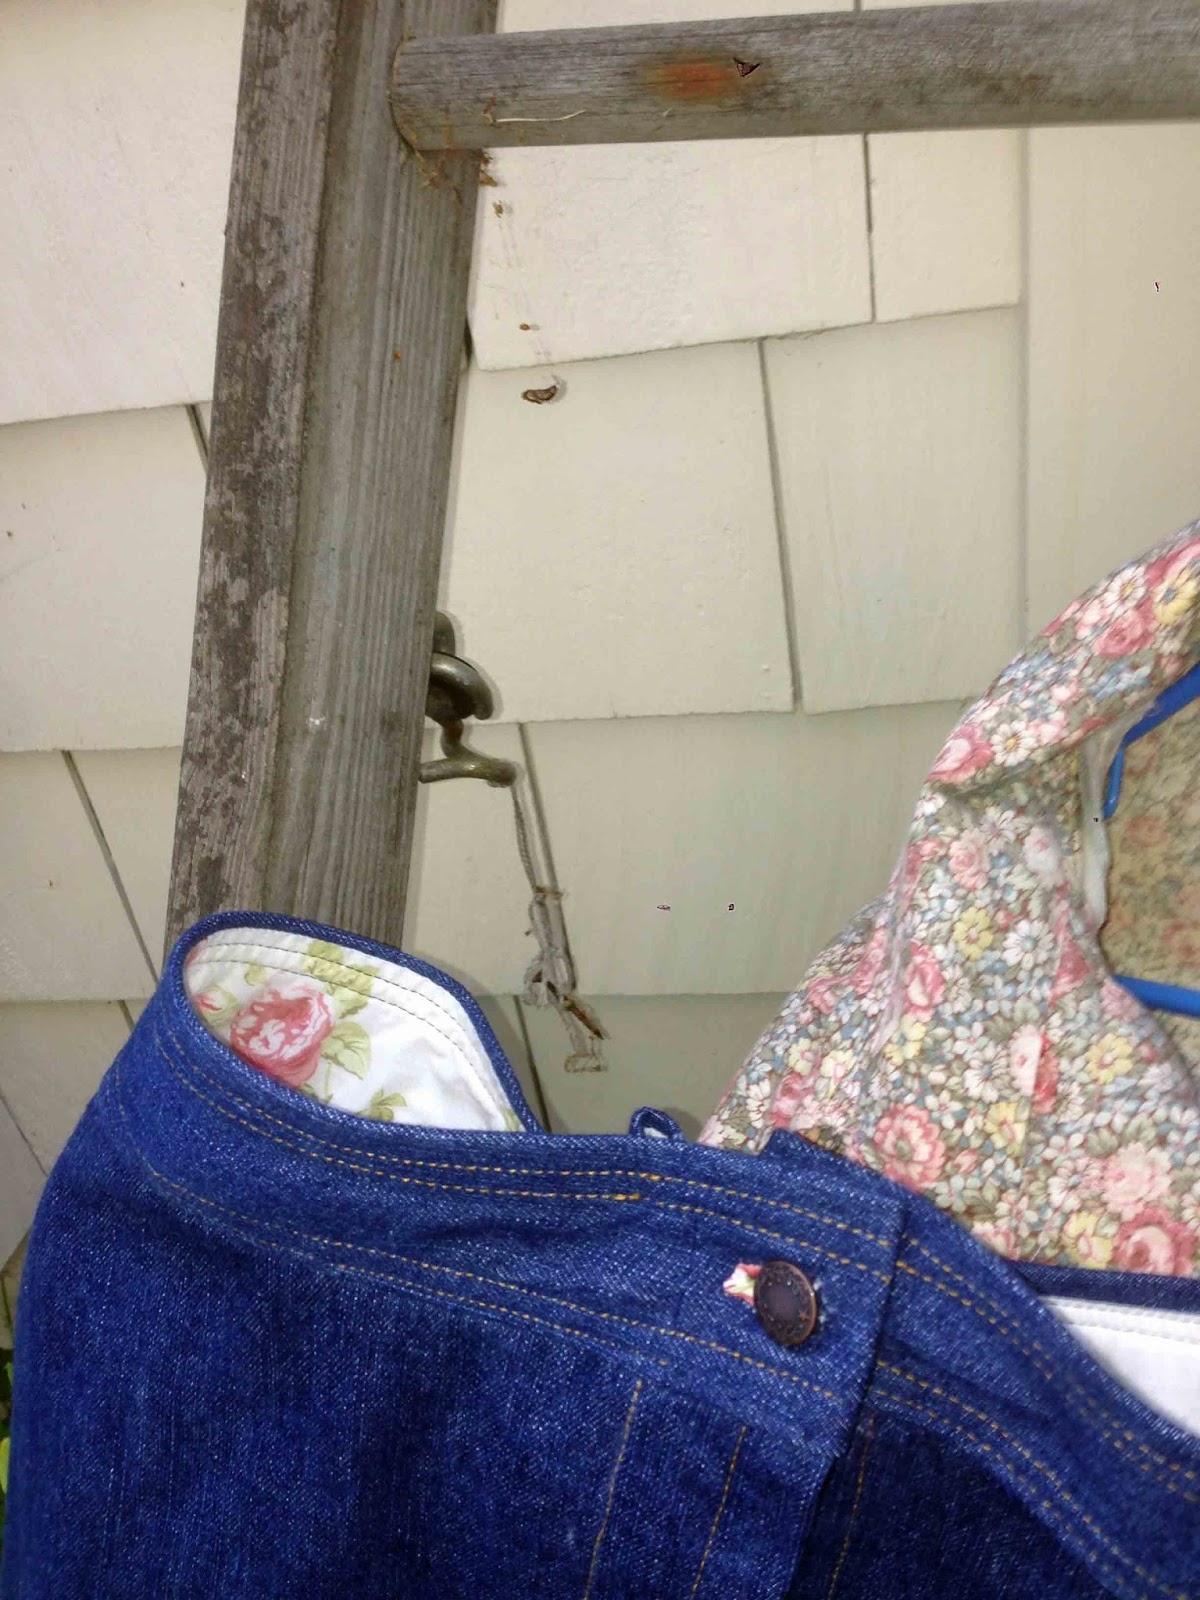
My skirt looks so official
with it's jeans button
I lined the waistband with a light weight
cotton batiste print
I interfaced it with a medium weight
fusible. That was a big decision and
I'm glad I did interface it now.
I really wanted to shelve the skirt many times, because sewing that heavy weight 11-oz denim (like Levis 501's ), figuring out where to find and apply rivets, jeans button, when to do the topstitching (I wanted complete lines of stitching because it sure shows when it's not), not to mention addressing the faux flat-felled seams, was just a lot of unfamiliar-to-me work and techniques. I never managed to get the real kind of flat-felled seams to to roll around and stitch straight, though I'm good with the faux look for now. I blogged about that a couple of weeks back.

Oh and don't get me started on the curved waistband! I think the topstitching and waistband seam and top of waistband finally go straight across on either side. I sure checked those (and pinned, re-pinned, hand and machine basted and re-basted) to get those areas crisp and clean. I did have to add a snap on the inside of the fly. I think  that was because I over-fitted the garment a little and the fly band gaped a little. I over-fitted because otherwise the a-line skirt didn't 'a' out. At least for me, that heavy denim is not at all easy to work with. Maybe it's simply different than what I'm used to sewing with.

I'm really proud of myself for doing something hard and new-to-me. When I get ready to sew my jeans project for the Pants Drafting class I'm currently taking at Cañada, I'll have a head start on some of those techniques. I'm sure they won't be perfect, but they will be lots better than if I hadn't sewn this skirt first.

Another thing I'm glad I thought to do. I sewed several fly-front zippers (FFZ) in trouser and shorts project over the last year or so. So, although I still don't love doing a FFZ, they don't overwhelm me. And that was important when learning to work with heavy fabric, different threads and needle-type, new-to-me techniques and hardware.

I didn't make the cute pockets or belt loops I meant to do (I know how to use a double needle to make those belt loops professional too), cuz I was just done with itI'm planning to prep the pockets and belt loops for my jeans project first , because those are really the fun part. In this case I'd had enough and just wanted to move on with life. That's the way it goes with me, when I'm learning something new. In software application development (and probably other fields as well, I imagine), we called that MVP - minimal viable product.

Sometimes I just want to be finished/terminado!

Now I'm planning to do some fun and familiar sewing for a bit. I have another one of my favorite shirts to finish up. I last blogged about it as Kit 1 (here's a link). I'm now calling it "Lilacs and Liberty". It's a romantic fem style - lilac Robert Kaufman gingham with accents in a darker purple and green Liberty of London Tana Lawn print, (which I recently identified as the Liberty print "Mauverina") and sparkly'ish buttons. Bet it will look cute with the denim skirt too....

The challenge of acquiring new sewing skills, and the pleasure of returning to comfortable and favorite sewing projects, keeps me....
Enchanted by Sewing!
~ ~ ~
* All the posts about this project, begin with the phrase "Jeans Sewing, Skirting the Issue"

1) I began writing about the project, fitting and pattern selection on August 9'th http://meencantacoser.blogspot.com/2013/08/jeans-sewing-skirting-issue.html

2) When Zippers Fly

3) Resources

4) WAISTing Time

5) Absolutely Riveting