I love to use Pinterest as my virtual bulletin board. As you might guess many of my pins are sewing related. Click here to see what fun stuff I've found and pinned to different sewing boards.
Showing posts with label easy. Show all posts

Monday, May 15, 2017

Pattern Work: Altering a Patch Pocket for Sukey

I'll trim the top of the actual pocket, so those stitches won't show. How bout that little tuck? I like the 3-d effect it gives the pocket, and it makes a little more inside space as well.

I like learning to alter major aspects of patterns, but nothing beats quick and easy pattern changes.Changing a patch pocket's shape and depth is a very straightforward alteration. No fitting required! 

Altering a patch pocket is great for first timers, and easy timers too. You can play with pockets on aprons, shirts, jackets, or .... ?

Here I traced the rectangular pocket pattern.

Entonces/Then I rounded the bottom corner.

I graded the pocket out a little above the point where the rounded corner comes in, so that I could take a little 3-d tuck in the middle of the pocket.
~ ~ ~
I'm making this pocket for a shirt I call 'Sukey', in honor of the bird and berries fabric's designer.

Friday, December 23, 2016

EnchBySew-50: Tote’in for the Festive Season - Holiday Postcard

Click on this link in iTunes   to download the 50'th episode of the Enchanted by Sewing Audio Podcast,  produced in December of 2016.

Or listen directly on the web by clicking on http://traffic.libsyn.com/enchantedbysewing/FINALHolidayBagLaurelShimer.mp3

This December I’ve put more time into sewing, than blogging about sewing. So though I’ve actually sewn five items – I’ve only blogged about two of them - so far. I’m hoping I'll find some time to post about what I’ve made, next week, because I really enjoy having a sewing journal.

I love looking back through my blog and remembering – oh that’s right Back in December of 2016 I made
* Queen Cordelia – a printed courderoy princess seamed shirt with ¾ len sleeves, fun buttons and some collar embellishment
* A pair of front-pleated denim trousers
* A  night shirt for my husband,
* A simple flannel baby blanket
* A flat bottomed tote bag

This Month’s Show is a holiday postcard, focusing on the basic technicos/techniques of sewing a flat-bottomed bag that can serve the combined purpose of being both a tote and gift bag.

Five reasons to know how to sew a tote

1 - Save money or just  be Green: I don’t know about where you live, but around here, we get chargd 10 cents for store bags -it’s really worth remembering your tote bag!

2) Be Arty as well as green and clean up your sewing resource inventory : A tote bag is a handy way to use up fabric scraps and remnents. I serves as a  vehicle for trying out favorite or new embellishment techniques like embroidery, craft button designs, beading, quilting or a collage made of scraps of  lace and trims

 3) A tote bag is a basic sewing project . It’s  a good  way to stare learning to sew, or get back into sewing . It doesn’t take very long and you can practice basic seaming and other sewing techniques.

4) Unlike garment sewing - A tote bag does not require fitting!

5) A tote bag makes a great packable and reusable gift. If you have the resources on hand - You could even decide to make one an hour or so before it’s needed!

I blogged about, a tote I made earlier this month for visitng family members as a holiday gift. That posting includes four photos intended to show basic steps of tote bag sewing.

BTW I included a pound and a half box of biscotti from a wonderful local Italian deli – Diandras in San Mateo at Crystal Springs shopping center . If they ate , or shared, all the cookies during the conference they came for, they could use the tote to carry home their dirty laundry. Back home They can use it for grocery shopping or They can pass it on to somebody else as a gift bag. The bag itself was small and light weight , so it wasn’t going to make trouble when it came to taking their bags back on the airplane.


Technicos/Techniques: How to sew a flat-bottomed tote

Photo Collage and brief summary of basic steps for sewing the tote http://meencantacoser.blogspot.com/2016/12/green-sewing-tote-bag-for-reusable.html

Tuesday, December 6, 2016

Green Sewing: Tote Bag for Reusable Grocery or Gift Bag


I figure it's green sewing because the fabric was a small remnant I had in my inventory for three or four years.

Pinking shears on all the edges makes for easy seam finishing.

1) After seaming side and bottom seams I cut out a 1 inch by 1 inch square from both the left and right hand corners
2) Pulled across to make a flat box corner and seamed
3)Used a decorative blanket-type stitch to add strength to the corner/box seam
4) I used this same stitching on the top edge of the bag

Wide black gros-grain ribbon (glad to find in my trim inventory) made handles. I stitched an 'X' shape to hold those in place.


The bag is all ready to hold a present of biscotti from Diandras Bakery in San Mateo. Diandra's was started by a gentleman who came over after WWII on a boat from Italy. I know that because a wonderful Italian teacher I had one summer came over on the same boat! Diandras makes great baked goods. The giftees might then use the bag as a grocery tote, a dog toy bag, a dirty clothes bag or ????

Tuesday, December 30, 2014

Scraps: Scrunchies or Chou Chous? Green Sewing for the New Year

Two Completed Chou Chous
(along with a fabric covered book) I made for gifts
~ ~ ~ 
Web Resources 
Enchanted by Sewing Show Notes and Links to Shows http://www.enchantedbysewing.blogspot.com/2014/12/ench-by-sew-027-festive-holiday-tees.html

Audio-Only Link http://ec.libsyn.com/p/7/1/3/713e354889f7b167/FINALcastFestiveTeaAndTeesdec2014.mp3?d13a76d516d9dec20c3d276ce028ed5089ab1ce3dae902ea1d06c98e3ed7cf5d5260&c_id=8063812

What is a Chou-Chou or a Scrunchie? http://en.wikipedia.org/wiki/Scrunchie

Although I made chou-chous for holiday gifts, they are a perfect cleanup-for-the-New-Year or anytime, sewing cleanup/recycling project. You can't get more green than using up scraps of fabric that are too pretty to toss. You can also use the ends of stained or recycled clothing. You can even repurpose old worn elastic!


Here's the idea in picture form, to help you follow along with the Technicos segment of that show.


I can never toss really pretty scraps
But at some point, I need to use them!

I measure out 10 inches of 1/4 inch elastic

I fold a 20 (or slightly longer) tube of scrap fabric
This one isn't perfectly straight and it has one edge hemmed  as a result
of a long-ago project trim. No problem

I pieced on one extra scrap, to make the tube about the
right width
An extra seam at an odd place isn't a problem
when you are scrunching up the fabric anyway

 I cut a piece of string longer than the length of the tube

And lay it inside the tube, along the fold line

Stitch down one side of the tube and across just ONE open end
Make sure not to catch the string when you sew the long side
But DO catch it when you sew across the open end

At this point, I chose not to trim along the seam line,
to give a sausage-like look to the finished chou-chou

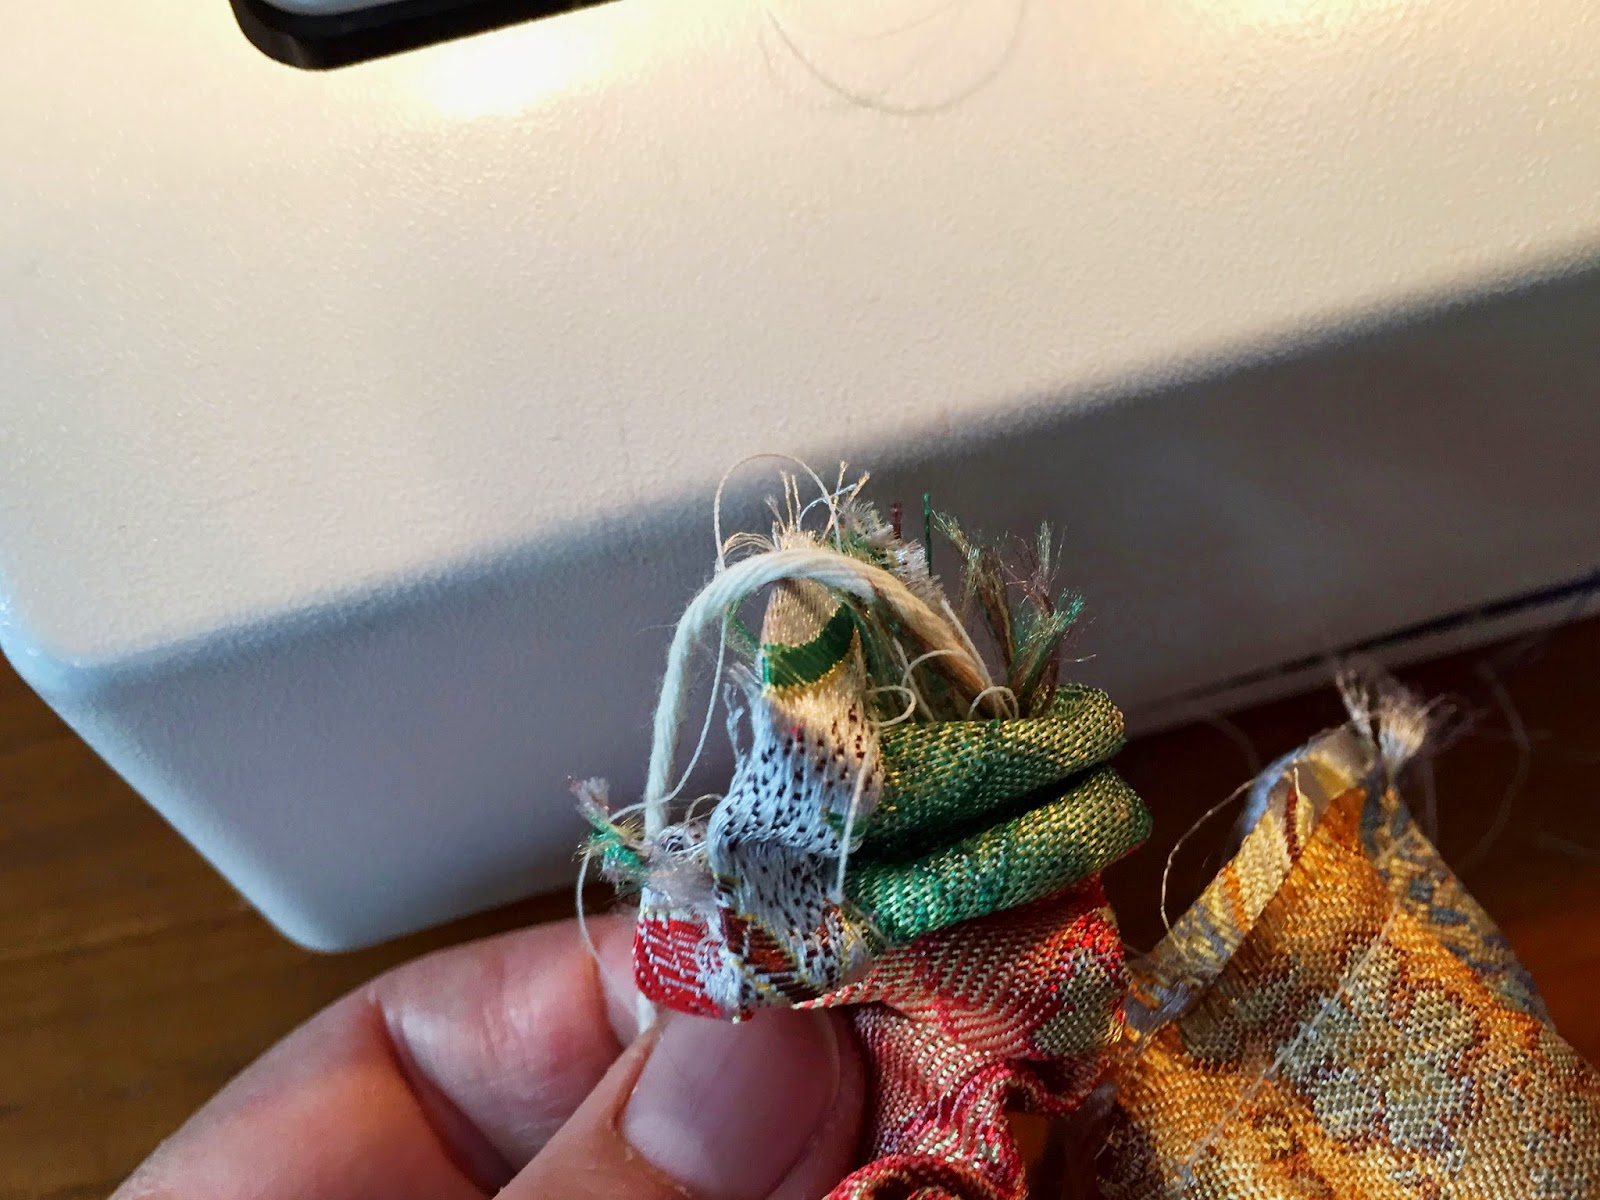
Push the sewn across end down into the tube


Pull the string end through the tube, so the outside pulls through
Note that this is a very thick, fabric like chou-chou
That's because I chose not to trim the seam after I sewed it,
to give that sausage-like appearance.
Remember, the chou-chou fabric tube should be about twice as long as the elastic,
so that the fabric scrunches up
You also want enough elastic to be able to double the band around the hair
Otherwise, it will slide off.

Open the sewn-across end, by snipping off the string
Now you have two open ends
Add a safety pin to your 10" of elastic
Pull the elastic through your tube
I set the zig-zab stitch on my machine
I caught up/secured my elastic end on both ends
with a zig-zag stitch.
Be careful not to lose the elastic ends  down either end of the tube, at this point!
Then I sewed the two secured ends together
When I doubled the finishing off seam back to get a neater finish
I broke my needle
So after that, I wrapped my second, neatening seam with a hand stitch
That takes less time than changing my machine needle!


Saturday, January 4, 2014

Technicos: Strip Strap Sewing With Ease (Spaghetti Straps - No Tube Turner Tool)


I have made spaghetti straps or fabric tubes using a standard tube turner tool. But I much prefer this technique. I may have learned about it originally, in a reader letter in Threads magazine, but I'm not sure. I just know I've made a lot of fabric tubes this way with very little fuss. However I don't hear about other sewists making them this way. 

Maybe you'll like doing them this way like I do. And you will never have to figure out where you last put your tube turner again:-)


Resources
Fabric - A strip somewhat longer than you actually need. It should be more than twice as wide as the tube/spaghetti strap you want. In fact, if X is the width of the desired strap and S is the amount of seam allowance you are going to use it should be 2X+S wide. 

For example - If I want a tube 1/2 and inch wide and I plan to sew a 5/8 inch seam allowance, then my fabric strip should be 1 and 5/8 inches wide, because (2 x 1/2) + 5/8 = 1 5/8

If I need a total of oh say, 72 inches of tubing, I would probably add another 5 inches just to be on the safe side. (That's very conservative). Because I will be cutting away some of the end of my tube. 

String or an old piece of bias tape, or cord or other stringy thing that won't break apart easily . I keep a roll of packaging string around, but even jute string works. Just make sure the string/cord doesn't get sewn over as you sew along the long edge.

Cut your string/cord longer than your fabric piece. Add five inches total to be really safe.

1) With RIGHT SIDES TOGETHER- Press the length of fabric  you are making into a tube or spaghetti strap, in half down the middle, going the long way.
2) Lay the string/cord down the middle, right up
against the fold and away from the raw edge.
Leave a tail of string/cord sticking out
on both ends
of your fabric.


3) Sew back and forth over one end of the folded piece
securing the string/cord really well. You are going to be
cutting away this end later on, so you don't care
what it looks like. Just make sure the cord can't come out down here.
Also, make sure you leave a little tail end of the cord
hanging out beyond this stitching line to be
absolutely sure the string/cord doesn't pull away.


4) Now, keeping the string/cord on the fold side,
 sew along the long end of your tube.
Don't catch the cord in your stitches!

Leave the second short end open when you finish this long line of stitching.

Make sure you have another tail end sticking out of the open end of your tube! That's the second short end, the one opposite the one you secured so well back in step 3.

5) Trim along in the seam allowance, close to your stitching line.
You don't want fabric in the way of next step.


6) Start pulling on the end of the string/cord tail that's sticking out of your open end.
As you pull the fabric will ruffle up.
That's good!


Push those ruffles back toward the secured end as you keep pulling. Just work them along. They'll be a little hesitant, but you be the boss!

At a certain point you will be able to push the first bit of ruffled up fabric
up and over the original
short end you secured.

7) Oh look what's coming through!
There is the nice little fabric tube you've been looking for.
The seam allowance is on the inside!!!!
Keep pulling until it's all out.

When you're done you'll have a long piece of string
hanging off the secured end. Cut that secured end off now.
You might be able to reuse the string/cord for another tube,
if that tube is a little shorter than this one :-)