I love to use Pinterest as my virtual bulletin board. As you might guess many of my pins are sewing related. Click here to see what fun stuff I've found and pinned to different sewing boards.
Showing posts with label elastic waist. Show all posts

Saturday, July 2, 2016

Summer Essentials: Cropped Pants

Are these Summer Essentials Exciting Sewing? 
No!
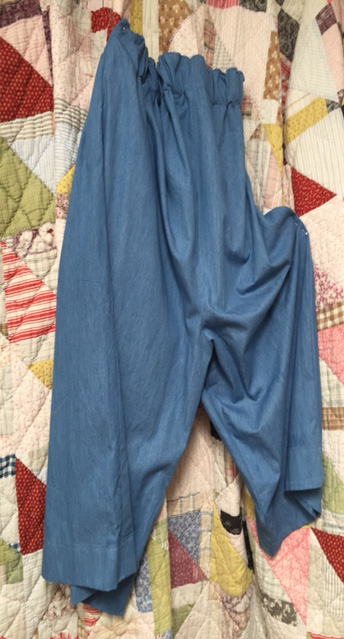
Practical though. I've worn out a number of pairs of these full-leggedelastic waist, cropped pants over the last ten years or so. This version is in light-weight denim. They work great with my princess-seamed Western Winds shirt. I'm at work on Pinto, another version of this shirt, and hope to make a few more of these sleeveless, princess-seamed shirts this summer. These pants, as well as the basic denim shorts I made last summer, will see a lot of summer wardrobe wear.


M2791 is out of print But there are many used versions available when you search the web

Saturday, August 23, 2014

Terminado! Wardrobe Builder: Midnight Sky Black Denim Skirt

Nothing improves my wardrobe so much
as another good basic denim skirt
In my July Enchanted by Sewing Podcast, I mentioned several garments I was considering sewing next. I got that cap done (in fact technical details for the cap will be featured in this month's podcast) and also recently finished this great basic black denim skirt. I finished it early this week and have worn it three days since then. I like it for walking (it looks cute with blue or black tennis shoes:-), running errands (with my red or sage green sandals), and working at home. 

I didn't used to wear skirts much in my mostly casual life, but since I made my Summer Skies blue denim skirt with this same simple elastic waist, size vented pattern in June, I've found myself reaching for it all the time. I don't know if it's the low-key nature of the denim or whether I'm simply changing my personal style to include more skirt wearing.

Simple lines and styles, like this skirtare starting to appeal to me more than they have in the past. I think that's because I'm more in control of the pattern work now, focusing on what flatters my figure and how I want fabric to hang in a garment. I draped this straightforward skirt pattern myself. 

While I worked on this skirt I was also working on two other sewing projects.
1) Altering a shirt dress pattern (I've been using my dress form,  draping skills, and a length of muslin to create a flattering fit)
2) Another simple cotton print sleeveless summer blouse - close to being done! For that I've been working on making more changes to the pattern I used, for the semi-fitted sleeveless blouse pattern I developed* last month, and created in pink and white striped seersucker. I called that blouse "Amaryllis" and  talked about  it in the July Enchanted by Sewing Podcast. I'm still trying to decide on a name for this new blouse. It's got a print of berries on a text background, so It's the Berries, seems like an obvious name. But it doesn't really grab me. 

Working from patterns I'm really familiar with and continue to alter over time to suit my needs, figure, and personal style 
is the kind of thing that keeps me . . .
Enchanted by Sewing
~ ~ ~
Web Resources

Enchanted by Sewing Podcast Show Notes: http://EnchantedbySewing.blogspot.com

Inspired by Amy Adams: Creating the Perfect Shirt Dress for Me http://www.meencantacoser.blogspot.com/2014/08/inspired-by-amy-adams-creating-perfect.html

Terminado! Amaryllis Blouse: http://www.meencantacoser.blogspot.com/2014/07/amaryllis-my-new-semi-fitted-blouse.html

Termininado - Sewing a Simple Denim Skirt (My Summer Skies Blue Denim Skirt) http://www.meencantacoser.blogspot.com/2014/06/terminado-sewing-simple-denim-skirt-is.html

* I didn't drape that sleeveless blouse pattern from scratch. It started out as a commercial shirt pattern and has undergone many transformations since.

Wednesday, November 28, 2012

My Newest Greenie Stick 'Em Pants

     
A Recent Sewing Creation
Photoshop Filter "PaintDaubs"
     When I was a kid I had a pair of green pants this same color, that my mother had sewn for me. The went well with a little green striped tee shirt I had.

      I well remember an argument with my father about these pants. He wanted me to wear this ensemble, which he termed my "greenie stick 'em outfit" when he was taking me some place and I just downright refused. Why, I wonder now? I'm pretty sure I liked the outfit. Likely, I was just being ornery.  I bet you anything I outgrew them soon after. Wonder if some other little girl inherited them. Did she cheese off her parents with her own ideas about clothing choices as well?.....

      I'm still partial to green pants, though I noticed when taking an informal poll at the shopping center that no other women were wearing colored pants.  Sometimes I have to nerve myself up to wear what I like, and ignore the prevailing mode. I blogged about that a few days back in What the Arty Romantic Wears on Black Friday, but I'm still mulling it over.

I finished sewing these elastic waist, corduroy pants about two weeks ago and I think I've worn them five or six times since. We've just hit slightly cooler, and occasionally rainy, weather here in our temperate climate. These and my new print cord pants have been just the thing for the current spot on the thermometer. I've put off getting out my light weight wool pants in favor of these comfortable, cotton charmers. 

My experience with this thin corduroy is that it doesn't last much longer than one, or maybe two, seasons. But it's still worthwhile sewing pants that feel so good and work well walking, biking or hiking. They'd be good for travel too. 

These are another shot at an old favorite tried and true pattern, MCCalls 2791. As I mentioned in my November Podcast, "The Lady Wears Trousers", this pattern is out of print. But it's still available through many resellers on the web inexpensively.

created thread belt loops in these pants as well as the linen ones I made several weeks back. I'm loving those loops. Links to Suzanne Beaubien's youtube tutorial that shows you how to create these loops in the show notes for the November Podcast.


Wednesday, November 7, 2012

The Lady Wears Trousers: Elastic Waist Pants Checklist


Abbreviations
Right Sides (RS)
Wrong Sides (WS)

Notes:
 a. Mark each leg front, front, back, back. I like to pin a piece of posit tape marked 'F' or 'B' on each leg. It sounds simple, but those legs can get confusing
b. Use Continuous Stitching(CS) whenever possible. It helps keep track of all four legs as well as the usual benefits of C.S.
 Checklist
1.  Sew Inseam pockets
2.  Front legs to back legs, Right Sides (RSs) together.
3.  Create two separate legs
1.           Sew both side seams of each leg separately (continuous stitching is a good idea)
2.           Sew both inseams of each leg separately
(continuous stitching is a good idea)

4.   With one leg RS out and the other leg WS out, slip the RS out leg INSIDE the WS out leg.
5.   Stitch entire crotch seam
6.  Press
7.  Put pants Rs out
8.  Waistband
1.           Put pants on and tie a piece of elastic or string around waist at natural waistline. Good time to use actual elastic waistbanding too. Try 4-5 inches less than actual waist and see how everything looks in the mirror.
2.            Mark natural waistline using chalk . I also had success folding the ws over the top of the wide elastic waistbanding (not the way it actually will go on!),  safety pinning it front and back on myself, then pressing in crease after I took them off, and marking that crease (on the inside).
9.  Check, is there sufficient casing depth for elastic width used? Add extra strip along casing edge if needed. Twill tape or self fabric
10.      Press actual casing in place
11.       Slip elastic through, safety pin and  eyeball fit.
12.      Measure actual waistband elastic Try 4 inches less than actual because of stitching through center will stretch it out
13.      Sew casing fold, leaving elastic gap
14.      Pull elastic through Safety. Pin well and check fit
15.      When fit ok safety pin or baste through long center
16.      Check fit again
17.      Sew edges of elastic together butted together or lapped over, using zig zag stitch.
18.      Sew along center of elastic all around waist to give doubled look
19.      Hem
1.           Fold up, press and pin. Try on with clogs to eyeball hem.
2.           Turn in quarter inch fold at raw edge and sew that or finish the edge if not turning under. On linen pants I didnt turn under. On courderoy pants I sewed on seam tape. Both avoided a bulky look
3.           Hand stitch hem in place for linen pants . Fused stitchwitchery between the two WS’s on the courderoy pants.


* I take sewing classes in the CaƱada College Fashion Department, Redwood City, California

Saturday, November 3, 2012

The Lady Wears Trousers: Inseam Pocket Checklist


Inseam Pockets
Elastic Waist Pants Under Construction
The long strip is the Stay for the garment front
The pocket and stay are cut from "Drill"
The Leash running from the top of the Drill pocket
up into the waistband is cut from Silk Organza - sturdy yet light

* 1. Notes 
* 2. Checklist

1. Notes
1.   Pocket bags can be cut any shape that works for person wearing. Make sure they are cut deep enough!
2.   Remember to add extension to pant front and back when CUTTING OUT pattern
3.   Adding extension to front and back of pants (skirt) helps match up where pocket bag fits in better (for me) than notches
4.   Use continuous stitching wherever possible
5.   Remember to mark F and B and Right Sides (RS) of all four pieces
6.   Cut pocket leash from Silk Organza for front of pocket only. This will tie into the waistband, will not add bulk and keep pocket in place
7.   This is also an excellent time to stay the fork of the crotch (fronts only)

2. Inseam pocket checklist

1.  Cut stays from selvage edge or folded muslin strip at least an extra inch above and below
1.           Make sure opening fits hand At least six inches wide

2.  Reinforce front and backs along pocket opening an inch or two above and below hand opening
1.           Sew Stay openings to fronts and backs
3.  Press stays
4.  Pin all four pocket bags carefully
1.           Eyeball check both fronts to backs, make sure it all seems to be laying correctly for the garment
2.           Sew all four pocket bags to fronts and backs. Use a 3/8 Seam Allowances (SA)
5.  Press SA
1.           Towards pockets
2.           With Pockets facing out
3.           Press each SA open
6.  Grade front SAs only
7.  FiNISH seam edges
8.  Hand baste front pocket bags to back along across opening
9.  Sew side seams above and below
10.      Reinforce stressnpoints
11.      Press step three
12.      Sew pocket bags
13.      Deal with extended leash here. BASTE to waistline marking
14.      Catch front seam in stitching
15.      Seam finish edges
16.      Clip bottom, back SA to but not through
17.      Press open below clip
18.      Press pocket towards garment
19.      Catchup pocket leash with basting in waist area


* I take sewing classes in the CaƱada College Fashion Department, Redwood City, California