I love to use Pinterest as my virtual bulletin board. As you might guess many of my pins are sewing related. Click here to see what fun stuff I've found and pinned to different sewing boards.
Showing posts with label seam. Show all posts

Saturday, April 5, 2014

Seams To Fit Part 2: Making My Mark (Technicos)


Figuring out how to eliminate using a tracing wheel, has me making a stronger mark that is also less likely to damage my pattern or fabric.

How I'm Marking My Bustier Seams

• I do not include seam allowances on the pattern piece

• I watch the straight of grain (SOG) carefully.  SOG is an issue with the narrow curved pieces in this garment. I need to be sure that seam lines are drawn correctly, relative to the SOG.

•  I carefully mark the seam allowances in, around the pattern piece.  on one side of the double layer of fabric. I was originally using a toothed marking wheel to do this, but I realized there is a better way, for me, that creates a more visible mark on the other side.

On the top, right along the edge of my no-seam-allowance pattern, I make a dashed marking all the way around with a colored pencil. Underneath, I've placed Chacopy marking paper.

•  Then I draw on the seam allowances. I'm using a 1" seam allowance. I could use a double Clover wheel to get a precise 1" added on, but in fact if my seam line is just right I can be somewhat  general about a more-or-less 1" seam. Because I won't be positioning my needle relative to the cut edge, as I typically do.  I will be positioning my needle over the actual seam line.

Marking technique

- Can use Clover double wheel to mark at seam line and at desired width out. I have done several 1" seam allowances, and can mark those with Clover. Can also do them smaller
- Because my marking wheels are spoked type, they impact my pattern (when I have patterns with seam allowances) and they also can put holes in the fabric I may not want
- Marking seam lines with colored pencil and waxy Chacopy paper underneath gives me a stronger mark than running the wheel along the seam line. This also avoids fabric or tissue damage or holes.
~ ~ ~
Web Resources

Sewing My Bustier - Enchanted By Sewing Audio Podcast 18: http://meencantacoser.blogspot.com/2014/03/ench-by-sew-018-boning-up-on-bustiers.html

Chacopy Marking Paper (the waxy kind) http://www.amazon.com/Clover-Tracing-Paper-Chacopy-ea/dp/B001DZUW2C/ref=sr_1_3?ie=UTF8&qid=1399433920&sr=8-3&keywords=clover+tracing

Wednesday, March 12, 2014

Reading Between the Seams - Why Finish Seams?


French Seams and bias tape hem edge
From Lilacs and Liberty: An Insider's View
My guilty secret? I never used to finish my seams when sewing, as long as they weren't visible when I wore the garment.

My reasoning?
1) I was a seat-of-the-pants sewist. I hadn't taken sewing classes and had mostly learned to sew by reading instruction sheets and looking at at few books. When the instructions got around to seam finishing I just figured.... Why bother? My goal was to finish the item as quickly as possible so that I could wear it.

2) Seam  finishing seemed overly fussy to me. I figured that precision and neatness were less important than Creativity (Note which has the capital letter!).

Creativity meant sewing as many garments as possible! A couple of times when I mentioned this, a few folks (fussy folks I thought) urged me to take my time and do a "good job", I saw their remarks as patronizing. So I continued along with my own quick-as-possible style.

3) I didn't know how to do most seam finishes. I learned how to do French Seams only because I could see that sheer garments needed a seam finish, and French Seams worked for that.  If the seams were going to show when I took the item off or on, I'd line it.

4) Other than keeping my raw edges from showing when wearing or putting on a garment, I didn't see a reason for finishing seams.

You  can probably guess that I have some different ideas about why finishing seams has value these days, and that I'll continue journaling about my attitudes towards seam finishing, in future postings.

 You might also guess that changing my ideas are one of those things that keep me....
Enchanted by Sewing!

~ ~ ~
Web Resources

Lilacs and Liberty: An Insider's View http://meencantacoser.blogspot.com/2014/03/lilacs-and-liberty-insiders-view.html

This book has really helped me to learn how to sew different seam finishes. The illustrations and descriptions are spot on!
The New Complete Guide to Sewing: Step-by-Step Techniques for Making Clothes and Home Accessories Updated Edition with All-New Projects and Simplicity Patterns (Reader's Digest)


Thursday, July 18, 2013

Jeans Technicos/Techniques - Further Disasters in Flat-Felled Seaming!


Jeans techniques are challenging my sewing skills, however I've also get just a few other...  sewing projects going. I refit B5526, got another shirt partially cut out of it, and began working on fitting a new (to me) tee shirt, the Hot Patterns Weekend Sunshine Top .

It's multi-tasking like this, that keeps me enchanted by sewing!
~ ~ ~ 
Oh dear, my journey into the land of the flat-felled is not following a smooth - or straight - road
Woof! Look at that topstitching line!!!! You can practically hear the sound effects 
as the needle moves back and forth, right?
Believe it or not, I was focusing
on the toe of my presser foot lining up as I sewed,
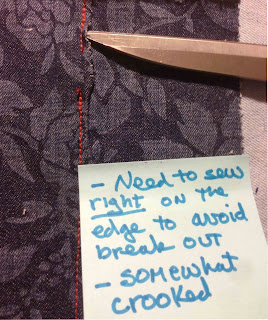
but it looks like I need to find better visual  guidelines.
This light-weight denim moves around
Did I actually trim one edge too close?
A few posts back I shared my challenges when it came to sample sewing flat felled seams in a light/medium weight denim . I gave it another shot tonight, this time using both a heavy levi-type weight (the pale/washed out blue sample above) and some of the light/medium weight (that indigo blue with the scrolly rose design over on the right). I thought if I skipped the glue stick I used last time, to hold the tucked under seam in place, I might avoid the needle-jamming problem I had before. I also thought that if I simply sewed a wider gap between the original seam and the topstitched one, I could get a nice straight seam line and avoid the problem of the raw edge not being caught in the top stitching and peeking out.

Hummmm...

1) It does appear that the glue stick was the culprit in the jamming. I have certainly used glue sticks successfully in the past for a variety of projects, as have many other sewists, but perhaps when working with heavy weight fabric, or maybe it's the heavy denim needle, that may not be a good idea. So, one problem solved, it didn't jam.

2) I'm not, however, making progress on the straight-line front. My topstiching was, if anything, even more crooked!

3) In addition I continued to have problems with a raw edge of fabric poking out from under my flat felled topstitching. I can't seem to get the longer edge to fit in underneath the trimmed seam. Am I trimming it too close to the seam? I wonder if that is causing this problem.

Next....

a) I'm going to focus on this flat-felled seam tutorial from Oliver + S, and see if I get any new ideas about what is proving to be surprisingly challenging for me.
b) I wonder if I should go for a wider seam allowance. I've been sewing a 5/8 " seam, typical for wovens, and trimming one seam down to about 1/8". Should I cut a 1" allowance and then trim the one seam down to.... maybe something closer to 1/4"? I might try the 1" seam on two different samples - one with a 1/4" trimmed seam and the other with the 1/8 - or at least very closely trimmed seam edge.

But first I'm going to read more about what others have to say about this type of seaming. In addition to the Oliver + S article, I'm going to look through the Pattern Review article "Make your own Jeans, You Can Do It"  and also in my all-purpose Readers Digest sewing book.

Can you imagine how much more enchanted I'm going to be with sewing, on the day when I've resolved these challenges?

Saturday, July 13, 2013

Jeans Technicos/Techniques - Flat-Felled Seams Fall Flat, when it comes to Sewing Denim

In my last post, Summer of Jeans Sewing, I described my plan for learning to sew and fit jeans. I began by working on my flat-felled seam techniques.

How hard could that be? I've sewn these seams in light weight cotton a few times.
Hummmm, guess who needs to keep working on her flat-felled denim sample sewing? 

I started out with a review of flat-felled seams, In which Russell Conte of Sewing Arts Center shows us how to complete a Flat Felled Seam to give your garments a fresh clean professional look.
Check it out at http://www.youtube.com/watch?v=klyJYE4OcM0''


Another Resource to study http://oliverands.com/blog/2011/01/flat-felled-seams.html


Frankly, I figured i'd spend longer listening to Russell's well-done youtube video than I would sewing my first sample.

Har de har har!

~ ~ ~

Entonces, I got out my bits and pieces and got the sewing going.


Whoops! You sew WRONG Sides together when sewing a flat-felled seam.
Time for a visit with Auntie Seamah Rippah.


That's right
Wrong Sides together, and ready to seam
Remember to use
Jeans Needles
Seam
Press to embed stitches on both sides of sewn seam
Butterfly open and press on both sides
Study worn-out Ready to Wear Jeans
Oh, I see I want the topstitching on the back edge
Actually - in my sample below - I did it the other way with the
topstiching on the front edge.
But that was the least of my challenges

I'm going to trim away here,
As close to the seam as I can get
But just on one side

Deciding that I wanted to have topstitching
on the right of the Front seam - opposite of the Ready to Wear pair above!-,
 I trimmed the front
Seam Allowance, so that the Back Seam Allowance
Would wrap around, over, and encase the front
which would mean I'd topstitch on the front Seam Allowance edge

Here, I folded the back seam allowance
over and around the front
Then glued it down so the seam wouldn't move
while I topstitched

How close to the seam allowance did the
Ready to Wear folks do their topstitching?
An eighth of an inch.
No - it didn't occur to me until I made my graph paper model (below)
that they probably didn't sew a 5/8 inch seam allowance like I did!

OK, that means I sew here

I'll position my left presser foot toe on top of the
seam, to keep my line of topstitching straight

Hope this orange topstiching thread is the right stuff
It's Gutterman, heavy weight topstitching, but it doesn't
specifically say it's for jeans....

Hummmm No matter what I did when I started (and re-started)
The fabric didn't move well when I began sewing
But, as you see on the scrap piece, it sews fine on a single layer
And I've sewn this same fabric into shorts, so I know it should sew up
Is it the glue?

Uh oh.... That eighth of an inch topstitching ddn't really catch the seam

I added a second line of topstitching to fell the rest of the seam
And golly, my topstitching wasn't straight, though I thought I was
watching the presser foot toe carefully on both stitching passes

Time to get out the graph paper and think this thing through!

Gee, it sure sounded easy before I actually tried it!


Wednesday, March 6, 2013

Technicos: Slotted Seam, Cousin to the Channel Seam

Don't you love the look of this slotted seam? It's pretty straightforward to sew.

* Put right sides together, basted the seam
* Clipped bobbin thread about every fifth stitch
* Press seam open
* Cut my slot - the pretty under piece (the polka dots here)
* Centered the slot right under my seam line
* Topstitched the polka dotted slot on either side of the seam line - equidistant
* Pulled out my basting threads
* Press either to show the polka dots (butterfly style) or just a neat press with an occasional show throw of the slots due to body movement

A channel seam is similar except that you use a wider strip of show-through fabric and you lay the outer/either side fabric neatly on top of the channel show-through instead of basting.

A good source of directions for the slotted seam and other seam finishes is Reader's Digest, New Complete Guide to Sewing. You can find this book affordably used as well as new. Or maybe you have a public library that has it!

Tuesday, September 11, 2012

Tee Time Technique: Stayin’ Stable at the Shoulder


Having made a few tee shirts out of wiggly-jiggly-creeping-down-the-arm-over-time jersey-type knits, I was suspicious that I needed to learn more about stabilizing the shoulder seams. Here’s what I learned about that in class today.

Thanks Rhonda!

Technique
1)  Sew shoulder seams – front to back (maybe you like to sew them back to front, it’s your call :-)
2)  Cut a ¼ inch wide piece of fabric the length of the seam. IMPORTANT cut it the opposite direction from the stretch. If, say, the tee knit fabric stretches left to right (from selvedge to selvedge) then cut this piece top to bottom. As a matter of fact, the selvedge might be a great place, from which, to cut the strip.
3)  Sew this stabilizing strip right on top of the shoulder seam.
4)  Another good, supportive, idea is to topstitch on either side of the shoulder seam, either as the stole method of stabilizing or in addition to the stabilizing strip. 

Since knits don't ravel there's no need to finish the seam edges