I love to use Pinterest as my virtual bulletin board. As you might guess many of my pins are sewing related. Click here to see what fun stuff I've found and pinned to different sewing boards.
Showing posts with label seams. Show all posts

Saturday, April 12, 2014

Seams to Fit Part 4: Neat as a Pin (Technicos)

Using pin techniques to join sections of my bustier precisely.


The outer shell of my Bustier is coming along
Too bad I can't just pin it to myself and head out the door


Seams To Fit Part 1: A Little Less Laxity 
Seams To Fit Part 2: Making My Mark 
Seams To Fit Part 3: More Power to Interlining!

Pinning seams becomes extra important when working on sewing narrow, curved, very fitted pieces together. I wanted a stitching line that runs precisely along the stitching line I created when fitting the test garment and creating the pattern. It went a bit against my casual, arty bent to be concerned with being as neat as a pin. It just wasn't a natural skill for me, and I had to think carefully about the process.

In my last "Seams To Fit" posting, I described how I used stitching marks on my interlining pieces to define the stitching lines on the fashion fabric it's backing. In both part 2 and part 3, I described how I made sure the fashion fabric was matched up properly.

Now that I was getting ready to sew each bodice piece together, I began to think of each piece as more of a section. That section is composed of one appropriately shaped piece of fashion fabric (the denim that shows on the outside of the bustier in my case) backed by an equivalently shaped interlining (a blue plaid cotton flannel). When it's prepped, one section is like one pattern piece.

At this point in the process, I needed a way to join the stitching lines of each section precisely to it's neighboring section. When working on doing the same operation on the inner fitting shell of the bustier (then I was joining the cutil/lining pieces together) I'd found this to be rather challenging. I was constantly turning the sections over and finding that the pins weren't going through into the stitching lines.


I marked the stitching lines all the way around each section
with pins, using the stitching lines marked on the interlining
I figured out the best way for me to get the sections joined together precisely, the second time around. In part 3, I describe how I'd marked each section (equivalent of one pattern piece) marked all the way around with pins. The pin heads show on the interlining side. Now, I could line up each section (one fashion fabric/interlining section for each pattern piece) with it's corresponding section. 
Working pins through from the stitching lines on one section
to find the stitching lines on the other side.
Here you can see a couple of pins I've already pinned through from the other side.
These are ever so slightly off!
When I laid, for example, piece 1a next to 1b, putting the fashion fabric (right sides) together, I now had pins on either seam line. I moved down the marked/pinned stitching lines pinning in the direction of the seam. As I moved, I worked another pin from one side of the stitching lines into the set on the other section. My fingers could feel that the pins were marrying up. I could, and did, still flip the sections back and forth, but it went a lot more easily than it had in the inner shell.


The only Photoshopping I did was to
change the fabric of my dress form, and
swap the real background for my little
gingham and scissors creation:-)
When I went to do the actual sewing, things just sewed up better. I only had to stop and unstitch a very short distance once. 

The proof is in the denim pudding. My bustier's outer shell is coming along and fitting snug and right.

The fitting shell that goes below will provide the support the garment needs to allow the garment to leave my dress form and head out into the world.

Figuring out techniques for sewing seams precisely is one of those thing that keeps me...
Enchanted by Sewing! 
~ ~ ~
Web Resources

Boning Up On Bustiers: http://meencantacoser.blogspot.com/2014/03/ench-by-sew-018-boning-up-on-bustiers.html

My Pinterest  Bustiers Board 


Wednesday, April 9, 2014

Seams to Fit Part 3: More Power to Interlining! (Technicos)

Using  stitching marks on my interlining pieces to define the stitching lines on the fashion fabric it's backing.              

Previously
Seams To Fit Part 1: A Little Less Laxity 

Seams To Fit Part 2: Making My Mark 

I figured out how to take advantage of my interlining, to help match the seams on my bustier project.

What is interlining?
Interlining is like a piece of backing for a garment's fashion fabric. In this bustier project, my fashion fabric is denim. My interlining is a piece of plaid 100% cotton flannel. You will never see the interlining once the garment is done, even on the inside. That's because this garment will have a second shell that includes lining. The interlining will be sandwiched in between the lining and the garment fabric.

I cut the interlining just like I cut the fashion fabric.

The interlining is just sewn on underneath the piece it backs.  I treat the two pieces of material as though they are just one piece of fabric. The back/wrong side of the interlining is sewn to the back of the fashion fabric.

Why did I used interlining in this garment?
Typically interlining is used to make a fashion fabric more stable and give a little less. For example you might use interlining with linen to make it crisper. (In which case you might cut the interlining just a little more narrow - a good trick, eh?)

In this case, I used interlining as a layer of extra protection because of the bones/stays that are in the next layer below it. It helps avoid the chance that these bones will slip out and poke into the outer/fashion fabric layer.


How I took advantage of my interlining, to help match the seams on my bustier project.

Because this bustier has really small pieces, and is really fitted, I marked, then sewed through, the stitching lines all the way around on my interlining pieces. I just sewed through that one layer, to make the seam/stitching lines really clear. 

I also marked all the stitching lines on the inside of my fashion fabric. I could have basted those lines, then matched up the stitched lines to ensure that my seams are precise.

But I really don't like having to take all those basting threads out of the fashion fabric. Also, sometimes they're hard to remove, especially if I sew over them.

Since I have the stitched lines on the interlining and the marked lines on the fashion fabric, I was able to slip pins through from the interlining into the marked line and pin the interlining layer to the fashion fabric layer all the way around the piece. I could easily check on the fashion fabric layer to see that the stitched line above was marrying up right with the marks all the way around.

I repeated this process with the adjoining piece - both on the fashion fabric and the interlining fabric - then joined the seams of the two pieces together, slipping the pins from one seam line marking into the one below. I was able to constantly check my pinned stitching lines, to make sure that the seam line below was matching up properly with the seam line on the top.


Figuring out how to sew narrow garment pieces together precisely, and save time removing basting stitches later on, is the kind of technique that keeps me....
Enchanted by Sewing.


~ ~ ~
Web Resources

Boning Up On Bustiers: http://meencantacoser.blogspot.com/2014/03/ench-by-sew-018-boning-up-on-bustiers.html

My Pinterest  Bustiers Board 


Thursday, July 18, 2013

Jeans Technicos/Techniques - Further Disasters in Flat-Felled Seaming!


Jeans techniques are challenging my sewing skills, however I've also get just a few other...  sewing projects going. I refit B5526, got another shirt partially cut out of it, and began working on fitting a new (to me) tee shirt, the Hot Patterns Weekend Sunshine Top .

It's multi-tasking like this, that keeps me enchanted by sewing!
~ ~ ~ 
Oh dear, my journey into the land of the flat-felled is not following a smooth - or straight - road
Woof! Look at that topstitching line!!!! You can practically hear the sound effects 
as the needle moves back and forth, right?
Believe it or not, I was focusing
on the toe of my presser foot lining up as I sewed,
but it looks like I need to find better visual  guidelines.
This light-weight denim moves around
Did I actually trim one edge too close?
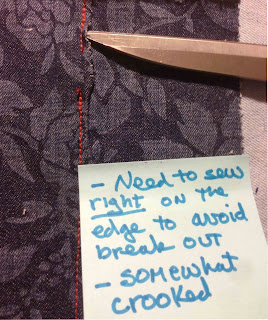
A few posts back I shared my challenges when it came to sample sewing flat felled seams in a light/medium weight denim . I gave it another shot tonight, this time using both a heavy levi-type weight (the pale/washed out blue sample above) and some of the light/medium weight (that indigo blue with the scrolly rose design over on the right). I thought if I skipped the glue stick I used last time, to hold the tucked under seam in place, I might avoid the needle-jamming problem I had before. I also thought that if I simply sewed a wider gap between the original seam and the topstitched one, I could get a nice straight seam line and avoid the problem of the raw edge not being caught in the top stitching and peeking out.

Hummmm...

1) It does appear that the glue stick was the culprit in the jamming. I have certainly used glue sticks successfully in the past for a variety of projects, as have many other sewists, but perhaps when working with heavy weight fabric, or maybe it's the heavy denim needle, that may not be a good idea. So, one problem solved, it didn't jam.

2) I'm not, however, making progress on the straight-line front. My topstiching was, if anything, even more crooked!

3) In addition I continued to have problems with a raw edge of fabric poking out from under my flat felled topstitching. I can't seem to get the longer edge to fit in underneath the trimmed seam. Am I trimming it too close to the seam? I wonder if that is causing this problem.

Next....

a) I'm going to focus on this flat-felled seam tutorial from Oliver + S, and see if I get any new ideas about what is proving to be surprisingly challenging for me.
b) I wonder if I should go for a wider seam allowance. I've been sewing a 5/8 " seam, typical for wovens, and trimming one seam down to about 1/8". Should I cut a 1" allowance and then trim the one seam down to.... maybe something closer to 1/4"? I might try the 1" seam on two different samples - one with a 1/4" trimmed seam and the other with the 1/8 - or at least very closely trimmed seam edge.

But first I'm going to read more about what others have to say about this type of seaming. In addition to the Oliver + S article, I'm going to look through the Pattern Review article "Make your own Jeans, You Can Do It"  and also in my all-purpose Readers Digest sewing book.

Can you imagine how much more enchanted I'm going to be with sewing, on the day when I've resolved these challenges?

Saturday, July 13, 2013

Jeans Technicos/Techniques - Flat-Felled Seams Fall Flat, when it comes to Sewing Denim

In my last post, Summer of Jeans Sewing, I described my plan for learning to sew and fit jeans. I began by working on my flat-felled seam techniques.

How hard could that be? I've sewn these seams in light weight cotton a few times.
Hummmm, guess who needs to keep working on her flat-felled denim sample sewing? 

I started out with a review of flat-felled seams, In which Russell Conte of Sewing Arts Center shows us how to complete a Flat Felled Seam to give your garments a fresh clean professional look.
Check it out at http://www.youtube.com/watch?v=klyJYE4OcM0''


Another Resource to study http://oliverands.com/blog/2011/01/flat-felled-seams.html


Frankly, I figured i'd spend longer listening to Russell's well-done youtube video than I would sewing my first sample.

Har de har har!

~ ~ ~

Entonces, I got out my bits and pieces and got the sewing going.


Whoops! You sew WRONG Sides together when sewing a flat-felled seam.
Time for a visit with Auntie Seamah Rippah.


That's right
Wrong Sides together, and ready to seam
Remember to use
Jeans Needles
Seam
Press to embed stitches on both sides of sewn seam
Butterfly open and press on both sides
Study worn-out Ready to Wear Jeans
Oh, I see I want the topstitching on the back edge
Actually - in my sample below - I did it the other way with the
topstiching on the front edge.
But that was the least of my challenges

I'm going to trim away here,
As close to the seam as I can get
But just on one side

Deciding that I wanted to have topstitching
on the right of the Front seam - opposite of the Ready to Wear pair above!-,
 I trimmed the front
Seam Allowance, so that the Back Seam Allowance
Would wrap around, over, and encase the front
which would mean I'd topstitch on the front Seam Allowance edge

Here, I folded the back seam allowance
over and around the front
Then glued it down so the seam wouldn't move
while I topstitched

How close to the seam allowance did the
Ready to Wear folks do their topstitching?
An eighth of an inch.
No - it didn't occur to me until I made my graph paper model (below)
that they probably didn't sew a 5/8 inch seam allowance like I did!

OK, that means I sew here

I'll position my left presser foot toe on top of the
seam, to keep my line of topstitching straight

Hope this orange topstiching thread is the right stuff
It's Gutterman, heavy weight topstitching, but it doesn't
specifically say it's for jeans....

Hummmm No matter what I did when I started (and re-started)
The fabric didn't move well when I began sewing
But, as you see on the scrap piece, it sews fine on a single layer
And I've sewn this same fabric into shorts, so I know it should sew up
Is it the glue?

Uh oh.... That eighth of an inch topstitching ddn't really catch the seam

I added a second line of topstitching to fell the rest of the seam
And golly, my topstitching wasn't straight, though I thought I was
watching the presser foot toe carefully on both stitching passes

Time to get out the graph paper and think this thing through!

Gee, it sure sounded easy before I actually tried it!