I love to use Pinterest as my virtual bulletin board. As you might guess many of my pins are sewing related. Click here to see what fun stuff I've found and pinned to different sewing boards.
Showing posts with label Cañada College Fashion Department. Show all posts

Friday, February 20, 2015

French Pattern Drafting/Moulage: First Muslin Test of Back and Front Blocks

  
I detailed what I'm learning about  in my Moulage/French Pattern Drafting class with Lynda, in this post http://meencantacoser.blogspot.com/2015/02/drafting-my-back-block-learning-pattern.html
I added a sort of modesty skirt below the full hip line
Other ladies wore leggings or just winged it in their
intimate garments

This week....I zipped myself carefully into the muslin test I created from my back and front blocks, for Moulage class. Uh oh, I sewed the zipper inside out! I thought Lynda Maynard wanted our seams and darts on the outside.
Guess who wasn't listening properly in class last time?

A buddy in class managed to get the zipper tab up for me.
Not too many changes, but I still need to make those few, and make a new muslin for next week. I'm in good company though. I think there were only one or two people who didn't need Lynda to tweak theirs.

How about those lips?
I had the goofiest look on my face
I kind of like these lips I borrowed!

Sunday, February 8, 2015

Drafting my Back Block - Learning Pattern Work with Moulage/French Pattern Drafting

Version 1 of my Back Pattern Block Draft

I'm taking Lynda Maynard's Moulage class at Cañada College. Moulage is the traditional style of pattern drafting used in France. Lynda studied pattern drafting, among other things, with Kenneth King. We're using a printed version of Kenneth King's Moulage book. 

On the web I can only find Kenneth King's Moulage Book on CD http://www.kennethdking.com/book/#moulage


We'll be creating a skin-tight, fitted moulage and then a sloper - a moulage that includes minimal wearing ease. We'll also be drafting sleeve patterns/slopers to work with these. My sewing buddy Susan and I, are very excited about those sleeves! Susan was featured in last month's Enchanted By Sewing Audio/Podcast - A Very Fitting Sewing Day With Susan

We've begun by drafting our back pattern blocks.

To get to this point, we followed Kenneth King's/Lynda's directions. Those included:

1) Taking careful measurements of, and recording, many dimensions of our bodies - front and back. I think there are about 20 measurements between our neck to the floor, with most of them centering around the torso. This is not something you can do for yourself. You need at least one buddy. It reminded me of the measurements we took when we made our dress form kits. (I produced a podcast about creating Dress Forms)

2) Using these measurements in a number of formulas, to create a sheet of calculations. Again we made a careful record. It was definitely worth my time to triple-check that I had
a) transferred the right measurement into the formula
b) done the math correctly
We rounded up all of our math to the nearest 1/8'th of an inch. 1/8'th of an inch is the smallest measurement on most rulers.
The book includes metric directions as well.
3) Next we followed  Kenneth King's/Lynda's directions to draft the back block you see here, using the calculations. Once more I'm went back and triple-checked, to be sure I was using the correct calculations in my draft.

Lynda reviewed our work not only for correctness, but also to make adjustments for various figure types. She adjusted the line in many of our shoulder drafts down at an angle. I'd guess that you might see the need for this later on in the process, if you're doing this work on your own.

Next we'll be drafting our front block.

After that, we'll work up a version in muslin.

This is one of those processes that takes a lot more time than I'd expect, but it's going to be well worth it for me.

My goals for the class are:

A) To make a new fit garment for my dress form, Conchita. I'll also be removing some of Conchita's padding and batting, to fill out that fit garment correctly. Gosh, wouldn't it be great if it were that straightforward for people to lose weight?

B) To create clear plastic transparencies I can use when altering commercial patterns. Lynda says the material she uses for this is from Tap PlasticsTap  Plastics:
24 1/2"  by  45"  by  .020  smooth/matte  polypropylene  sheet  SKU#20346)

C) Down the road... I might use these block in some way, in conjunction with draping my own patterns


Learning more about what makes patterns come together is the kind of thing that keeps me . . .
Enchanted by Sewing!
~ ~ ~
My Buddy Susan and I share what we've each learned about getting a good fit with our sewing patterns. In Last month's Enchanted By Sewing Audio/Podcast  Susan described key things she learned from sewing fit classes (Also we had a lot of fun chatting) A Very Fitting Sewing Day With Susan (Download or just listen on Line) http://enchantedbysewing.blogspot.com/2015/01/ench-by-sew-028-very-fitting-sewing-day.html

Enchanted By Sewing Audio/Podcast - Dress Forms (Download or just listen on Line) 
http://enchantedbysewing.blogspot.com/2013/09/ench-by-sew-12-dress-forms.html

Monday, September 30, 2013

Tuesday, September 3, 2013

Jeans Sewing: Skirting the Issue - Terminado!/Done!


¡Que Bueno!
Huzzah! 
Worth the Work
I created this jeans-style denim skirt
in order to work
on jeans sewing skills
I do feel more confident about approaching my
first jeans project.
I'm also really looking forward to wearing this
great new addition to my wardrobe!
On the final evening of Labor Day weekend,  I finished the jeans-style denim skirt (  Palmer and Pletsch M6361 )  I've been blogging about over the last month. (*) The task was acquiring the tenor of a forever-more sewing project. Those are deadly! Sometimes I get so tired of long-term sewing projects, that they get popped into an in-process bin and you know what happens next, right? Often, by the time I return to the bin it's even more intimidating. Or maybe it just looks silly or dated. I didn't want to have my skirt become a UFO (What Lori often referred to as UnFinished Objects in the Sew Forth Now Podcast). So I kept at it, even when other sewing projects sung out, and they definitely did! You can just bet I never let myself take that jeans needle out of my machine.


My skirt looks so official
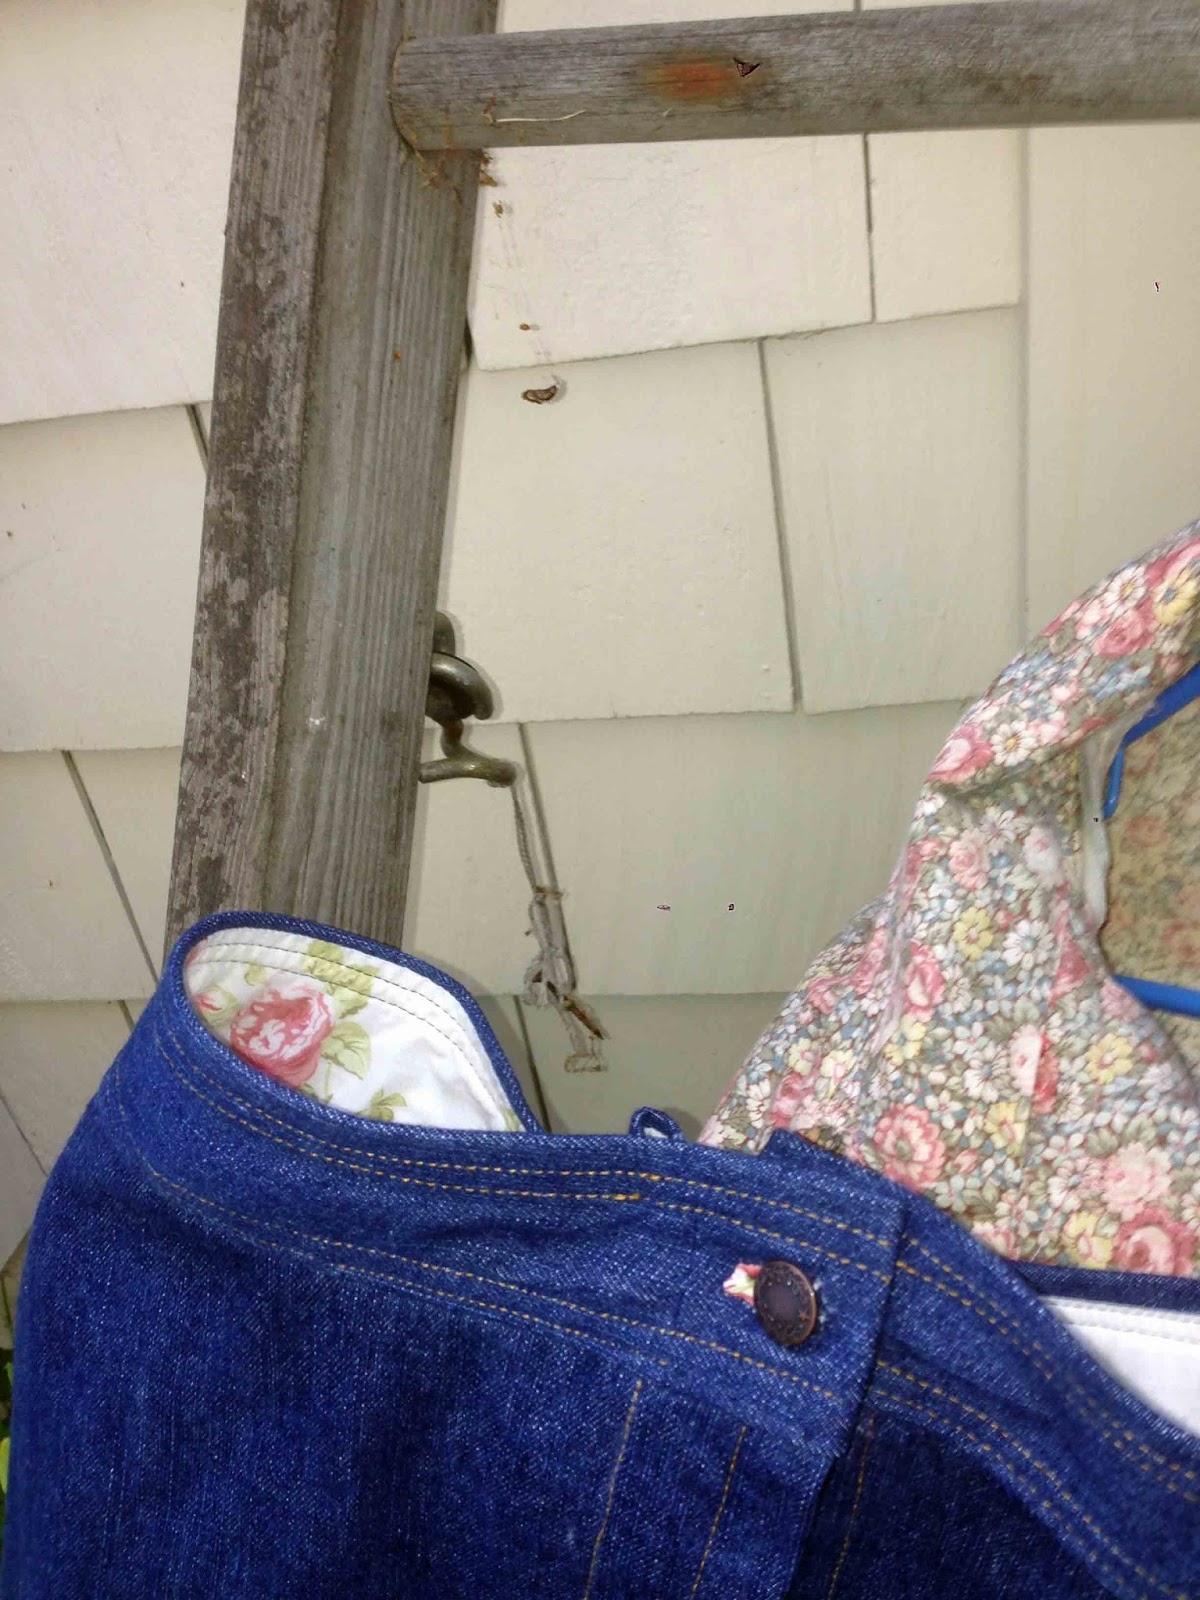
with it's jeans button
I lined the waistband with a light weight
cotton batiste print
I interfaced it with a medium weight
fusible. That was a big decision and
I'm glad I did interface it now.
I really wanted to shelve the skirt many times, because sewing that heavy weight 11-oz denim (like Levis 501's ), figuring out where to find and apply rivets, jeans button, when to do the topstitching (I wanted complete lines of stitching because it sure shows when it's not), not to mention addressing the faux flat-felled seams, was just a lot of unfamiliar-to-me work and techniques. I never managed to get the real kind of flat-felled seams to to roll around and stitch straight, though I'm good with the faux look for now. I blogged about that a couple of weeks back.

Oh and don't get me started on the curved waistband! I think the topstitching and waistband seam and top of waistband finally go straight across on either side. I sure checked those (and pinned, re-pinned, hand and machine basted and re-basted) to get those areas crisp and clean. I did have to add a snap on the inside of the fly. I think  that was because I over-fitted the garment a little and the fly band gaped a little. I over-fitted because otherwise the a-line skirt didn't 'a' out. At least for me, that heavy denim is not at all easy to work with. Maybe it's simply different than what I'm used to sewing with.

I'm really proud of myself for doing something hard and new-to-me. When I get ready to sew my jeans project for the Pants Drafting class I'm currently taking at Cañada, I'll have a head start on some of those techniques. I'm sure they won't be perfect, but they will be lots better than if I hadn't sewn this skirt first.

Another thing I'm glad I thought to do. I sewed several fly-front zippers (FFZ) in trouser and shorts project over the last year or so. So, although I still don't love doing a FFZ, they don't overwhelm me. And that was important when learning to work with heavy fabric, different threads and needle-type, new-to-me techniques and hardware.

I didn't make the cute pockets or belt loops I meant to do (I know how to use a double needle to make those belt loops professional too), cuz I was just done with itI'm planning to prep the pockets and belt loops for my jeans project first , because those are really the fun part. In this case I'd had enough and just wanted to move on with life. That's the way it goes with me, when I'm learning something new. In software application development (and probably other fields as well, I imagine), we called that MVP - minimal viable product.

Sometimes I just want to be finished/terminado!

Now I'm planning to do some fun and familiar sewing for a bit. I have another one of my favorite shirts to finish up. I last blogged about it as Kit 1 (here's a link). I'm now calling it "Lilacs and Liberty". It's a romantic fem style - lilac Robert Kaufman gingham with accents in a darker purple and green Liberty of London Tana Lawn print, (which I recently identified as the Liberty print "Mauverina") and sparkly'ish buttons. Bet it will look cute with the denim skirt too....

The challenge of acquiring new sewing skills, and the pleasure of returning to comfortable and favorite sewing projects, keeps me....
Enchanted by Sewing!
~ ~ ~
* All the posts about this project, begin with the phrase "Jeans Sewing, Skirting the Issue"

1) I began writing about the project, fitting and pattern selection on August 9'th http://meencantacoser.blogspot.com/2013/08/jeans-sewing-skirting-issue.html

2) When Zippers Fly

3) Resources

4) WAISTing Time

5) Absolutely Riveting

Saturday, August 31, 2013

Jeans Sewing: Skirting the Issue - Absolutely Riveting

I started off by poking a hole through the
many layers of denim, and drill with my seam
ripper. I didn't rip with it, but I used it's
sharp little point just to get to the other side.

Once I had a tiny hole, I worked through with
the pointy end of a bamboo skewer. I had to
do that on either side, and really work it back and
forth, in order to get a big enough hole for the rivet
to feed through.
After I fed the rivet through, and capped
it off, I taped it down with several layers of
masking tape on either side, just to keep it in place and
then moved on to the next rivet.  I have 4 of them
ready to go - two on each end of the pocket opening.

I'm going to get a little help
with the hammer to make the two ends come firmly together.
I did some test work on multiple layers of denim scrap,
 and found that smashing those two ends together
straight on,  isn't the easiest thing in the world.
I believe there is a tool for it, but I don't think it's cheap.
Since I wrote this post, I've realized that probably the correct tool for creating the rivet hole is an awl. The nice lady at the fabric store said she wouldn't bother to spend the $7 on one herself, if the technique I came up with here is working. I'm still considering whether or not to plunk down the money for what appears to be the right tool.

 I don't  know the official reason for rivets, but I would guess they help stabalize certain features of the garment. I'm putting them at either end of my front hip pockets, which have a tendency to gape open, no matter how much trying on and basting I did to get that opening to lay flat. Perhaps they help with that too?

 I do know that the kind of jeans I like, have rivets at the corners of the pockets, so I want to know how to add them.

I'm going to admit right off that I don't know the right way to add rivets. I could keep looking through all the resources I've collected, or buy more (I was told the Palmer and Pletsch have a good video on everything from fitting to sewing jeans), or I could simply forge ahead, get some experience with this fabric, sewing skill set, and thought process. That is the way I learn best - a little reading, a little trying it out, and then go back and read and listen some more. That's why I'm working on this jeans-style denim skirt I've been blogging about.

Trying out new-to-me techniques, like the ones I'm feeling my way through on this jeans-style denim skirt are the kinds of experiences that keep me 
Enchanted by Sewing


Wednesday, August 28, 2013

Jeans Sewing: Skirting the Issue - WAISTing Time

I have been spending quite a lot of time with my jeans-style denim skirt waistband. And I'm definitely not WAISTing my time. it seems mighty important that I do so.

As you may recall from other postings in my "Jeans Sewing: Skirting the Issue" theme, I'm using this project to learn skills that will help me when I work on sewing my first pair of jeans. There's a lot to learn, and I don't expect I"ll get it all down before I start my actual jeans sewing project. But whatever I can take away with me, will stand me in good stead with that first pair.

Here are some issues I've worked on, not all of which I've resolved.

* Given the weight of the denim (11 oz - heavy weight) do I interface or not? I went ahead and did so.

* Two layers of this weight denim seems like too much. I lined one side of the waistband with a nice thin cotton print (check out the roses)

* Ugh! Two heavy denim seams at the waist and then you add in foldover bits from the edge of the waistband ... How many layers of denim is that? !!!!  I've been doing a lot of scissor trimming after seaming,  to attempt to cut back on additional bulk in this zone, but there's a limit as to how much I can cut away without just cutting off the whole waistband. This is something to ask around about.

* Getting the waistband to meet properly in front - waist seam to waist seam and the tops at the same height is no easy feat. Is it just me? I have been working on what sometimes seems like an endless loop... baste, try on, unpick, re-baste,  try on, unpick.... repeat steps until.... OK I thinnnnkkkk I've got it! It's worth working to get it right.

Next on the agenda is adding the rivets on the pockets, and the jeans button on the waistband. After all the fussing over getting the waistband to meet right, I sure hope I get the buttonhole centered properly over the button! 

After that the hem. I've already finished the raw edge on the bottom of the skirt and pinned it in place. I still need to try it on and eyeball it.

I've also got several long topstitching threads hanging around in a lot of places, waiting to run through a needle and take through to the back side. It's challenging figuring out at what points to topstitch the different parts, especially on the waistband. Some of it (like on the side seams) had to be done before other garment construction steps.

On the waistband, however, I topstitched too soon. Well, so... a little bit of my topstitching isn't totally continuous. I wouldn't be surprised if the same things happen with my test garment jeans, but once I repeat the process with them, moving onto a second and third pair, I'll start to learn when I can continuously topstitch without being likely to have to release some of the threads.

I was planning to work on cute back pockets and belt loops, like real jeans ones, but frankly I just want to finish this puppy up! I'm kidding myself that I could add those puppies later, but I bet I won't. I've got my Lilacs and Liberty shirt to finish, as well as several knit tops to create - hey the denim skirt cries out for those toppers. I'm also taking a pants drafting class at Cañada, where I'll be drafting my own jeans pattern. So I'll  have another opportunity to get on with those quintessential jeans additions in the not-too-distant future.


Working on my jeans-sewing skill set is almost like being a new sewer. You know what that does for me, right? Yep, it keeps me....
 Enchanted by Sewing!

Saturday, December 22, 2012

Anthony G. Sews Again! - Fourth Podcast Episode Almost There

You know the challenge... I've been working on my podcast about sewing for the past several days, therefore I haven't gotten on with my own sewing! And there's so much I want to get on with.

Here's Anthony G.. You'll be hearing him in an interview in my December podcast show (iTunes Enchanted By Sewing), wearing two vests he made himself. The underneath one is wool lined with linen. And isn't that long, loose outside one cool? He designed it as a comfy around the house piece, but it would be absolutely great for long chilly walks as well.

I can't believe I saw the results of Anthony's first-ever sewing project back in September (it was a very snarky long-sleeved black tee shirt). Since then he's also made three other tees and a pair of linen pants as well as these vests and a hoodie lined in linen. And did I mention he's taking two other really challenging classes with major outside commitments?

In this fourth episode of the "Enchanted By Sewing Podcast", Anthony has a lot to saw about natural textiles - a lot I didn't know.

I'm planning to have the show published this weekend. I need to make a couple more passes and make sure I didn't manage to cut anything out - or leave anything odd in!

Just search on "Enchanted By Sewing" in the iTunes store.

But you knew that!

Tuesday, September 11, 2012

Tee Time Technique: Stayin’ Stable at the Shoulder


Having made a few tee shirts out of wiggly-jiggly-creeping-down-the-arm-over-time jersey-type knits, I was suspicious that I needed to learn more about stabilizing the shoulder seams. Here’s what I learned about that in class today.

Thanks Rhonda!

Technique
1)  Sew shoulder seams – front to back (maybe you like to sew them back to front, it’s your call :-)
2)  Cut a ¼ inch wide piece of fabric the length of the seam. IMPORTANT cut it the opposite direction from the stretch. If, say, the tee knit fabric stretches left to right (from selvedge to selvedge) then cut this piece top to bottom. As a matter of fact, the selvedge might be a great place, from which, to cut the strip.
3)  Sew this stabilizing strip right on top of the shoulder seam.
4)  Another good, supportive, idea is to topstitch on either side of the shoulder seam, either as the stole method of stabilizing or in addition to the stabilizing strip. 

Since knits don't ravel there's no need to finish the seam edges