I love to use Pinterest as my virtual bulletin board. As you might guess many of my pins are sewing related. Click here to see what fun stuff I've found and pinned to different sewing boards.
Showing posts with label dress form. Show all posts

Monday, April 27, 2015

The Woodland Fairy Queen's Bifurcated Dress Form - Even Titania...

While hiking Windy Hill this past weekend, I was amazed to see that the Woodland Fairy Queen had gone off leaving her bifurcated dress form behind.

It seems, even Titania wears trousers these days.

(co-published in Postcard From California, and  Me Encanta Coser/Encanted By Sewing)

Saturday, July 19, 2014

Conchita's New Dress (Dress Form Fun)


As I mentioned in a recent blog posting, I've been working on altering my tried-and-true B5526 from a shirt to a short-sleeved, somewhat fitted, summer blouse. My dress form, Conchita, has been of immeasurable help to me in this endeavor as I 
a) Dropped the shoulder seam slightly forward
b) Decreased the torso girth
c) Added a waist to apex-of-bust dart.

Don't you think Conchita deserves this new lace frock to celebrate all the help she gives me? It's actually a piece of lace salvaged from a long-ago frock I had taken apart and then tucked into my fabric inventory. 

I simply draped the lace over Conchita's foamy body, but I think it suits her style.


Having fun with my dress form buddy is the kind of thing that keeps me...
Enchanted by Sewing!


~ ~ ~
Web Resources

Planning for Rosa: My Summer Dream Blouse (Liberty of London Tana Lawn)

My Experiences Creating Two Different Dress Forms (Audio Podcast with show notes links to various blog postings)

Saturday, July 5, 2014

Fabric for Rosa - The Summer Dreams Blouse

A few weeks back I purchased two yards of Rosa, a Liberty Art Fabric Tana Lawn, at Brittex in San Francisco. Like my other Tana Lawns, the hand of this material is incredible, like a wonderful silk - kind of - but with something else I haven't figured out how to describe. 

Why is this print different from any other basic flower print? I can't say, but for me, it is.

In preparation for cutting and sewing a short sleeved blouse from this wonderful fabric, I altered my favorite shirt pattern, (B5526) into a short sleeved blouse pattern. My alterations involved moving the shoulder lines forward, decreasing the bodice girth and adding waistline to bust apex darts.

I'm currently working on sewing my first test version in pink and white striped seersucker. When I say "test version" I don't mean a muslin - I've created a muslin already and fitted it on my dress form and on me. The test version is one that I'll be wearing to see how I like the alterations. I plan to make at least one more test version before I snip into Rosa. That's partly because I adore Rosa and partly because Tana Lawn is quite pricy - a real investment! - whether I buy it in San Francisco or London. 

http://www.liberty.co.uk/fcp/product/Liberty//Rosa-H-Tana-Lawn/59043

Designed for Liberty by Allan Thomas in 1997 and has been on Classic Tana since 2002. 100% cotton with a texture and sheen to beat the band! Product ID: 59043

Wednesday, January 29, 2014

Bustiers: Made to Measure - Altering the Pattern (Draping Skills)

A little blue-sky sewing
created this bustier:-)
Recently I posted about my imaginary bustier. This blue-sky sewing illustration (I created it as a bookmark/luggage tag) has helped me to develop a general design sense for my project for the bustier class I'm taking from Lynda Maynard* at Cañada. OK, sure my figure doesn't resemble Barbie Doll's, but still we all need an idea of what we're going for!

You may have read in this blog, that I took a draping class this last fall (2013), where I learned to create patterns using a dress form. My goal from that class is not only to occasionally create my own pattern that fits and flatters me, but also to learn to alter commercial patterns so that they work well for my own figure.

You may also recall that I did a podcast about creating my "Uniquely You" Dress Form over the summer.  There, I created my own dress form, Conchita. I'm really glad that I began learning to work with Conchita over the fall. Those experiences are coming in handy as I work on altering the Simplicity bustier pattern Lynda Maynard* recommends for students in her class. (We can chose a different pattern if we want). So far I've spent a good chunk of time over the last three weeks, working on creating and altering my version of the pattern. I sure hope I'm getting close to a flattering fit.

My dress form Conchita is helping
me to alter the Simplicity bustier pattern to fit
and flatter my figure.
Does this look like anything I'd actually
wear in public?
!!!
Working through muslin garment versions and multiple pattern variations, can really take the time. It's an exercise in patience. And does it look like anything I'd actually wear in public while I'm working through the process? You look at the illustration to the left and be my judge!

 Worth it in the long run? You bet! I was really happy with my first pair of jeans that I made in Lynda's pants drafting class in the fall.

The muslin version looked truly terrible, and for a number of weeks too! Now, I wear those jeans nearly every day, and am looking forward to making another pair once I'm done with the bustier. There's nothing as great for a garment sewist as creating clothing that is truly made to measure.

~ ~ ~
Resources

Laurel's Bustiers Board on Pinterest : http://www.pinterest.com/lrshimer/sewingbustiersinspiration/

And stop by and check out some of my other sewing boards! http://www.pinterest.com/lrshimer/

Cañada College Fashion Program, Redwood City, CA
http://canadacollegefashion.com

*Lynda Maynard
http://canadacollegefashion.com/blog/2013/11/instructor-lynda-maynard/

Bustiers: Class Pattern
http://www.meencantacoser.blogspot.com/2014/01/bustier-class-pattern.html

Bustiers: Not a Corset! (Class)
http://www.meencantacoser.blogspot.com/2014/01/bustiers-not-corset-plus-free-printable.html

Creating Dress Forms: An Audio Podcast About the two different dress forms I created in 2013
http://www.meencantacoser.blogspot.com/2013/09/ench-by-sew-12-creating-dress-forms.html

Draping: But What Is It?  -One of several postings I wrote about draping last fall:
http://www.meencantacoser.blogspot.com/2013/11/draping-but-what-is-it-pattern-altering.html

Friday, December 20, 2013

Draping Lucy - Terminado! New Dress and back to Rec Sewing


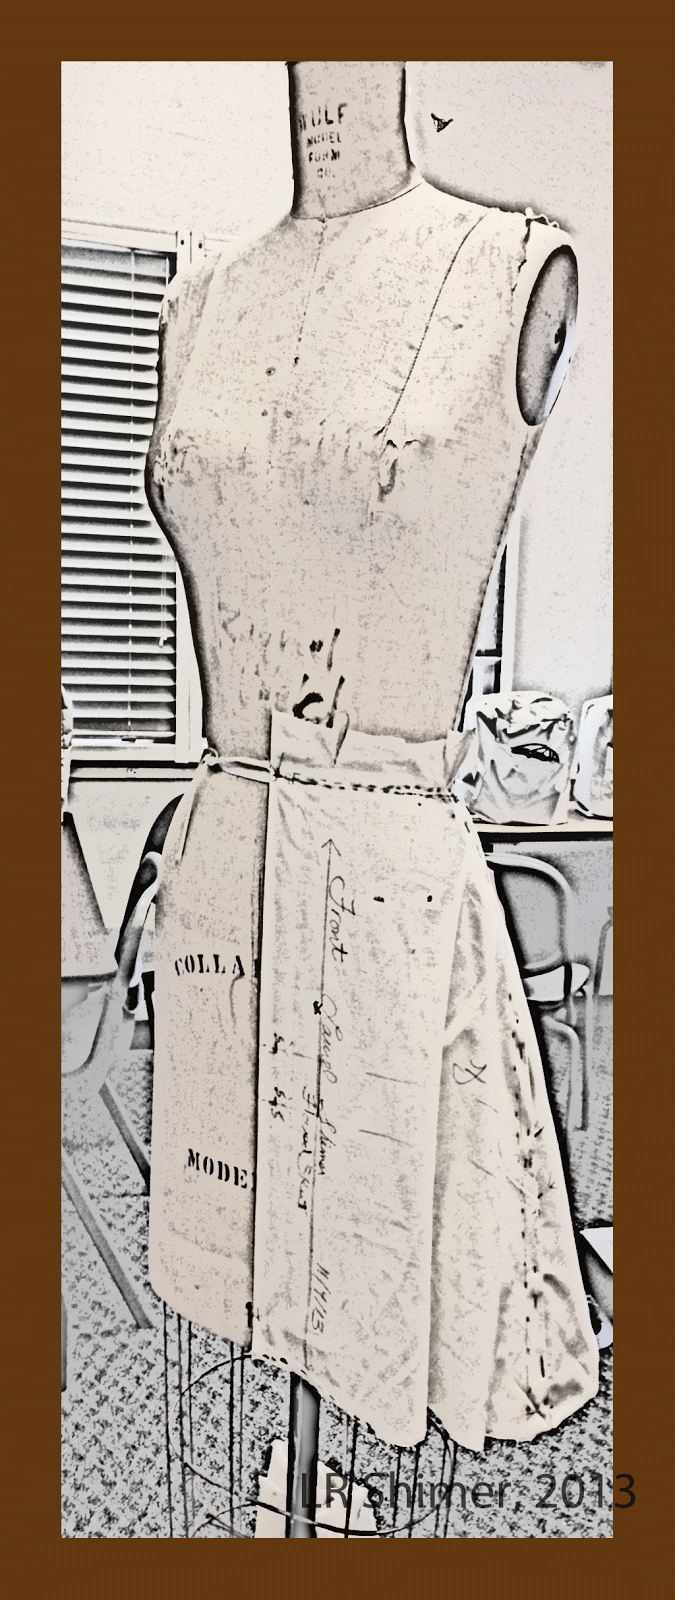
Lucy is the first garment I've
created  from a pattern I
made entirely myself, on my
custom dress form.

I haven't done any regular, recreational sewing all semester (one semester = 16 weeks) because I've been focused on the class work and final projects for my two fashion classes at Cañada College. The first class was Pants Drafting, taught by Lynda Maynard (that's the woman who knows what we really want to sew, and teaches us how to do it!)  In that class, I used drafting techniques,  and many fitting followups, to produce inumerable muslin garments, tissue pattern drafts, and my first pair of jeans. Can't wait to use that pattern again and again!

My second class was Draping. This class is excellently taught by Judy Jackson. Again I went through a lot of muslin, this time learning to design my own patterns by draping them in muslin fabric on a dress form, then creating tissue patterns from those draped garments. You may have seen some of my posts this fall that showed off some of the basic garment shapes I created on a standard sized 10 dress form (I called her Babs, a name that seemed appropriate for a mannequin who came to life in the early '60's). I also began draping on my own custom dress form that I created over the summer. 

When I last talked about my custom dress form I was calling her Colette, but I've since realized that she is really a Conchita
I found working with Conchita even more challenging than working with Babs, and Babs wasn't an easy customer. Was it because Conchita represented clothing I actually plan to wear? I'm not sure yet. But if I figure it out, I'll let you know!

Starting around midterm time, I spent several weeks creating a muslin sloper (a fitted bodice and fitted straight skirt) for Conchita. For some reason I found this very challenging, though I had produced the same garments for Babs. My teacher seemed to think that there should be the same amount of challenge, if only I was careful with my measuring. I worked very hard to be exact but all I can say is that it was much harder for me and just took a lot of time, muslin, tissue and patience.

Another view of Lucy
As you can see, I moved on from my sloper to make my first garment. I had originally planned to make a traditional shoulder-yoked, dropped shoulder, shirtwaist dress with a collar and front button plackets. I was of two minds as to whether the dress would have a separate skirt joined by a waistline seam or be a one piece dress. I was planning to use a beautiful piece of deep forest green silk noil (raw silk) that I have for that dress. In my mind the dress I was planning to drape was named Ivy. I'm still planning to take up with Ivy in the not to distant future. But I got distracted by Lucy....

I'll be writing more about the process of draping Lucy in upcoming postings in this journal. One thing I know I'll be reflecting on repeatedly, is learning to read the fashion fabric's story. This lesson came from my experiences in both my pattern-creation classes this semester. In both cases I saw that constructing beautiful garments is not just about designing a piece in my mind or on a sketch pad. It really comes down to watching the behavior of the fabric I've chosen to sew with, after it's cut out and initially put together on me or my custom dress form. Creating a muslin test garment is an important part of the pattern making process, but once I start the ball rolling with muslin, I then really have to listen to the story the actual material for that garment is telling me. That's what is going to guide me to bring the garment I'm sewing to life.

Learning to listen to, and read the fabric's story really keeps me
Enchanted by Sewing
~ ~ ~ 

Resources

You can drape on a person or on a dress form. When creating for ourselves, it's easiest to use the dress form approach!

In the September Enchanted by Sewing Audio Podcast Dress Forms Episode, I described my experiences creating two different dress forms. You can listen to this talk either online on the web, or you can download the show to your mobile device (like an iPhone, Android, etc.)
http://www.enchantedbysewing.blogspot.com/2013/09/ench-by-sew-12-dress-forms.html

I'm just beginning to learn the historic and modern art of draping. It's a very artistic experience !  I've begun to develop my skill set in a class taught through the Cañada College Fashion Department. I'll be continuing my draping journey by continuing to follow the richly illustrated draping tutorials and examples in our class textbook, The Art of Fashion Draping. This excellent, and highly regarded book, by Connie Amaden-Crawford has been in use for decades. both within the industry, and by home sewists. 

Thanks Sponsors! 
When you buy products through links in this blog, you support the regular work of this blog and The Enchanted by Sewing Podcast.

Wednesday, December 11, 2013

Vintage Threads - Katherine Hepburn Mid-Rise Waistlines

Hepburn often sported a mid-rise
waistline - a very 30's look
I've been exploring waistlines off and on since early last month. I started with thoughts on no waistlines, then moved into under-bust waistlines. I've also included some elements of fashion history. 

Now I'm moving on down to think about mid-rise waistlines, those that occur between the under-bust (like Empire style dresses) and the natural waistline (like those on "New Look" bouffant skirts).  

You see the mid-rise waistline at several times in history. Some of my favorite are those sported by Katherine Hepburn. The timeless striped dress she wore in "Bringing up Baby" had a mid-rise waistline. I journaled about that dress back in a discussion of vintage godets - the Bringing Up Baby post

Of course Hepburn wore this waistline frequently because it was what was in style, however I also think it flattered her slim-hipped figure. For women who don't go out much in the hip area, this look lengthens the body. It also shows off the leg line. Hepburn had a very active style about her. Indeed she was quite active, and liked to get a lot of exercise. Her mid-rise waistlines make the most of her quick style of movement.

I don't have Katherine Hepburn's slender figure, but I do share one trait with her. I don't curve out much in the hip area. I noticed when I worked on fitting my first pair of jeans, that a high-rise waistband is flattering for me. As I'm working on my first complete (and final) garment assignment for draping class, I'm paying very close attention to where I'm defining the waistline. I've marked both a traditional and a mid-rise waistline on my custom dress form, and I keep experimenting with where to define the dress waistline.


No matter where I draw the waist's line, considering and placing it to best suit my own figure is the kind of project that keeps me...
Enchanted by Sewing!


~ ~ ~
Resources

Vintage Threads - Bringing Up Baby - Katherine Hepburn's striped dress with godets http://meencantacoser.blogspot.com/2013/11/vintage-threads-katherine-hepburn-in.html


Enchanted By Sewing Audio Podcast - Creating my own Dress Forms http://www.meencantacoser.blogspot.com/2013/09/ench-by-sew-12-creating-dress-forms.html

My first pair of jeans, created as the final project for my pants drafting class,  have a mid-rise waistline http://www.meencantacoser.blogspot.com/2013/10/jean-sewing-my-first-jeans-are.html

Wednesday, November 13, 2013

Draping: But What *Is* It? (pattern altering and design)

A flared skirt I draped in
Fashion Lab
You're right, that hem wasn't
yet even!
Before people sewed they draped. 
And we continue to drape today. 

Most of my buddies, both sewists and non-sewists, understand what I'm talking about when I say I bought a pattern, altered it to fit a little better, and sewed it up. But when I say I'm studying draping, they give me the funny look. When I explain what draping is, I get another look.

Draping is the most historic way of creating clothing. Long before people applied the first ancient bone needles and early threads to join pieces of fur or fabric together, they hung or draped clothing on themselves and others and found ways to fix those materials onto the body. 

You may have tied or wrapped stuff around your own or a dolls body at one point in your life, and achieved a serviceable garment. Ever tossed a hole-embellished sheet over your head, and been a ghost for Halloween? I know I achieved a lovely Roman goddess effect with a large blue sheet and a little twisting around my self and over one shoulder, back in sixth grade.

In most cases of early draping, the fabric was draped directly onto the body the piece of clothing was intended for. Eventually pins were added to hold things in place (If you can knap stone or bone to create an arrowhead, why not a pin?). By the time the Romans dominated the western world, many civilizations were using something along the lines of the Roman fibula, a kind of forerunner to the modern safety pin to hold longer clothes on. They were also pretty savvy about tying fitted workmanlike garments onto their bodies.

Stitching things in place came rather later in history. It was the tying, draping and arranging of fold and fabric that counted. 

Skipping forward quickly (did you know I'm an inveterate time traveller?) we find that though modern folks have invented the flat pattern method of clothing construction, clothing designers and sewists continue to use draping as either an alternate method of creating a pattern, or as a way of testing, altering or polishing the fit of a garment created with a flat pattern. 

I'm taking a draping class in order to develop skills I can use with my custom dress form. (You may also choose to buy dress forms that you can adjust to reflect your measurements.) That means I'll be better able to alter commercial patterns to fit me, in addition to beginning my journey into creating my own patterns. I also hope that someday I'll be bold enough to create a garment from scratch right on my custom form, just like the couture houses do for their high-end clients!

As I learn to drape, I'm learning more about this ancient art form, increasing my appreciation for historic garments, and developing a sense of why the lines of different pieces of clothing fall the way they do. 


Learning to drape, and studying the history of draping is the kind of thing that keeps me...
Enchanted by Sewing!


~ ~ ~
Resources

The profession known as a "draper", has an historical significance that goes back to medieval trade guilds. http://www.ask.com/wiki/Draper

You can drape on a person or on a dress form. When creating for ourselves, it's easiest to use the dress form approach!

In the September Enchanted by Sewing Audio Podcast Dress Forms Episode, I described my experiences creating two different dress forms. You can listen to this talk either online on the web, or you can download the show to your mobile device (like an iPhone, Android, etc.)
http://www.enchantedbysewing.blogspot.com/2013/09/ench-by-sew-12-dress-forms.html


I'm just beginning to learn the historic and modern art of draping. It's a very artistic experience !  I've begun to develop my skill set in a class taught through the Cañada College Fashion Department. I'll be continuing my draping journey by continuing to follow the richly illustrated draping tutorials and examples in our class textbook, The Art of Fashion Draping. This excellent, and highly regarded book, by Connie Amaden-Crawford has been in use for decades. both within the industry, and by home sewists. 

Thanks Sponsors! 
When you buy products through links in this blog, you support the regular work of this blog and The Enchanted by Sewing Podcast.

Thursday, September 26, 2013

Ench By Sew-12 Creating Dress Forms (Podcast Episode)

Co-Published with the Show Notes for Enchanted By Sewing


Hey! The latest Enchanted by Sewing Podcast has been published!
Two Ways to Listen
i)You can listen to the show right on the web by clicking on the this link
** * * 
~ OR ~
ii)  Click on this link to iTunes  to download this and other Enchanted by Sewing shows to your mobile device (iPhone, Android, etc.) free from iTunes 
Did I miss any links mentioned in the show? If so, please post here and let me know, or else email me ,  EnchantedBySewing AT gmail
~~~
This month show is about my experiences creating and using two different types of dress forms - 
a) A duct tape dress form
b) A Uniquely You dress form
~ ~ ~

Please send your thoughts about this month or next month's topic – Jeans Sewing -in the Post a Comment section,  below :-)
~ ~ ~

Please Note
My Uniquely You Dress Form Instructor was Judith Jackson. I referred to her as "our teacher" in the original recording, as I was waiting to ask her permission to include her name. She said 'yes' :-)

In this month's show

1) What is a dress form?
a. A mannequin who’se shaped like you. A fitting or body double, a way to fit patterns, garments, drape and design as though you’re the tailor and the dress form is you
b. Listen to Lori's Sew Forth Now Podcast for a history of dress forms
Lori not only talked about history, she also talked about the style of dress form and I’m not repeating any of that. Please listen to her wonderful show (she said it would remain there for the near future) esp interesting to me is lori’s archeologic work, uncovering the history of dress forms.
Lori uses an adjustable dress form, I worked with two different types – duct tape and a Uniquely You dress form
c.
2) Why I wanted a dress form
a. Fit
b. Trying out patterns and muslins in 3D
c.  Create and play around with my own designs, and minor commercial pattern alterations and design changes
d.  Because Lori made them sound so appealing!
e. Maybe for photographing in my blog….

3) Body Issues and your Team
a. Body issues are a part of our culture
b. Find helpers/team who help us feel good about ourselves
c. A dress form helps us distance ourselves from body issues – it’s just data
d. A dress form helps us notice our best features – what do I want to flatter more?
e. A dress form helps us make patterns or garments we design ourselves more flattering, so we learn to play up our best features
f. A dress form allows us to experiment with a muslin/toile – Can I make a shirtwaist that flatters my figure type?
g. Choosing our Team

4) Two types of dress forms I experienced. Basically what they are,  

5) Cost

6) Materials (tools)   and Resources (web stuff) - I list some Resources below

7) Safety- Working around kids,  young or older goofy, fun loving kids - Two good reasons not to !
8) Social Comfort/Body Issues – You need a work group, at least one other person. Find someone who supports your best interests and helps you feel good about yourself
9) How I’ve used my dress forms , what other things I or others might do w/ them
 - Fitting, altering, trying out new patterns, hand sewing/deconstructed neckbands - helps me conform neckline to lay well on me
- A Wedding in your future? Formal/Special Occasion Wear I would guess that if you’re doing a formal dress for someone with beading or close fitting - and maybe they aren't available at the drop of a hat, might be worth making a duct tape (or other type )  dress form for them


10) Technicos: In-depth details about how I made these two different styles of dress forms. What I actually did to create them

~ ~ ~
Resources

Listen to the Podcast on web - no need to download to a mobile device
http://traffic.libsyn.com/enchantedbysewing/draft5_dress_formENCHANTEDbySewingFINAL.mp3

There are so many fun things about dress forms - making them, draping on them,  displaying historic, artistic and other garments on them, and enjoying them as an art form - whether full sized, half size, miniature or doll size. There are even topiary forms inspired by dress forms. Whenever I see a good dress form that fits any of these categories, I pin it on one of my virtual bulletin boards http://www.pinterest.com/lrshimer/dress-forms/

Lori recorded a Sew Forth Now podcast episode on dress forms. I tried not to duplicate anything she already talked about in this great show

Dress forms are a popular theme with sewing bloggers 

"Threads" Magazine has many articles related to dress forms

Quick and Easy Duct-Tape Dress Form


Some people think Paper Tape works better than duct tape. Haven't tried it myself, but I'd be game!
      http://www.threadsmagazine.com/item/3633/paper-tape-dress-form Paper Tape Dress Form


Kenneth King make an extra body to use for two people  in Threads issue 161
 June/July 2012


I looked in the Threads Magazine Archive to find different articles. You can find that at...
http://www.tauntonstore.com/threads-magazine-issues.html  You can buy individual Threads back issues, if you or your public library doesn't have them on the shelf.


1) "Fit for Everyone" by Kenneth D. King in issue #161. This describes how to sew removable covers to make your dress form work for multiple figures.
A. "Tip: Meet Madeline" by Sandy Moeckel in issue #153. This tip describes how Sandy inexpensively made her dress form suitable for herself as well as her daughter.
1) "Tip: Identical Body Double" by Anne K. Brenz in issue #144. This tip describes the way Anne made her dress form fit her every curve.
"The Dress Form–A Sewer's Best Friend" by Carol Fresia in issue #123. Described below.
"Make An Arm for Your Dress Form" by Shirley Botsford in issue #90.
"Clone Yourself a Fitting Assistant" by David Page Coffin in issue #75. This article explains how to make a dress form from scratch.

~ ~ ~
Things I might try out for arty fun and practice with my dress form 


Making a newspaper dress on a dress form. Fun way to learn draping?


tutu might also be a fun way to experiment with draping on a dress form too "How to make a tutu out of paper" http://www.youtube.com/watch?v=qp6nKpzd0eI

Wednesday, September 25, 2013

Draping: Checking out my Dart Extensions (Fit)

In this illustration, I'm working with a tissue pattern I've
created from the muslin piece I draped on the dress form
I  tested the extended part of my dart, to make sure that there's
enough length. I did that by laying scrap tissue on top of my
freshly drawn pattern, adding the hemline on either side of the dart,
drawing in the dart, and pin-sewing it in place to make sure my
extension came out right. 
Some of the first things we are learning about in my draping class is adding darts. We start by drawing the straight of grain and the cross grains, and securing them to the dress form. Then we secure those grain lines to the dress form, and we're off.

We're learning not to think about making a dart, we capture a dart, as we smooth, and pin, the fabric into place.

I'm starting out using a class dress form, and looking excitedly forward to the day when I'll be draping on the Uniquely You Dress Form I made over the summer. The September Enchanted by Sewing Podcast will be all about my experiences to-date, creating and beginning to use two different types of dress forms. I wish I could publish the 'cast earlier, but I'm limited when it comes to disk space for new episodes (yes - I actually pay for podcast space!), so I can't publish before the end of the month.

Tuesday, September 17, 2013

Dress Form Haiku

She's my fitting friend
My dress form - separate - but me 

:-)
Foam core, woman spirit
L.R. Shimer

Yes, I am working on the Enchanted by Sewing Podcast for the month of September tonight. 
How did you guess?

Friday, August 9, 2013

Jeans Sewing: Skirting the Issue

My new amiga Colette,
is a big help when
it comes to creating a fitting muslin/toile
for the M6261 pattern.
Plus I get to use up this poplin for the fit garment.
I wonder what I thought I'd make out
of this when I bought it? :-)
I've blogged and podcasted before about my determination to  learn to sew jeans.

Until i had an actual project to sew, just doing sample sewing didn't motivate me enough, to work on my jeans sewing techniques. I sat down a couple of times this summer, and worked on denim flat-felled seams. Mostly what I learned is that when I stitch a heavy denim (11 oz), it's much more challenging to fell straight lines , than lighter weight cotton such as the ones i felled in my intermediate sewing construction class, or the scraps of 7 oz mid-weight denim, leftover from last summer's shorts and cap project. I fussed around thinking about different things to try,  and wondered if maybe I would even need a heavier duty machine, as was mentioned in a couple of different sewing forums.

I also thought a lot about simply getting straight lines of topstitching. I've located jeans needles and a variety of threads (topstitching and heavy for the seams) . In my sample sewing, I'd already run into tension issues. How could I expect to do the contrasting colored topstitching on pockets, waistband, and hems if I don't work that out?

And have I mentioned learning to install rivets and those special jeans buttons? I want to know how to do those too.

In addition to the challenges of jeans sewing skills, like flat-felling, and special embellishments, there's the whole issue of getting a jeans pattern to fit. Who among us doesn't find that a challenge?

I was determined to be really ready to sew jeans, but I was too intimidated to simply jump in and starting sewing them.

So how about a sewing project where i just sit down and work through some of the jeans techniques and special embellishments, as best as I can, but i don't actually sew jeans?

No I'm not talking about a cute cushion or a fetching tote bag, we're talking a denim jeans-style skirt. This skirt will still require fit-work too, which is a great opportunity to use my new dress form, Colette, whom I brought to life in summer school. Fitting a skirt to Collette, seems like less of a fit challenge than jeans (Colette isn't bi-forcated so I can't fully fit jeans on her, though she can help with some aspects).

M6361 is my idea of a good, basic
jeans-style skirt
I've chosen Palmer and Pletsch M6361, a  skirt and trouser pattern that suits my idea of what a jeans-skirt should look like. Here it is http://sewing.patternreview.com/patterns/47923

So far I spent about six hours fitting the skirt in this mid-weight teal blue poplin fabric, and several more hours cutting out the denim and getting going on my actual skirt. I've already realized that I'm not going to make real-true flat-fellled seams, but I'm still hoping I'll get a faux flat-felled look going. I'm relatively happy with the fit at this stage, though I haven't gotten far enough with the real skirt yet to be sure. I've also decided to wait to fit and cut out the curved waistband until I'm farther along with the project. So I'm crossing my fingers that I'll get a look and fit I"m happy with.

I'm really glad I'm getting going with my jeans sewing skills - even though I'm creating a different kind of garment. I'm looking forward to  blogging more about how the project goes.

Getting going with my jeans-sewing skills (and getting a skirt out of the deal!) keeps me enchanted by sewing!


Wednesday, July 24, 2013

Kits 1 and 2: Refitting B5526, with help from Helen - my DTD

Fold and refold, and cut the sleeve out twice
on two different pices of fabric
(Yes, I remembered to cut out one left and one right!)
 to squeeze out a front, back and two sleeves from
1 1/2 meters. Luckily it's a wider fabric
In my most recent posting, I described several personal sewing kits I've been creating - the first two were for B5526 shirts.

Somehow I did something funny with my back pattern piece from B5526, but I managed to recreate it ...using muslin, pattern tissue, a lot of comparing to my No. 1 Lady's Detective Shirt
My fantasy version of
Helen
my Duct Tape Dummy
and a lot of help from Helen - my Duct Tape Dummy. It took me 4 hours... I started at 10 p.m. one night and went to bed at 2 a.m. No, I'm not actually a night owl, but that was the best time to get it done.

Yes, I do wish I hadn't been so casual when it came to storing away or properly marking that original pattern piece!

After refitting B5526  I cut out most of two shirts using a lilac Robert Kaufman gingham for one and a green print LIberty Tana Lawn for the other. For both I used half meters (19.5 inches) of specialty Liberty Tana Lawn fabric for the cuffs and front facing. I had to do a lot of fooling around to  squeeeeezzze the front, back and sleeve out of the 1 and 1/2 meters (a little over a yard and a half) of green Tana Lawn I got the first time I visited this wonderful London store. I've normally been counting on having about 3 yards when I cut out these shirts.

I'd been holding onto the Liberty fabrics since my previous trip to London's wonderful Liberty (* See my blog and podcast links below for more on this London trip and the fabric I bought there at Liberty), but since I got two full shirt lengths on my more recent trip, it was time to use up these originals.

I love this classic William Morris Strawberry Thief print
As a matter of fact, one of the new shirt lengths
from my more recent Liberty trip, is
the green version of Strawberry Thief
I talk about this in the podcast (*link below)
I didn't cut out the collars and collar stands yet, because I didn't recheck the collar fit, and I had some issues with that collar being a shade bigger than I'd hoped when I made this shirt in the pink mille fleur print, just before our trip to the U.K. I'll probably have to use bits of the alternate fabric for these, probably on the under side of the collar. I'm sure I'll have to piece the green print, but hopefully it won't show.


Feeling confident I've got a shirt pattern like B5526 working so well, helps keep me enchanted by sewing!

Have you gotten a chance to see my post - Lovin' London's Liberty and listen to the June "Enchanted By Sewing" podcast show, Laurel Loves London)?

Sunday, July 21, 2013

Squeezing in the Sewing - Personal Project Kits (Organizing)


Kit 3 - My Duct Tape Dummy, Helen, has
been such a help as I learn about fitting.
Here, she's hanging out on her chair as
I fit  the
Hot Patterns Weekend Sunshine Top 
to her physique.
I'm taking a dress-form making class in
summer school, which is why I haven't concerned
myself with improving Helen's filling or
figured out some kind of stand for her.
I've been making myself the gift that keeps giving- several sewing kits.

Our household has been going back and forth when it comes to time for favorite activities, mostly on the negative side for sewing. Yet, by dint of staying up  really late a couple of different nights, I managed to get a couple of different pattern fitting projects in along with putting in a little more time on jeans techniques sample sewing.

It was tempting to simply cut one thing out from my fitting work, and sew it, for sheer satisfaction, but instead I made myself a bunch of ready-to-go sewing kits, because I know I've just got a short lull  before things get super busy in the house. Bet you know the difference it makes to have a project all ready to sew and go when you have twenty or thirty minutes to squeeze in some precious sewing time.

I made four kits so far, and am hoping to squeeze in one more before I put away all the fabric and patterns I dug out. That' something I have to do, since I share my sewing zones with other folks. The other residents of the household have needs too, and none of them involve stiching!

My kits are just zip lock bags - the gallon size (I think). There the same ones that hold a pattern and all it's pieces so handily. Do you have a big tote bag of those that you recycle from sewing project to sewing project like I do?

Kit # 1: B5526 Shirt - a.k.a. my No. 1 Lady's Detective Agency Shirt cut out in lavender Robert Kaufman gingham with a half meter of Liberty of London Tana Lawn for cuffs, collar and other contrast/highlight areas.

Kit # 2:  B5526 Shirt - a.k.a. my No. 1 Lady's Detective Agency Shirt cut out of 1 and 1/2 meters (Woof! how did I squeeze that one out!) of a green and cream Liberty of London Tana Lawn print with a half meter of Tana Lawn in purple background Strawberry Thief print for cuffs, collar and other contrast/highlight areas.

Kit # 3: New (to me) tee shirt, the Hot Patterns Weekend Sunshine Top . I've had this half-muslined since last fall (!). It's now fitted (thanks to my Duct Tape Dummy Helen) and cut out in a pink jersey knit (rayon/poly from Fabric.com) with white pin dots. I sure hope I see that note in the zip lock bag reminding me to use a streeetttcccchhh needle when I go to sew. If I don't use one of those needles with jersey knits I definitely get holes.

Kit # 4: A test garment tee from my standard most-basic tee shirt pattern (B3383). This is the kind of thing I'll get some use out of (assuming I'm happy with the actual fit) but not a long-term commitment garment. I cut out the shirt from two commercial tees that I bought on a trip to Vancouver Canada last summer. Inexpensive tees are my favorite way to get a test garment going on a tee shirt pattern, and I can always use another basic tee.

Kit # 5: Butcher's Apron-  In progress. About a yard of very appealing "Dick and Jane" fabric I've been holding onto for too long (I don't want to see my fabric inventory get stale!) , in combination with another remnant - a kind of stiff black cotton with white dots - and some red bias binding is going to form an addition to my wardrobe of much-used household aprons.


Organizing personal project sewing kits is a gift to myself. 
It keeps me enchanted by sewing.

Saturday, July 6, 2013

Fitting the Tee - Every Knit is Different - Duct Tape Dress Form

What do I love most?
 The embroidered hummingbirds?
The under-bust tucks?
The fringy bits I created from knit scraps?
The deconstructed neckline?
I've been squeezing in a little time here and a little time there on this simple rose pink tee with the embroidered hummingbirds. It's been one of those life-is-sometimes-like-that times. Bet you know how that goes :-)

It's a funny thing, I'm using a tee pattern I've altered in the past and sewn several times, but this time through the tee just didn't hang right on me. I'm so glad Lori addressed the variable character of knits so many times in different Sew Forth Now podcasts. Now I know it's not just me who has these challenges. You just never know with knits, they each have their own drape and stretch.

In this case, I admit that I was working with a very flimsy knit. I cut this shirt out of two rose pink commercial tee shirts. I keep them around more as muslins then for my regular wardrobe. But.... they were a pretty color and I just wanted a quick tee fix.

That's where the front detail came from. After doing the machine embroidery (I posted about those dragonflies last time) I just didn't love the way the shirt hung, so I added a little hang of my own.
Don't you love that elegant view of the
old newspapers coming out of the neckline of
my Duct Tape Dummy (DTD)?
It's not glamorous, but it helps her keep her shape for now
I'm not worried about filling her up properly, 'cuz
I'm actually taking a Dress Form Making class !
So, no, my little DTD is never going to be properly filled.
Hey, you knew I was going to show off the value of my Duct Tape Dummy again, right?

I first got out my lovely Dummy after I tried on the shirt and found I didn't like the typical fabric neckband. I did the slight stretch and fold over fabric neckband thing and no matter how much or how little I stretched the neckband/trim, the shirt  reminded me of something Beaver Cleaver wore. So I unpinned and unabasted (never commit the stitches till I'm sure!) and created this deconstructed neckband instead. It's simply a strip of black knit I cut off the bottom of another tee and then twisted and pinned, twisted and pinned all the way around. It's actually still pinned (as is the decorative bit in the front) waiting for sometime soon when I get a chance to sit and do a little hand stitching. The under bust strip is the original unsuccessful  neckband (which was shorter than the new deconstructed one), pinned in place over some tucks (or would you call them darts?) I just pulled in place by hand and safety pinned. I twisted that strip in the same way that I did the deconstructed neckband. 

I created the fringed bits in the front  from
- The ends of that strip hanging down
- Additional strips I added in and braided a little bit at the top
- Scraps of the rose pink I bound around that 
- Cutting each strip in half or thirds to make more and thinner pieces
Entonces... Finally I hung onto the top of each strip and pulled on the opposite end to get a longer, narrower rolled , dangly, fringy piece


Filling in the time gaps with my rose and  black tee shirt , adorned with hummingbirds and creative scrap embellishment really keeps me enchanted by sewing.

Saturday, April 27, 2013

Duct Tape Dummy Stands Up (fitting/duct tape dress form)

My Duct Tape Dummy (DTD) isn't exciting
But she Stands Up to Sample Sewing
This is fleece scrap I used to test some of the
 basic concepts I'm altering

I've been working on a fleece jacket, with sleeves that button off and on. I haven't had the heart to blog about the project, though I've been spending an awful lot of my recreation time muslining and altering a fleece jacket pattern I've made successfully in the past. I'm using a combination of home dec fabric for the button'y parts and fleece for the majority of the jacket.  I'm still at the just-don't-know stage. I would not recommend doing button on/off with fleece at this stage!

This project has given me an opportunity to use my Duct Tape Dummy (DTD) that Susan and I made over spring break. Actually, Susan did all the work on me. The one I attempted to make on her, was not a success. Yes, I do owe her, and plan to drive back over the hill one day very soon to strap her up. I didn't do the tape tight enough on her. Watch out for that if you are planning a similar project.

Though my actual DTD isn't nearly as elegant as my lovely tree-maiden vision (Did you see that posting? http://meencantacoser.blogspot.com/2013/03/dtd-planning-duct-tape-dummy-fitting.html) she does her duty. 

Yes, that is Hello Kitty duct tape. I also learned that you don't get nearly as much duct tape when you buy decorative duct tape, as when you get the basic macho version. That's what's underneath the kitties. Also I think we went through at least 2 rolls of the macho-duct tape, just in the bottom two layers (3 layers of duct taping in the whole thing). To be safe, I'd recommend 3 rolls of the macho duct tape (the kind you might actually use for duct work) and 2 rolls of decorative for the top layer. 

I still haven't fully stuffed my DTD. For the time being, she's partially filled with plastic newspaper bags, regular recycled newspaper and an old sheet. When I use her, she sits on the table, then goes to bed in a big plastic garbage bag (but well hidden so that nobody will toss her by mistake).

That DTD of mine is a kind of frowzy gal, but she knows her job.


Friday, March 8, 2013

DTD: Planning the Duct Tape Dummy (fitting)

Do you think my DTD could
possibly be as stunning as
this naturally woman-formed tree
I happened to see on a
neighborhood walk?
Since I wrote this posting...I've created both a duct tape dress form (aka my duct tape dummy - affectionately known as Helen)  and a Uniquely You Dress Form. My September "Enchanted by Sewing Podcast" will be devoted to what I've learned about making and using dress forms to date. Signup to be notified when this episode, and other monthly episodes, are published by visiting http://EnchantedBySewing.blogspot.com
I'm excited to begin planning to make a duct tape dress form over spring break, in early April. Just think I will be able to try things on my gal pal instead of ...

* Continuously pulling off my clothes in front of the sewing machine
* Running to the bathroom  mirror with a dish of pins
* Having the pins spill all over the bathroom counter. 

Well, yes that is how I currently do my a lot of my fitting, when I'm not in sewing lab begging somebody else for help. 

Of course I hope to work on this project with my sewing buddy, Susan. You remember Susan, she's the one who put her heart and soul into fitting my B5526 shirt pattern, which, (Hooray!), has indeed been altered to fit me because of all her hard work!!!!

 I don't know where I picked up the idea that this kind of project is also called a 'duct tape dummy' . I realize the Duct Tape Dummy(DTD) will be quite far down on the scale compared to the real deal, cool dress form that you can purchase or manufacture from specialty plastics, but I'm still jazzed about my DTD.

Wish me luck!

Saturday, December 29, 2012

Notions: I Don't Give a Pin!

Pincushion Gal Helps Keep Me
Enchanted By Sewing
But Darling, we can't have your mother to stay. We're going to the country this weekend.

Oh fiddledeedee, I don't give a pin about going to the country!

You don't hear people complaining that they .... don't give a pin! for something anymore. Usually a more vehement expression is used to express disinterest in a companion's speech or interests. I suppose it's because pins aren't worth much anymore, though you can still find references to people paying for things using pins in the delicious Betsy and Tacy books. And how many people do you know who refer to their pin money these days?

I love my new friend, Pincushion Gal. Mostly she's content hanging out behind my sewing machine, but she has been known to go visiting as far as the ironing board. At first I kept knocking her over, because her heavier torso was supported by a rather frail little base. After a confab with my husband we came up with a solution to that little challenge. I stitched up a little sack of dried beans, using the end of a piece of flannel from the night shirt I'd just made him (another good reason to hold onto scraps!), filled the little case with dried beans, then attached the resulting bean bag around the base of the form with - you guessed it- pins! My gal doesn't get knocked off her feet anymore, despite all the work she does for me.

As you can see, it's quite tempting to add more than pins to the newest member of Sewing Corner. So handy to tack down bits of silk organza scrap (good spots to stick my threaded needles), spare bits of trim, beading, and the pretty little brooch I picked up from the flea market. And of course a lady like this needs a fan for flirting with her many admirers.

Hanging out with the new girl at my machine, keeps me, as always, absolutely enchanted by sewing.