I love to use Pinterest as my virtual bulletin board. As you might guess many of my pins are sewing related. Click here to see what fun stuff I've found and pinned to different sewing boards.
Showing posts with label pin. Show all posts

Thursday, February 15, 2018

Concert Black Haiku - Part 1


All About Vision
Cutting, Pinning  - Plan to Sew

Replace Concert Black

M3650 - Out of Print - Many Vendors Still Carry This Pattern Used

Tired of the black top I've been wearing to sing as a member of Stanford Symphonic Chorus, I've recently cut out a Tried-and-True Pattern. The material is some kind of heavy-silklike, man-made fabric. I bought it in New York's Garment District. When performing we all wear black. The styles are up to us.

Our next concert is early March. Nothing like a goal to get something sewn!

Nothing like using a Tried-and-True  pattern to inspire me to dream about something new, take up my shears, and get going.

Wednesday, April 9, 2014

Seams to Fit Part 3: More Power to Interlining! (Technicos)

Using  stitching marks on my interlining pieces to define the stitching lines on the fashion fabric it's backing.              

Previously
Seams To Fit Part 1: A Little Less Laxity 

Seams To Fit Part 2: Making My Mark 

I figured out how to take advantage of my interlining, to help match the seams on my bustier project.

What is interlining?
Interlining is like a piece of backing for a garment's fashion fabric. In this bustier project, my fashion fabric is denim. My interlining is a piece of plaid 100% cotton flannel. You will never see the interlining once the garment is done, even on the inside. That's because this garment will have a second shell that includes lining. The interlining will be sandwiched in between the lining and the garment fabric.

I cut the interlining just like I cut the fashion fabric.

The interlining is just sewn on underneath the piece it backs.  I treat the two pieces of material as though they are just one piece of fabric. The back/wrong side of the interlining is sewn to the back of the fashion fabric.

Why did I used interlining in this garment?
Typically interlining is used to make a fashion fabric more stable and give a little less. For example you might use interlining with linen to make it crisper. (In which case you might cut the interlining just a little more narrow - a good trick, eh?)

In this case, I used interlining as a layer of extra protection because of the bones/stays that are in the next layer below it. It helps avoid the chance that these bones will slip out and poke into the outer/fashion fabric layer.


How I took advantage of my interlining, to help match the seams on my bustier project.

Because this bustier has really small pieces, and is really fitted, I marked, then sewed through, the stitching lines all the way around on my interlining pieces. I just sewed through that one layer, to make the seam/stitching lines really clear. 

I also marked all the stitching lines on the inside of my fashion fabric. I could have basted those lines, then matched up the stitched lines to ensure that my seams are precise.

But I really don't like having to take all those basting threads out of the fashion fabric. Also, sometimes they're hard to remove, especially if I sew over them.

Since I have the stitched lines on the interlining and the marked lines on the fashion fabric, I was able to slip pins through from the interlining into the marked line and pin the interlining layer to the fashion fabric layer all the way around the piece. I could easily check on the fashion fabric layer to see that the stitched line above was marrying up right with the marks all the way around.

I repeated this process with the adjoining piece - both on the fashion fabric and the interlining fabric - then joined the seams of the two pieces together, slipping the pins from one seam line marking into the one below. I was able to constantly check my pinned stitching lines, to make sure that the seam line below was matching up properly with the seam line on the top.


Figuring out how to sew narrow garment pieces together precisely, and save time removing basting stitches later on, is the kind of technique that keeps me....
Enchanted by Sewing.


~ ~ ~
Web Resources

Boning Up On Bustiers: http://meencantacoser.blogspot.com/2014/03/ench-by-sew-018-boning-up-on-bustiers.html

My Pinterest  Bustiers Board 


Wednesday, November 13, 2013

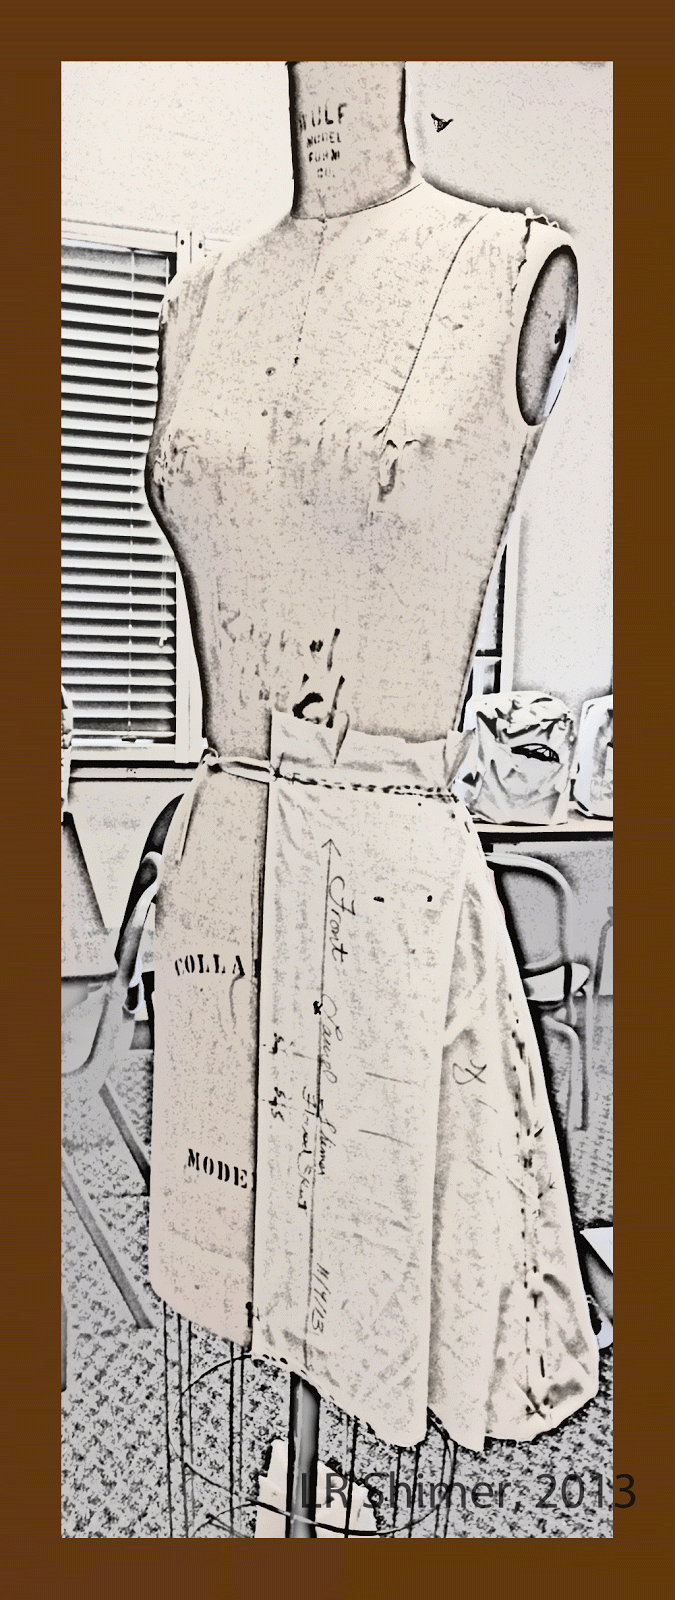
Draping: But What *Is* It? (pattern altering and design)

A flared skirt I draped in
Fashion Lab
You're right, that hem wasn't
yet even!
Before people sewed they draped. 
And we continue to drape today. 

Most of my buddies, both sewists and non-sewists, understand what I'm talking about when I say I bought a pattern, altered it to fit a little better, and sewed it up. But when I say I'm studying draping, they give me the funny look. When I explain what draping is, I get another look.

Draping is the most historic way of creating clothing. Long before people applied the first ancient bone needles and early threads to join pieces of fur or fabric together, they hung or draped clothing on themselves and others and found ways to fix those materials onto the body. 

You may have tied or wrapped stuff around your own or a dolls body at one point in your life, and achieved a serviceable garment. Ever tossed a hole-embellished sheet over your head, and been a ghost for Halloween? I know I achieved a lovely Roman goddess effect with a large blue sheet and a little twisting around my self and over one shoulder, back in sixth grade.

In most cases of early draping, the fabric was draped directly onto the body the piece of clothing was intended for. Eventually pins were added to hold things in place (If you can knap stone or bone to create an arrowhead, why not a pin?). By the time the Romans dominated the western world, many civilizations were using something along the lines of the Roman fibula, a kind of forerunner to the modern safety pin to hold longer clothes on. They were also pretty savvy about tying fitted workmanlike garments onto their bodies.

Stitching things in place came rather later in history. It was the tying, draping and arranging of fold and fabric that counted. 

Skipping forward quickly (did you know I'm an inveterate time traveller?) we find that though modern folks have invented the flat pattern method of clothing construction, clothing designers and sewists continue to use draping as either an alternate method of creating a pattern, or as a way of testing, altering or polishing the fit of a garment created with a flat pattern. 

I'm taking a draping class in order to develop skills I can use with my custom dress form. (You may also choose to buy dress forms that you can adjust to reflect your measurements.) That means I'll be better able to alter commercial patterns to fit me, in addition to beginning my journey into creating my own patterns. I also hope that someday I'll be bold enough to create a garment from scratch right on my custom form, just like the couture houses do for their high-end clients!

As I learn to drape, I'm learning more about this ancient art form, increasing my appreciation for historic garments, and developing a sense of why the lines of different pieces of clothing fall the way they do. 


Learning to drape, and studying the history of draping is the kind of thing that keeps me...
Enchanted by Sewing!


~ ~ ~
Resources

The profession known as a "draper", has an historical significance that goes back to medieval trade guilds. http://www.ask.com/wiki/Draper

You can drape on a person or on a dress form. When creating for ourselves, it's easiest to use the dress form approach!

In the September Enchanted by Sewing Audio Podcast Dress Forms Episode, I described my experiences creating two different dress forms. You can listen to this talk either online on the web, or you can download the show to your mobile device (like an iPhone, Android, etc.)
http://www.enchantedbysewing.blogspot.com/2013/09/ench-by-sew-12-dress-forms.html


I'm just beginning to learn the historic and modern art of draping. It's a very artistic experience !  I've begun to develop my skill set in a class taught through the Cañada College Fashion Department. I'll be continuing my draping journey by continuing to follow the richly illustrated draping tutorials and examples in our class textbook, The Art of Fashion Draping. This excellent, and highly regarded book, by Connie Amaden-Crawford has been in use for decades. both within the industry, and by home sewists. 

Thanks Sponsors! 
When you buy products through links in this blog, you support the regular work of this blog and The Enchanted by Sewing Podcast.

Saturday, December 29, 2012

Notions: I Don't Give a Pin!

Pincushion Gal Helps Keep Me
Enchanted By Sewing
But Darling, we can't have your mother to stay. We're going to the country this weekend.

Oh fiddledeedee, I don't give a pin about going to the country!

You don't hear people complaining that they .... don't give a pin! for something anymore. Usually a more vehement expression is used to express disinterest in a companion's speech or interests. I suppose it's because pins aren't worth much anymore, though you can still find references to people paying for things using pins in the delicious Betsy and Tacy books. And how many people do you know who refer to their pin money these days?

I love my new friend, Pincushion Gal. Mostly she's content hanging out behind my sewing machine, but she has been known to go visiting as far as the ironing board. At first I kept knocking her over, because her heavier torso was supported by a rather frail little base. After a confab with my husband we came up with a solution to that little challenge. I stitched up a little sack of dried beans, using the end of a piece of flannel from the night shirt I'd just made him (another good reason to hold onto scraps!), filled the little case with dried beans, then attached the resulting bean bag around the base of the form with - you guessed it- pins! My gal doesn't get knocked off her feet anymore, despite all the work she does for me.

As you can see, it's quite tempting to add more than pins to the newest member of Sewing Corner. So handy to tack down bits of silk organza scrap (good spots to stick my threaded needles), spare bits of trim, beading, and the pretty little brooch I picked up from the flea market. And of course a lady like this needs a fan for flirting with her many admirers.

Hanging out with the new girl at my machine, keeps me, as always, absolutely enchanted by sewing.